Gitlab CICD
本文讲一下如何使用
gitlab来做CICD:使用gitlab做代码仓库,同时用gitlab的CI功能完成代码扫描、编译打包、镜像构建和镜像中心,并使用k8s来做部署。我们的流程是先使用
gitlab来做完整的流程,一步步的由简到繁,一点点增加功能和优化过程,致力于达到真实gitlab企业的CICD效果。优化内容包括但不限于使用nexus、harbor等搭建私库优化CI的构建效率,使用k8snamespace做多环境隔离,并通过ConfigMap和Secret存储环境变量等。整个CICD均采用GitOps的一切皆代码 (Everything as Code)思想。Git作为一切的来源,这代表除了代码本身,CI流水线要代码化、k8s的部署要代码化、k8s环境变量配置也要代码化。
整个测试将使用四台服务器,服务器操作系统均为Debian12
192.168.31.193作为gitlab、gitlab-runner以及后续的jenkins、habor等部署192.168.31.240、192.168.31.66、192.168.31.97三个k8s节点,为服务做到多节点部署项目所用
gitlab版本为最新的18.1.1-ce.0项目完整代码和配置可见:coderZoe/cicd-test-project
1. Gitlab CI
1.1 Gitlab部署
services:
  gitlab:
    image: gitlab/gitlab-ce:18.1.1-ce.0
    container_name: gitlab
    restart: always
    hostname: 'gitlab.example.com'
    environment:
      GITLAB_OMNIBUS_CONFIG: |
        external_url 'http://192.168.31.193'
        registry_external_url 'http://192.168.31.193:5050'
    ports:
      - '80:80'
      - '443:443'
      - '22:22'
      # 镜像中心的端口
      - '5050:5050'
    volumes:
      - '/home/gitlab/config:/etc/gitlab'
      - '/home/gitlab/logs:/var/log/gitlab'
      - '/home/gitlab/data:/var/opt/gitlab'
shm_size: '1024m'注意,这里gitlab使用了ssh的22端口和http与https的80与443端口,且我直接映射出了,因此宿主机不能占用这些端口,如果宿主机占用了,可以修改gitlab所用端口,见Install GitLab in a Docker container | GitLab Docs
1.2 创建项目
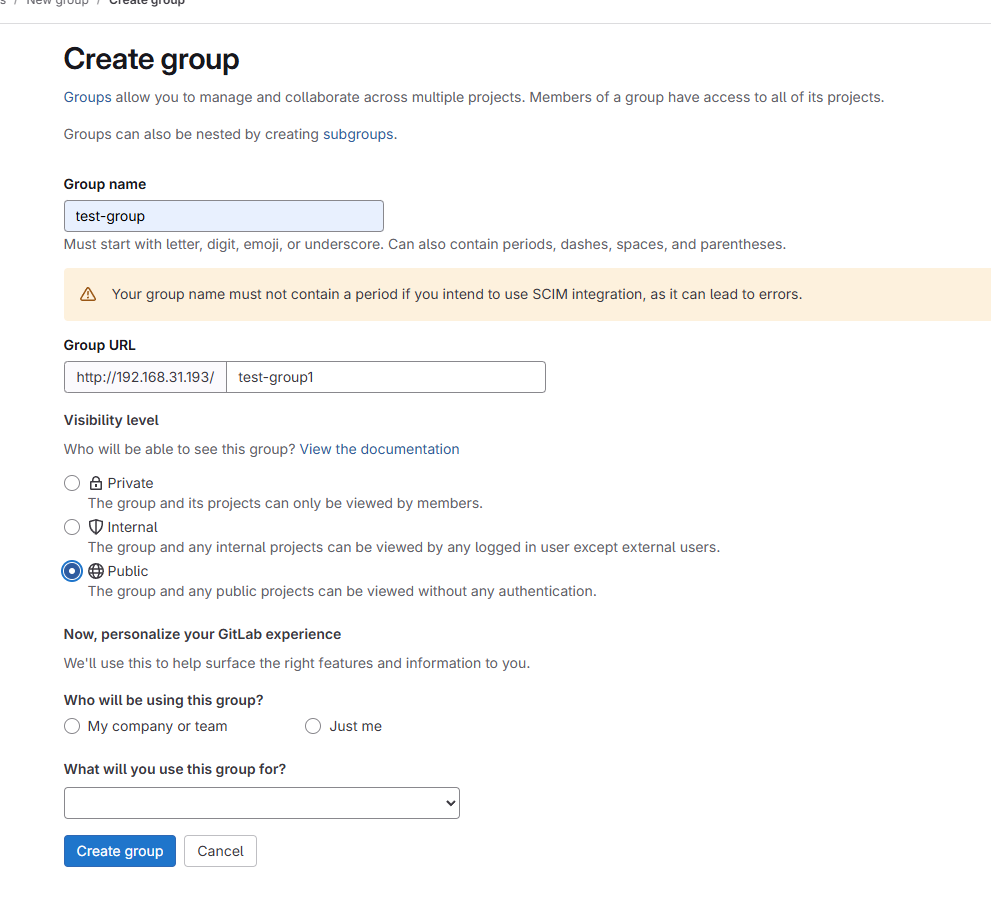
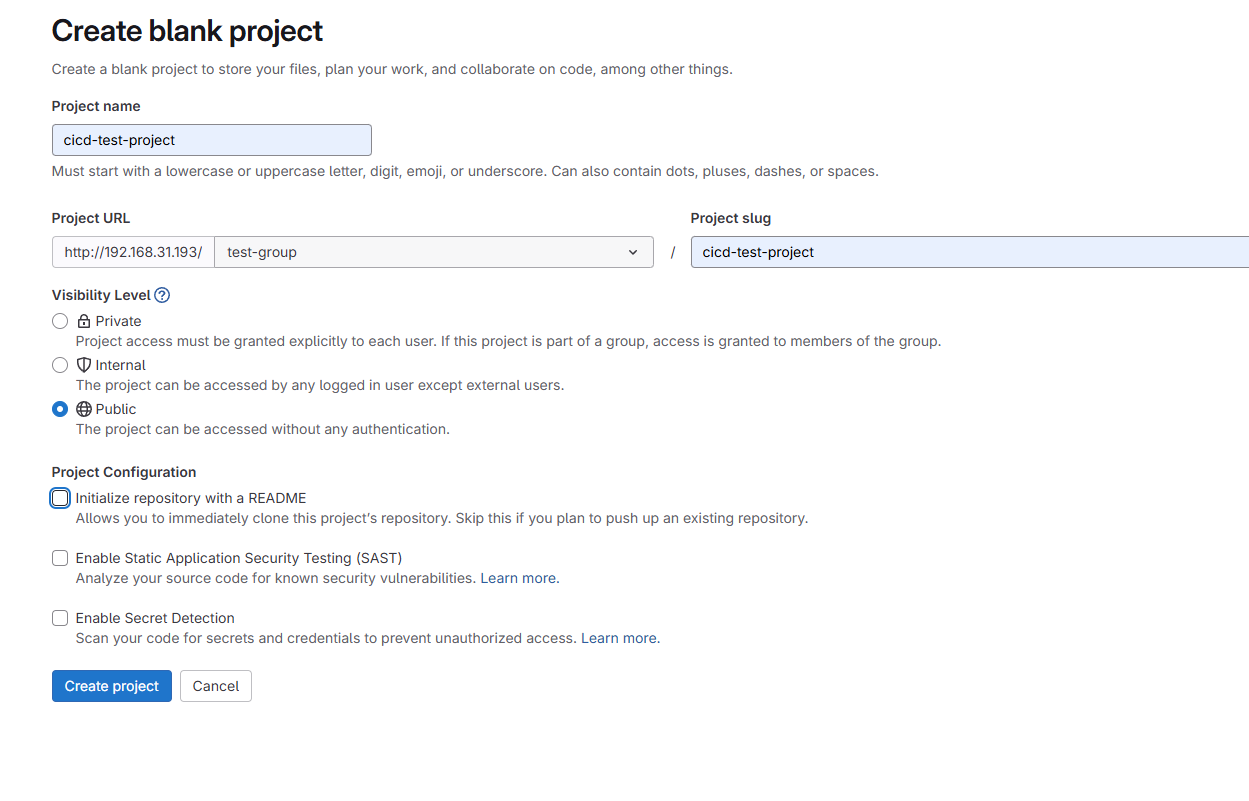
登录gitlab后,创建一个group并在该group下创建一个项目:
1.3 创建runner
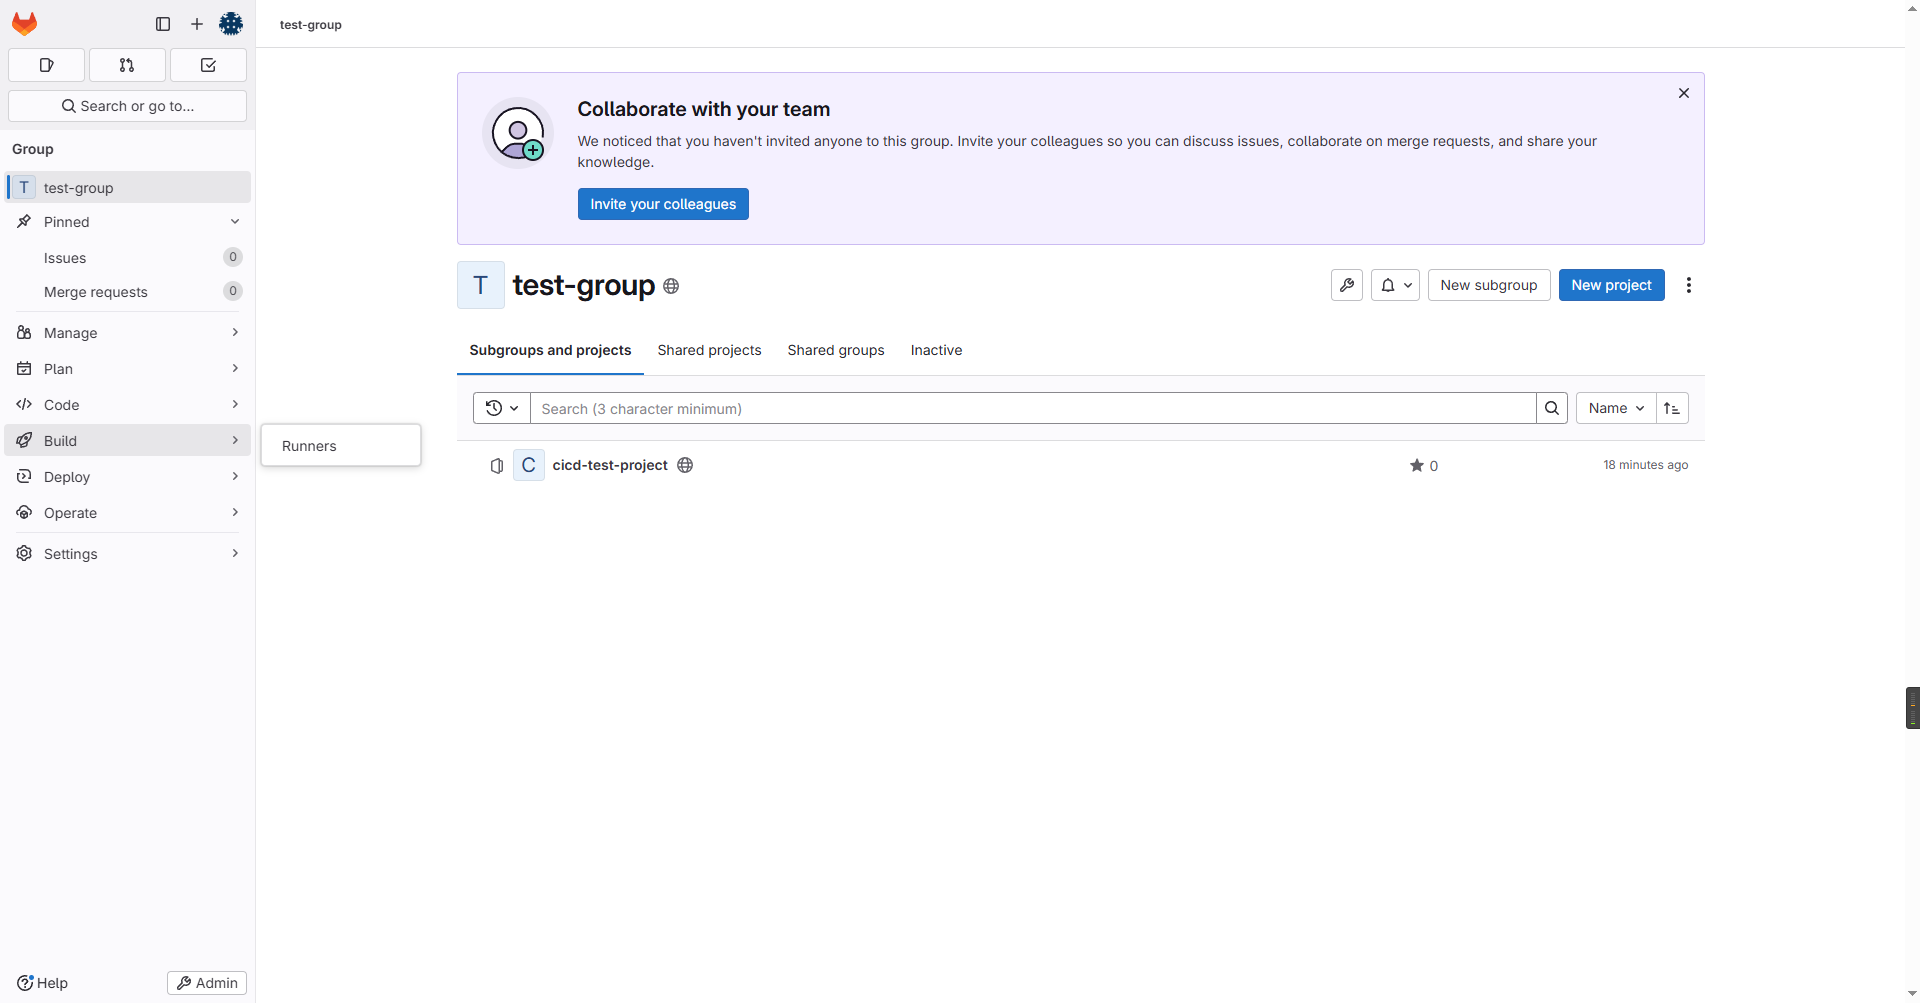
gitlab的runner负责执行具体的CICD任务,我们创建一个runner并将其分配到上面的test-group下。
首先修改docker-compose.yml,创建一个runner:
services:
  gitlab:
    image: gitlab/gitlab-ce:18.1.1-ce.0
    container_name: gitlab
    restart: always
    hostname: 'gitlab.example.com'
    environment:
      GITLAB_OMNIBUS_CONFIG: |
        external_url 'http://192.168.31.193'
        registry_external_url 'http://192.168.31.193:5050'
    ports:
      - '80:80'
      - '443:443'
      - '22:22'
      - '5050:5050'
    volumes:
      - '/home/gitlab/config:/etc/gitlab'
      - '/home/gitlab/logs:/var/log/gitlab'
      - '/home/gitlab/data:/var/opt/gitlab'
    shm_size: '1024m'
  # gitlab runner
  gitlab-runner:
    image: 'gitlab/gitlab-runner:v18.1.1'
    container_name: gitlab-runner
    restart: always
    volumes:
      # runner的配置
      - '/home/gitlab/runner:/etc/gitlab-runner'
      # 将宿主机的docker server映射出来,方便runner可以操作宿主机docker
- '/var/run/docker.sock:/var/run/docker.sock'然后在test-group下创建runner:
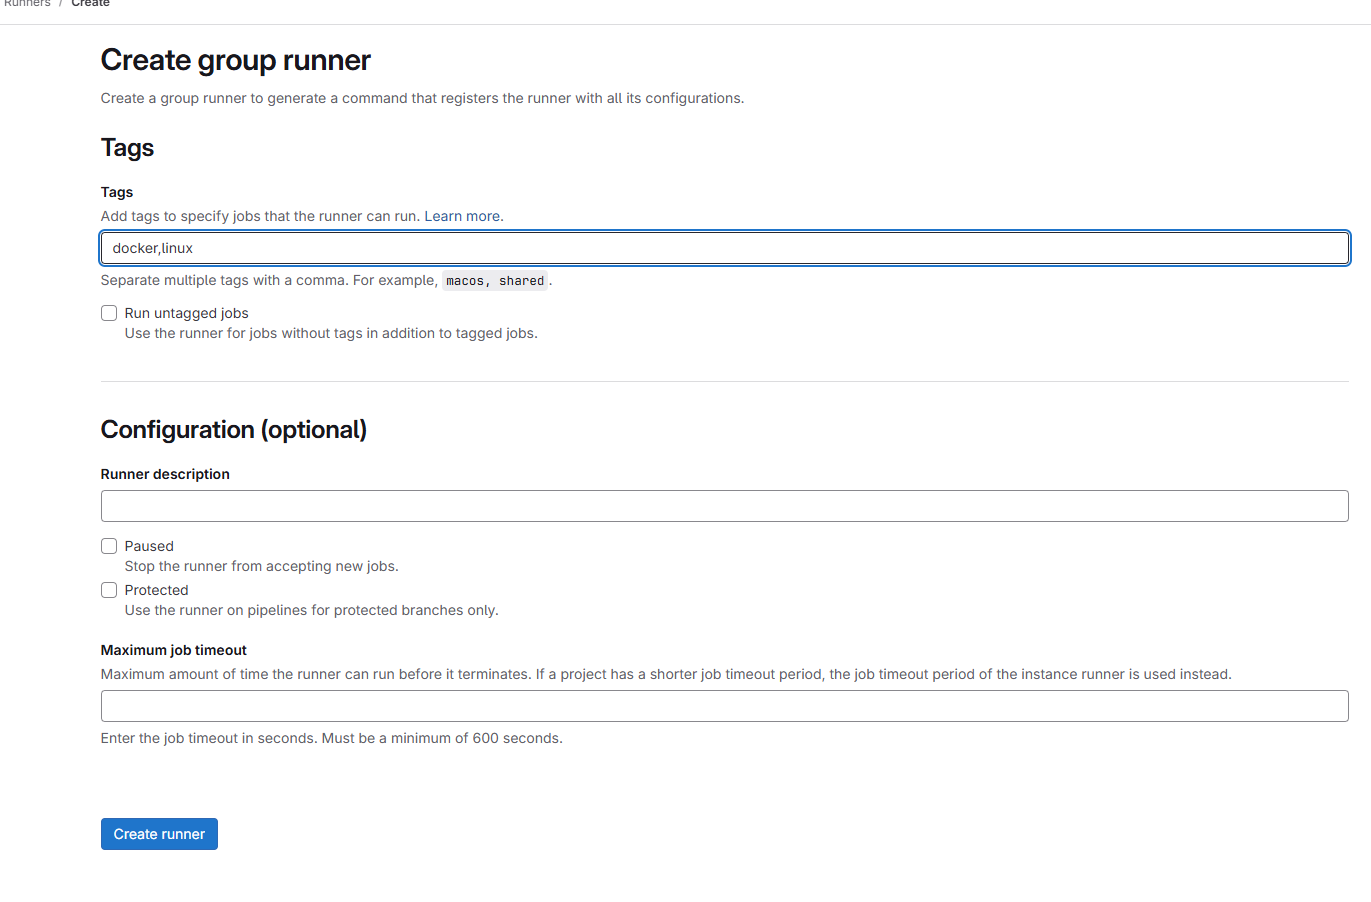
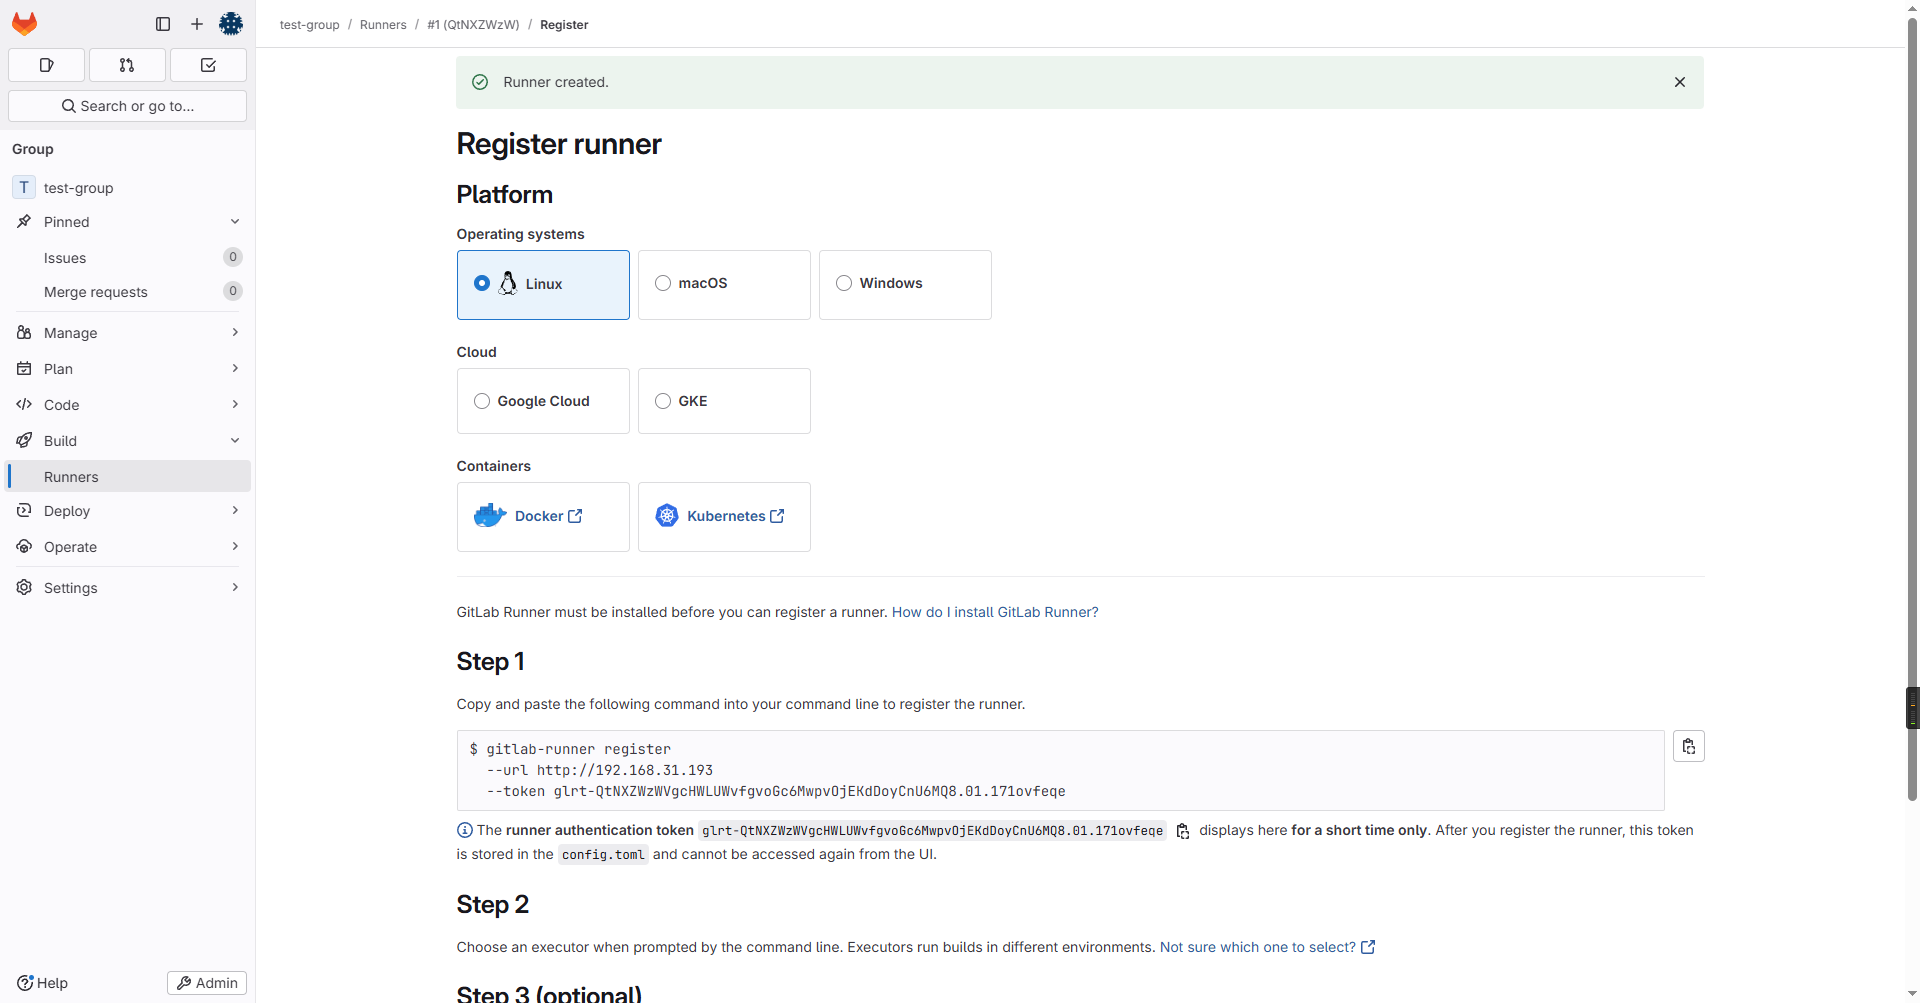
最后按照上述说明终端执行注册runner的指令
root@debian-4:/home/gitlab# docker exec -it gitlab-runner gitlab-runner register  --url http://192.168.31.193  --token glrt-QtNXZWzWVgcHWLUWvfgvoGc6MwpvOjEKdDoyCnU6MQ8.01.171ovfeqe
Runtime platform                                    arch=amd64 os=linux pid=19 revision=2b813ade version=18.1.1
Running in system-mode.

Enter the GitLab instance URL (for example, https://gitlab.com/):
[http://192.168.31.193]:
Verifying runner... is valid                        correlation_id=01JZQAERWE229FYN4J8TYQ512F runner=QtNXZWzWV
Enter a name for the runner. This is stored only in the local config.toml file:
[7dd12e268d62]:
Enter an executor: docker, docker-windows, docker+machine, kubernetes, shell, parallels, docker-autoscaler, instance, custom, ssh, virtualbox:
docker
Enter the default Docker image (for example, ruby:2.7):
alpine:latest
Runner registered successfully. Feel free to start it, but if it's running already the config should be automatically reloaded!

Configuration (with the authentication token) was saved in "/etc/gitlab-runner/config.toml" 注册完成后回到页面,可以看到runner正常运行了:
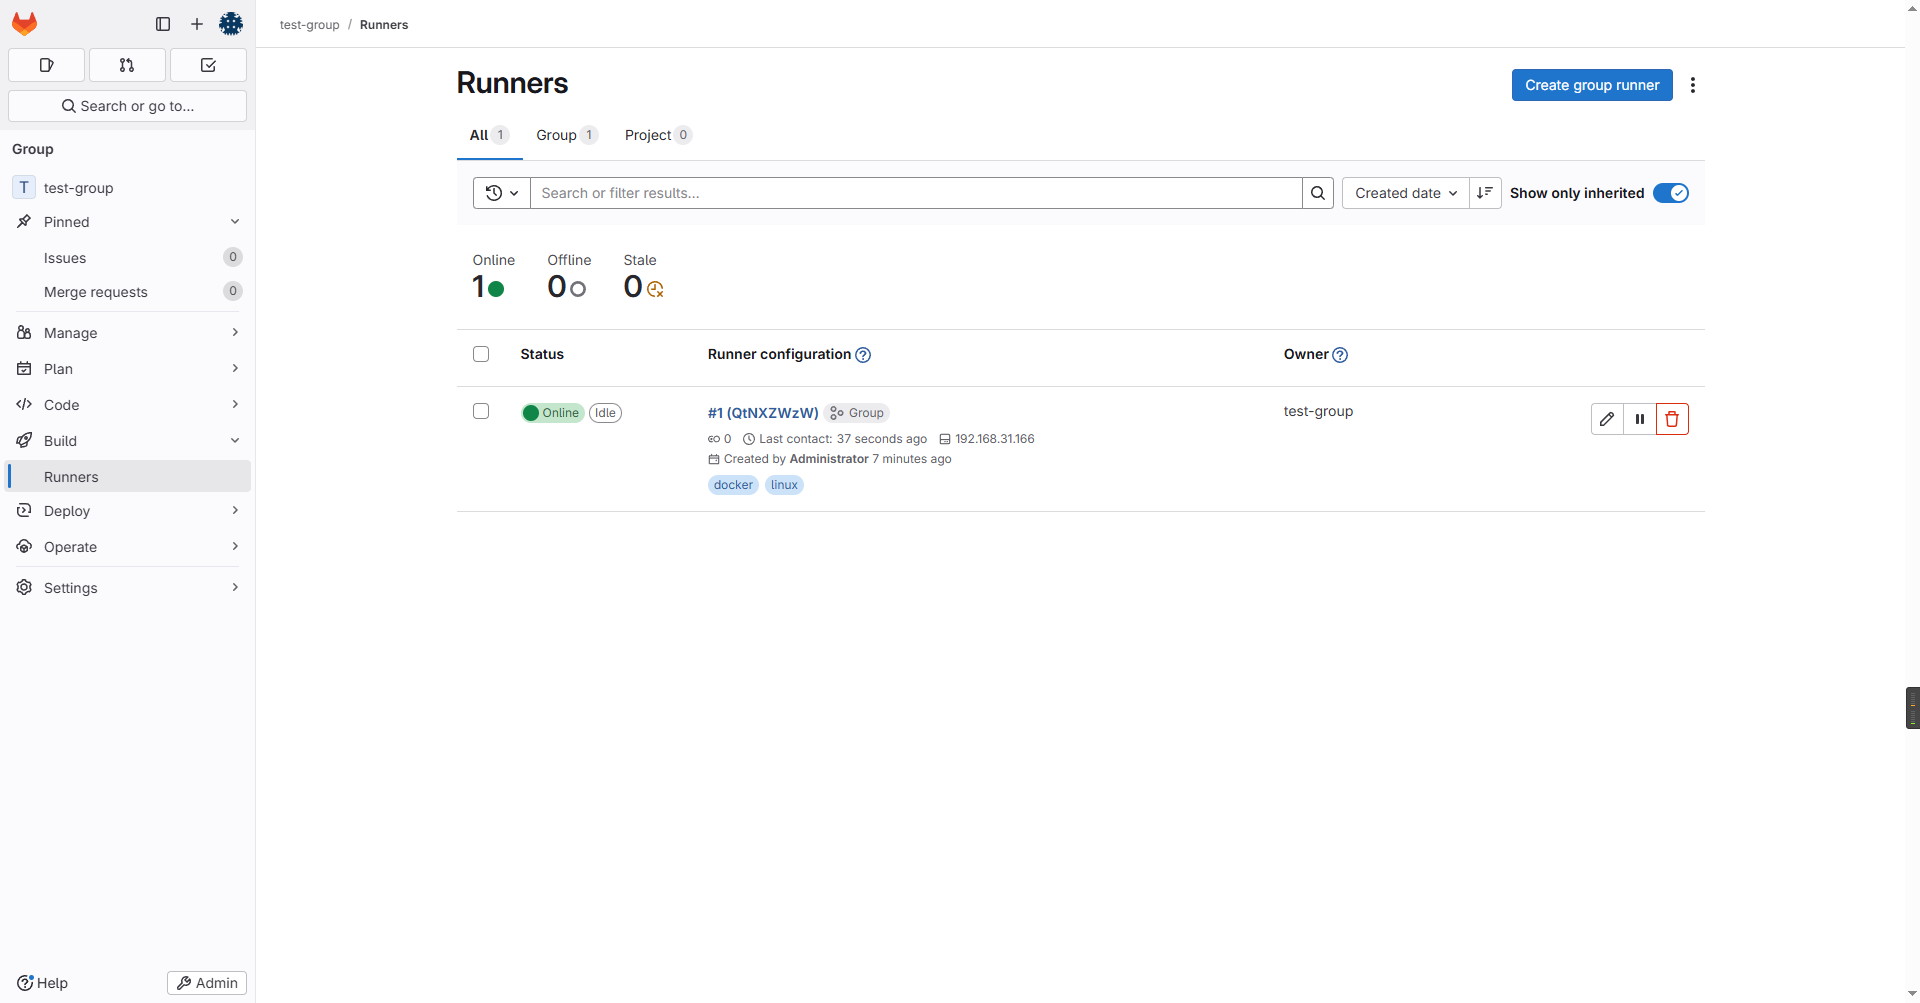
1.4 创建简单的CI
我们以一个Java SpringBoot项目为例创建一个简单的CI流程,流程为当代码push到gitlab后项目自动使用maven编译打包并根据Dockerfile构建Docker镜像。
首先我们需要对gitlab-runner和docker做一些改动
修改
gitlab-runner的config.toml,将docker.sock映射出来,方便gitlab-runner可以直接操作宿主机的docker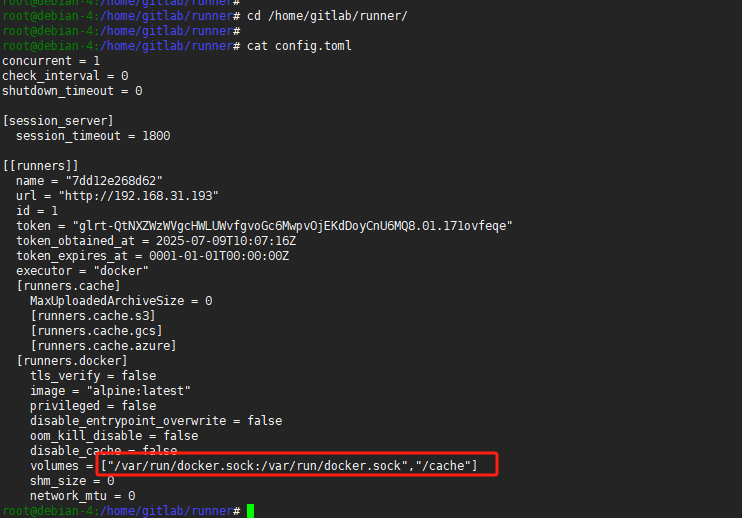
修改
gitlab-runner的config.toml,镜像拉取策略为if-not-present而非always,避免每次CI时都拉取镜像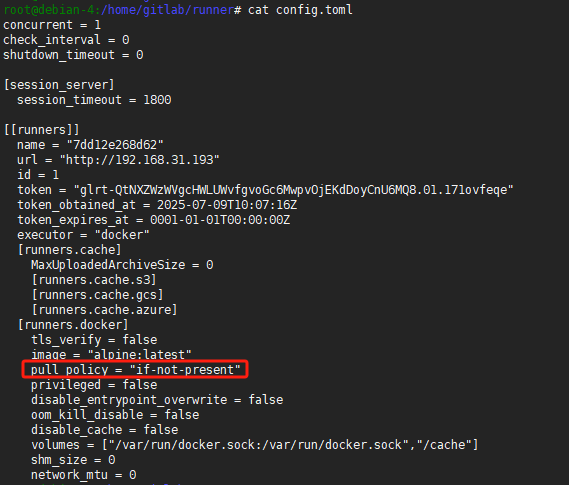
由于我们使用的是
gitlab自身的镜像注册中心,路径为http://192.168.31.193:5050,内网环境非HTTPS,因此需要配置允许非安全访问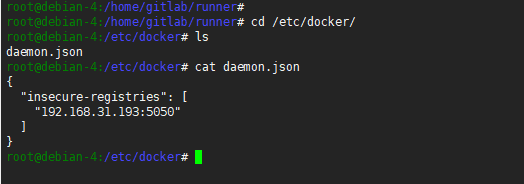
项目.gitlab-ci.yml
stages:
  - build
  - publish

variables:
  IMAGE_NAME: $CI_REGISTRY/$CI_PROJECT_PATH
  IMAGE_TAG: $CI_COMMIT_REF_SLUG-$CI_COMMIT_SHORT_SHA
  MAVEN_OPTS: "-Dmaven.repo.local=.m2/repository"

cache:
  key: "$CI_PROJECT_PATH_SLUG-maven"
  paths:
    - .m2/repository/

build-job:
  stage: build
  tags:
    - docker
    - linux
  image: maven:3.9.6-eclipse-temurin-21
  script:
    - echo "Java version check:"
    - java -version
    - echo "Maven version check:"
    - mvn -v
    - echo "Compiling, testing, and packaging the application ..."
    - mvn package -B
  artifacts:
    paths:
      - target/
    expire_in: 1 hour

publish-job:
  stage: publish
  image: docker:latest
  tags:
    - docker
    - linux
  script:
    - echo "Logging into GitLab Container Registry:" "$CI_REGISTRY"
    - docker login -u "$CI_REGISTRY_USER" -p "$CI_REGISTRY_PASSWORD" $CI_REGISTRY
    - echo "Building Docker image with name:" "$IMAGE_NAME:$IMAGE_TAG"
    - docker build -t "$IMAGE_NAME:$IMAGE_TAG" .
    - echo "Pushing Docker image...."
    - docker push "$IMAGE_NAME:$IMAGE_TAG"
  needs:
    - job: build-job
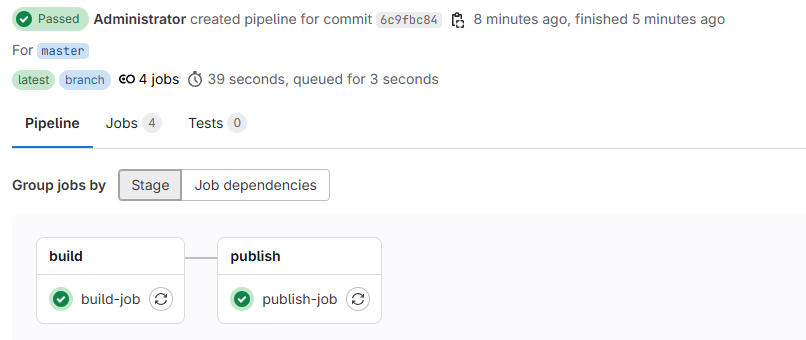
artifacts: true上述CI流程比较简单,分为build和publish两个阶段。build阶段使用maven镜像通过mvn package -B来编译打包项目,并将/target下的产物交给publish流程。publish使用docker镜像并结合当前的Dockerfile构建服务镜像,并将服务镜像上传到镜像中心。
项目Dockerfile
FROM eclipse-temurin:21-jre-alpine
WORKDIR /app
COPY target/*.jar app.jar
EXPOSE 8080
ENTRYPOINT ["java", "-jar", "app.jar"]当我们commit并push项目的时候,会自动触发pipeline并执行上述两个Job,执行结果如下:

上述.gitlab-ci.yml配置了缓存,缓存的key是项目名,缓存的内容是本地maven仓库,这主要是为了避免每次build的时候都需要从中央仓库拉取依赖然后build,很多时候之前拉取过的依赖是可以直接用的。这有些类似于我们本地的maven仓库,所有服务一般都使用本地同一份maven仓库,而不是每个服务一份。但这里我设置的key是项目名,而非一个全局常量,我看网上用全局缓存的也很多,这样所有服务所有分支每次打包都使用同一份maven仓库,理论复用更高,但考虑到我们项目比较少,且避免SNAPSHOT 依赖造成的冲突问题,还是采取了项目名级别的maven缓存。
2. CD
gitlab集成k8s,实现持续部署,k8s集群搭建可见附录。
由于我们这里镜像仓库采用的是gitlab的192.168.31.193:5050,k8s containerd从这镜像中心拉取镜像的时候也需要配置允许非安全访问,在三台k8s master上执行:
sudo sed -i '/\[plugins."io.containerd.grpc.v1.cri".registry\]/a\
  [plugins."io.containerd.grpc.v1.cri".registry.mirrors."192.168.31.193:5050"]\
    endpoint = ["http://192.168.31.193:5050"]' /etc/containerd/config.toml
创建k8s凭证
# 创建namespace
kubectl create namespace my-app
# 创建账户
kubectl create serviceaccount gitlab-ci-sa -n my-app
# 为账户绑定角色
kubectl create rolebinding gitlab-ci-rb -n my-app --clusterrole=edit --serviceaccount=my-app:gitlab-ci-sa
执行如下脚本获取账户凭证
#!/bin/bash

NAMESPACE="my-app"
SA_NAME="gitlab-ci-sa"
CLUSTER_NAME="default-cluster"

SERVER_URL=$(kubectl config view --minify -o jsonpath='{.clusters[0].cluster.server}')
CA_DATA=$(kubectl config view --raw --minify -o jsonpath='{.clusters[0].cluster.certificate-authority-data}')

TOKEN=$(kubectl create token ${SA_NAME} --namespace ${NAMESPACE})

echo "
apiVersion: v1
kind: Config
clusters:
- name: ${CLUSTER_NAME}
  cluster:
    server: ${SERVER_URL}
    certificate-authority-data: ${CA_DATA}
contexts:
- name: ${CLUSTER_NAME}
  context:
    cluster: ${CLUSTER_NAME}
    user: ${SA_NAME}
    namespace: ${NAMESPACE}
current-context: ${CLUSTER_NAME}
users:
- name: ${SA_NAME}
  user:
    token: ${TOKEN}
"将打印内容复制到gitlab:
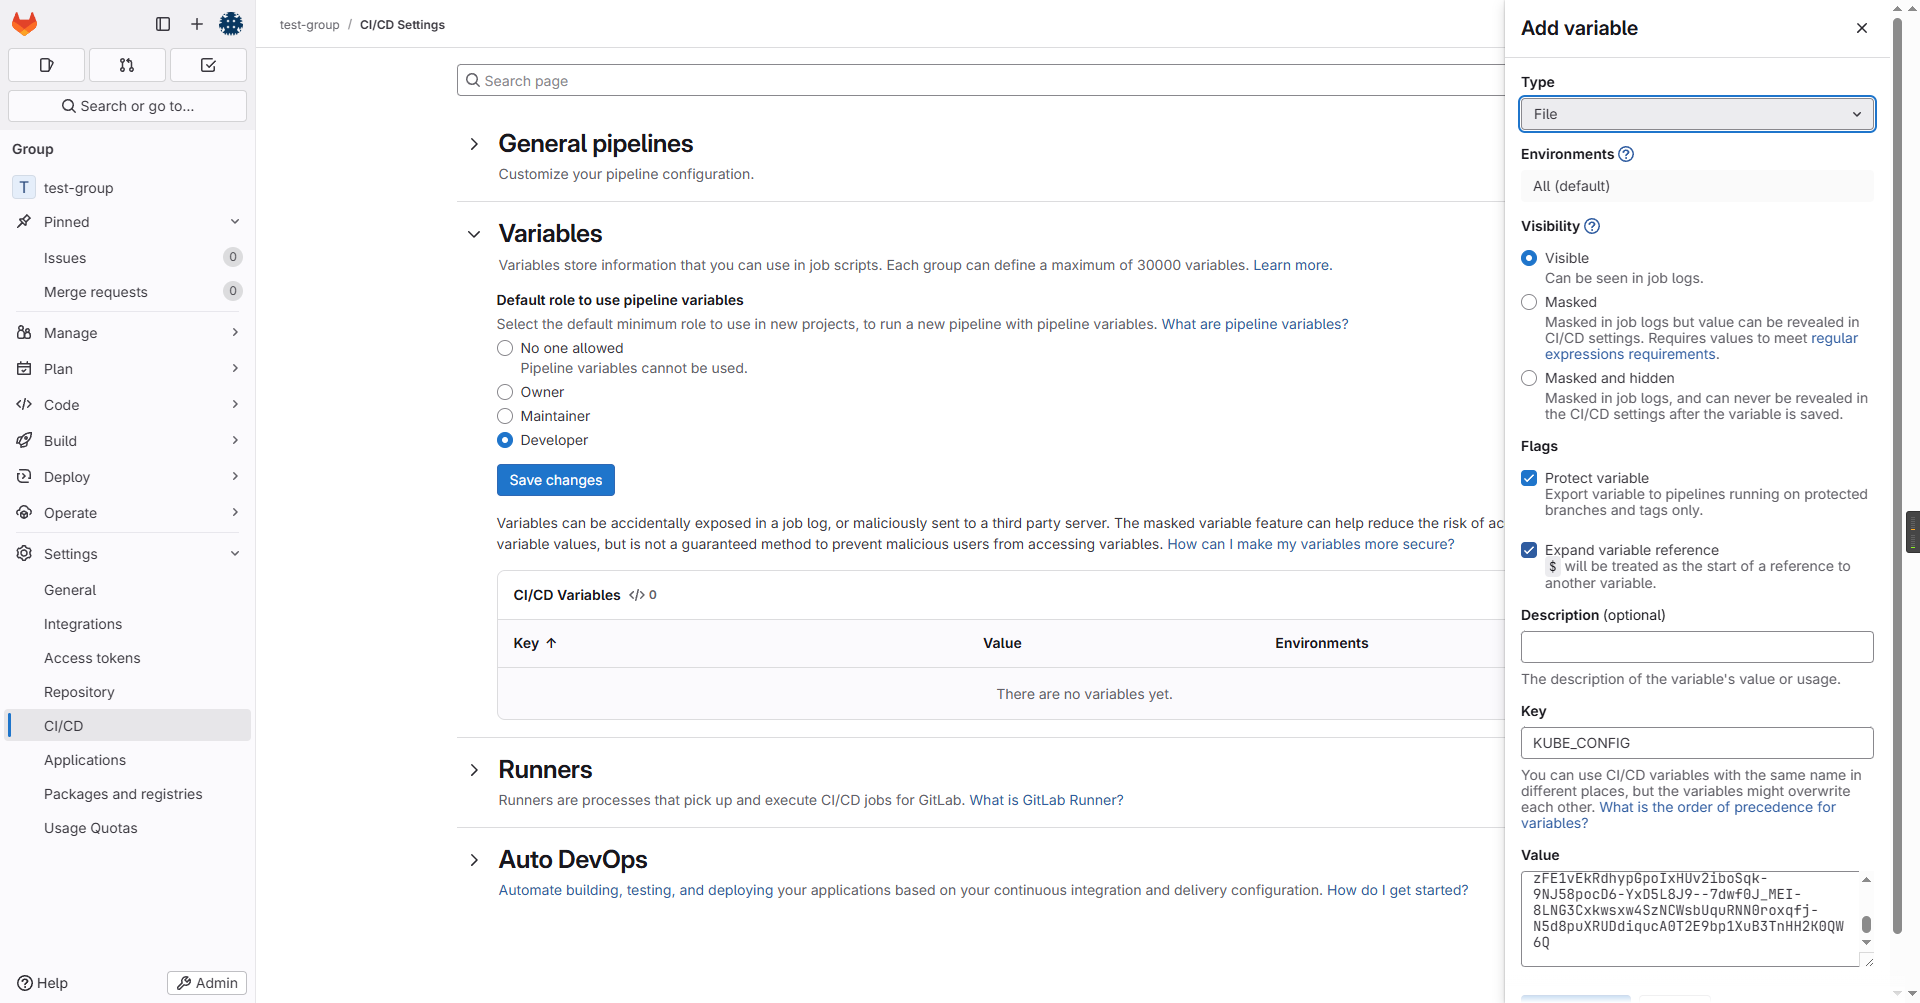
为项目创建deployment和service,在项目根目录创建k8s目录,并创建deployment.yaml和service.yaml在k8s目录下
deployment
apiVersion: apps/v1
kind: Deployment
metadata:
  name: cicd-test-project-deployment
  labels:
    app: cicd-test-project
spec:
  replicas: 3
  selector:
    matchLabels:
      app: cicd-test-project
  template:
    metadata:
      labels:
        app: cicd-test-project
    spec:
      containers:
        - name: cicd-test-project-container
          image: IMAGE_PLACEHOLDER # 占位符
          ports:
            - containerPort: 8080
service
apiVersion: v1
kind: Service
metadata:
  name: cicd-test-project-service
spec:
  type: NodePort
  selector:
    app: cicd-test-project
  ports:
    - protocol: TCP
      port: 80
      targetPort: 8080
nodePort: 30080修改.gitlab-ci.yml增加部署流程:
stages:
  - build
  - publish
  - deploy
variables:
  IMAGE_NAME: $CI_REGISTRY/$CI_PROJECT_PATH
  IMAGE_TAG: $CI_COMMIT_REF_SLUG-$CI_COMMIT_SHORT_SHA
  MAVEN_OPTS: "-Dmaven.repo.local=.m2/repository"

cache:
  key: "$CI_PROJECT_PATH_SLUG-maven"
  paths:
    - .m2/repository/

build-job:
  stage: build
  tags:
    - docker
    - linux
  image: maven:3.9.6-eclipse-temurin-21
  script:
    - echo "Java version check:"
    - java -version
    - echo "Maven version check:"
    - mvn -v
    - echo "Compiling, testing, and packaging the application ..."
    - mvn package -B
  artifacts:
    paths:
      - target/
    expire_in: 1 hour

publish-job:
  stage: publish
  image: docker:latest
  tags:
    - docker
    - linux
  script:
    - echo "Logging into GitLab Container Registry:" "$CI_REGISTRY"  "$CI_REGISTRY_USER"   "$CI_REGISTRY_PASSWORD"
    - docker login -u "$CI_REGISTRY_USER" -p "$CI_REGISTRY_PASSWORD" $CI_REGISTRY
    - echo "Building Docker image with name:" "$IMAGE_NAME:$IMAGE_TAG"
    - docker build -t "$IMAGE_NAME:$IMAGE_TAG" .
    - echo "Pushing Docker image...."
    - docker push "$IMAGE_NAME:$IMAGE_TAG"
  needs:
    - job: build-job
      artifacts: true

deploy-job:
  stage: deploy
  image:
    name: bitnami/kubectl:latest
    entrypoint: [""]
  tags:
    - docker
    - linux
  script:
    - echo "Deploying to Kubernetes in namespace 'my-app'..."
    - export KUBECONFIG=$KUBE_CONFIG
    - sed -i "s|IMAGE_PLACEHOLDER|$IMAGE_NAME:$IMAGE_TAG|g" k8s/deployment.yaml
    - kubectl apply -f k8s/deployment.yaml
    - kubectl apply -f k8s/service.yaml
    - echo "Waiting for deployment to complete..."
    - kubectl rollout status deployment/cicd-test-project-deployment -n my-app
    - echo "Deployment successful!"
  needs:
    - publish-job
代码push后:
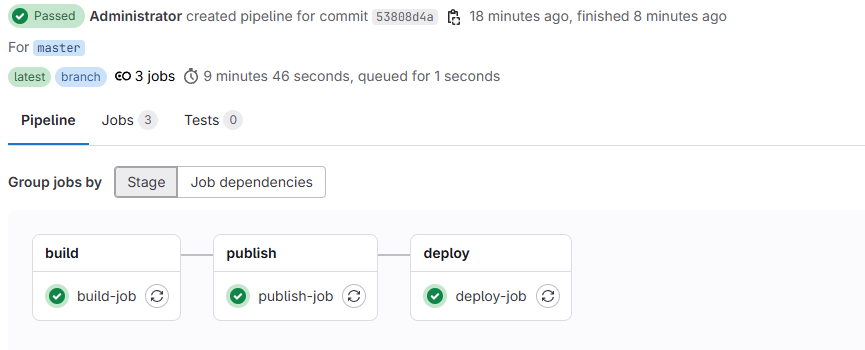
在k8s节点上查看:

访问http://192.168.31.100:30080/hello

如上我们就完成了一个简单的CICD流程,打通了从代码到gitlab仓库再到gitlab-runner和k8s等环节,实现了自动编译打包、构建镜像和自动部署功能。
3. Git Flow
3.1 Git Flow 流程
我们现在丰富上述CICD流程,增加质量门禁、单元测试与多环境部署的功能,丰富后的CICD流程如下:
Stage 1: build (编译打包阶段)
build-and-package(编译、单元测试和打包):- 运行
mvn verify -B对源码进行编译、单元测试和打包 - 质量门禁:要求代码覆盖率不低于80%(可配置),否则流水线失败。测试报告(如Jacoco)将被发布供审查
- 运行
Stage 2: test-and-analyze (扫描分析阶段)
code-quality-scan(静态分析):- 通过SonarQube Scanner进行代码质量扫描。
- 质量门禁: 如果代码异味、Bugs或漏洞超过预设阈值(如"Blocker"级别问题 > 0),流水线失败。
Stage 3: publish (镜像构建和发布阶段)
publish-image(构建镜像):- 使用公司标准化的
Dockerfile模板构建Docker镜像。该模板将包含多阶段构建(Multi-stage builds)优化,以生成最小化的生产镜像(如使用Distroless或Alpine作为基础镜像)。 - 镜像Tag将包含Git Commit SHA和流水线ID,确保唯一性和可追溯性(例如:
myapp:1.2.0-a1b2c3d-12345) - 构建完成将镜像推送到镜像仓库
- 使用公司标准化的
Stage 4: deploy-dev (部署到开发环境)
- 通过
kubectl使用gitlab环境变量里配置的开发环境的KUBE CONFIG信息,并结合项目的deployment和service等文件实现自动部署到开发环境,方便开发人员的自测验证
Stage 5: deploy-relese (部署到预发布环境)
- 通过
kubectl使用gitlab环境变量里配置的预发布环境的KUBE CONFIG信息,并结合项目的deployment和service等文件实现自动部署到预发布环境,方便测试人员测试
Stage 6: deploy-prod (部署到生产环境)
- 通过
kubectl使用gitlab环境变量里配置的生产环境的KUBE CONFIG信息,并结合项目的deployment和service等文件实现手动部署到生产环境
代码版本管理常见的工作流是Git Flow与Github Flow,以笔者多年经验 Git Flow是比较合理且完善的一种方案,我们就以Git Flow为例来模仿真实的企业版本管理与CICD流程。Git Flow核心CICD流程如下:
项目存在两个长周期的分支分别是develop和master,开发人员需要开发新功能的时候从最新的develop分支创建自己的feature分支。
- 开发人员可以正常在
feature分支上push代码,每次push后都会自动触发上述Stage1。 等开发人员开发完成当前迭代的需求后,将
feature分支代码MR到develop分支,一旦发起向develop分支的MR:- 运行成本较低的验证性流水线(Stage 1和Stage 2),为Code Review提供决策依据(代码质量、安全性、测试覆盖率是否达标)。如果验证不通过,MR应被阻止合并。
- MR被批准并合并后: 在目标分支(
develop)上,触发一次完整的、包含部署的流水线。此时,部署到开发环境(Stage 1、Stage 2、Stage 3和Stage 4)。
所有开发人员开发完当前迭代分支且都MR到
develop后,需要转测当前迭代的需求给测试人员测试,因此创建一个develop向release的MR:- 运行成本较低的验证性流水线(Stage 1和Stage 2),为Code Review提供决策依据(代码质量、安全性、测试覆盖率是否达标)。如果验证不通过,MR应被阻止合并。
- MR被批准并合并后: 在目标分支(
release)上,触发一次完整的、包含部署的流水线。此时,部署到预发布环境(Stage 1、Stage 2、Stage 3和Stage 5)。
当测试人员测试完当前迭代没有问题后,准备发版部署到生产环境,创建一个
release向master的MR:- 运行成本较低的验证性流水线(Stage 1和Stage 2),为Code Review提供决策依据(代码质量、安全性、测试覆盖率是否达标)。如果验证不通过,MR应被阻止合并。
- MR被批准并合并后: 在目标分支(
master)上,触发一次完整的、包含部署的流水线。此时,部署到生产环境(Stage 1、Stage 2、Stage 3和Stage 6)。
3.2 Git Flow 实战
3.2.1 设置保护分支
首先我们先设置项目的保护分支:master、develop和release只允许merge不允许push

3.2.2 部署sonarqube和集成gitlab
version: "3"
services:
  sonarqube:
    image: sonarqube:lts-community  # 我们使用长期支持的社区版
    container_name: sonarqube
    ports:
      - "9000:9000"
    environment:
      - SONAR_ES_BOOTSTRAP_CHECKS_DISABLE=true # 禁用Elasticsearch的启动检查,便于开发环境启动
    volumes:
      - sonarqube_data:/opt/sonarqube/data
      - sonarqube_extensions:/opt/sonarqube/extensions
      - sonarqube_logs:/opt/sonarqube/logs
volumes:
  sonarqube_data:
  sonarqube_extensions:
sonarqube_logs:上述sonarqube用的是内嵌数据块,仅适合测试,在生产环境请切为其他数据块(如postgresql)
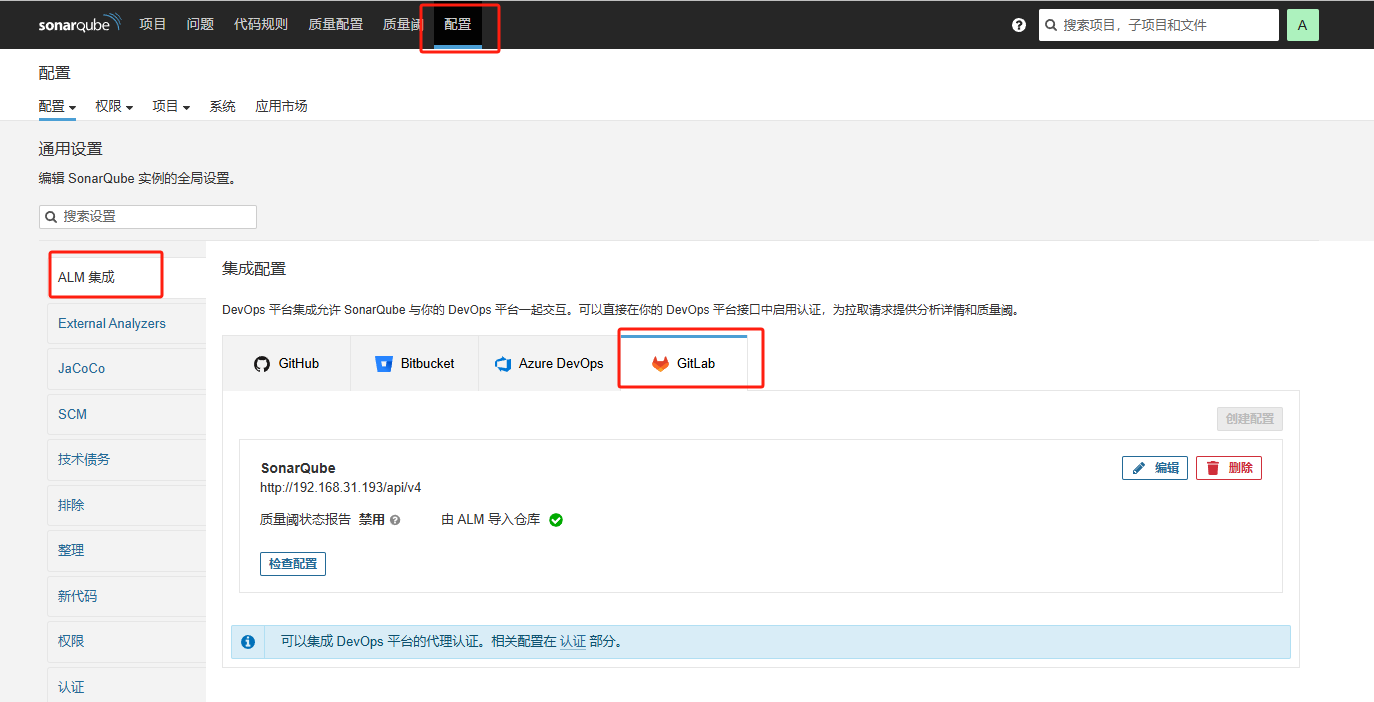
在sonarqube点击 配置=> ALM集成=> Gitlab
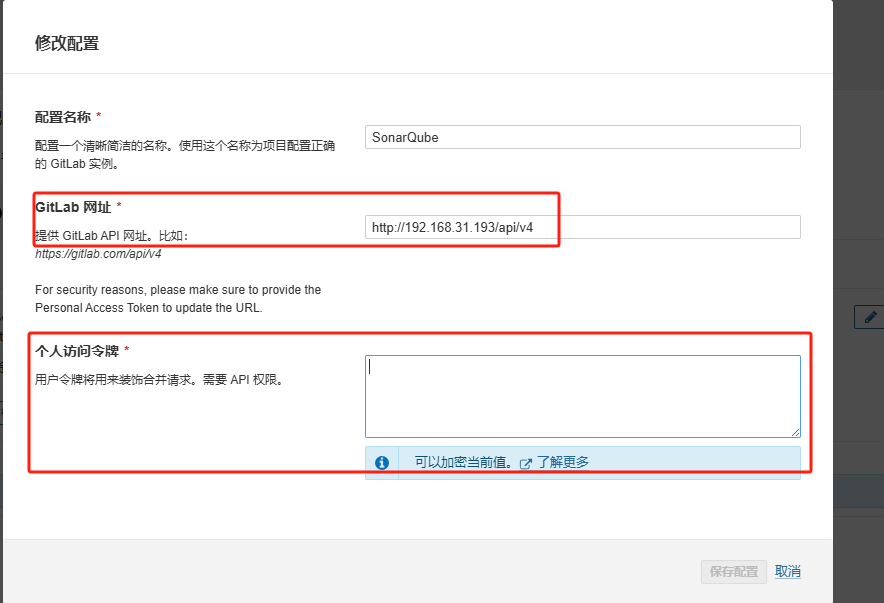
输入gitlab API网址和token:
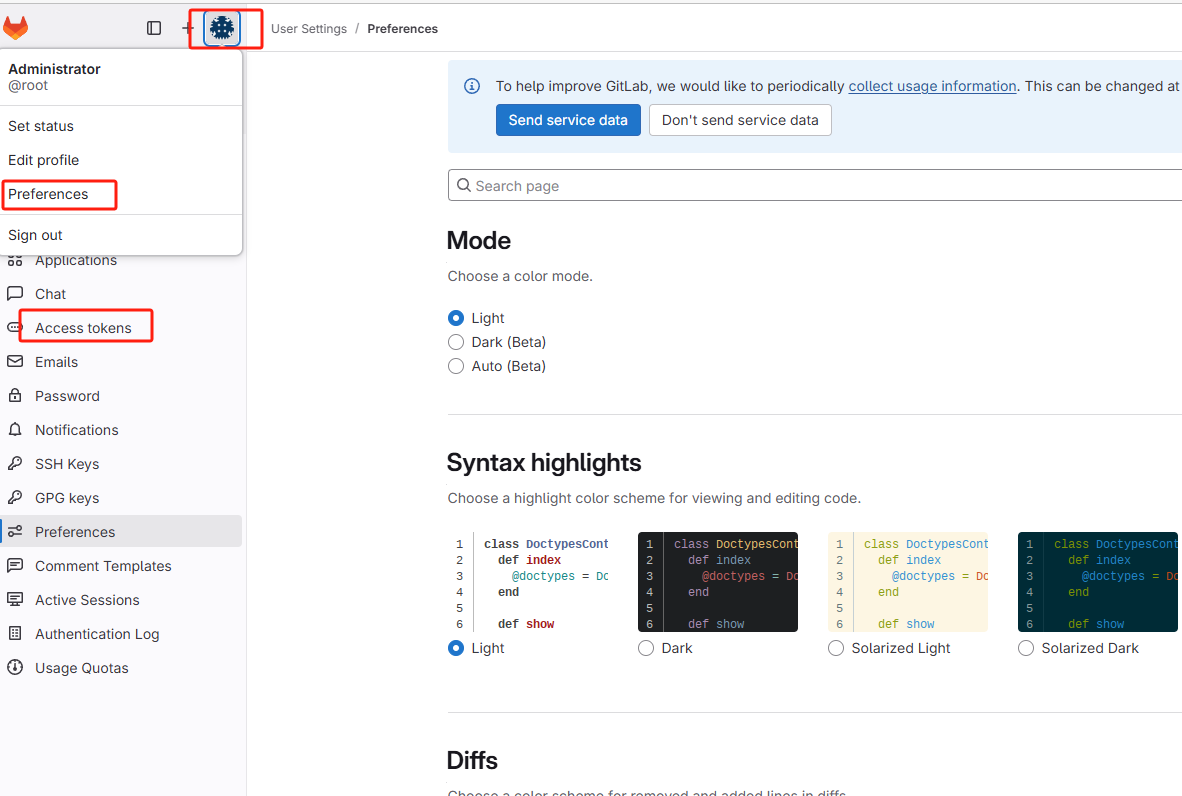
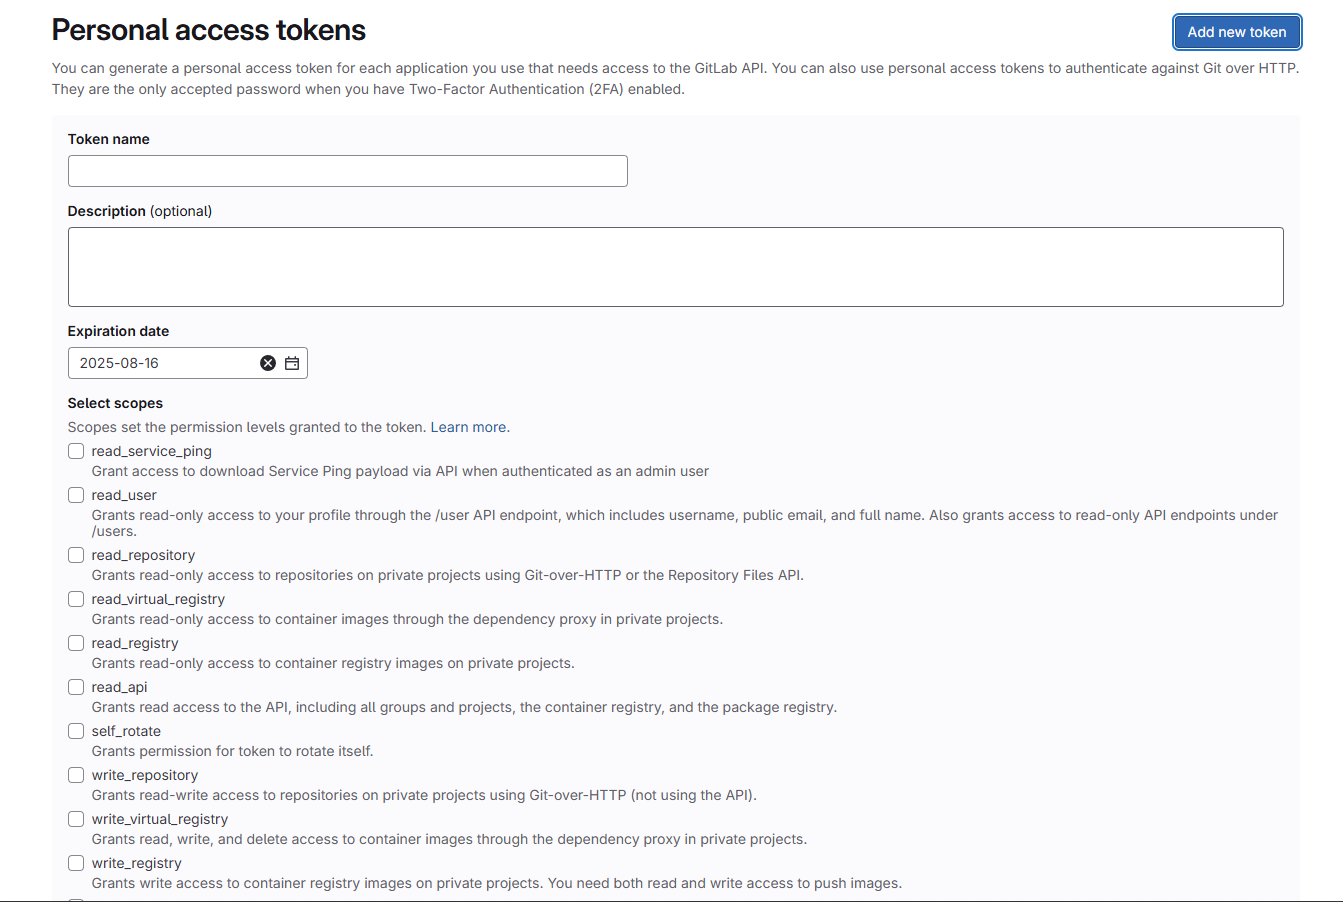
其中token获取方式:点击自己gitlab头像 => Preferences => Access tokens => Add new token,添加token,把权限都加上即可(也可以按需加,我图省事都加上了)。
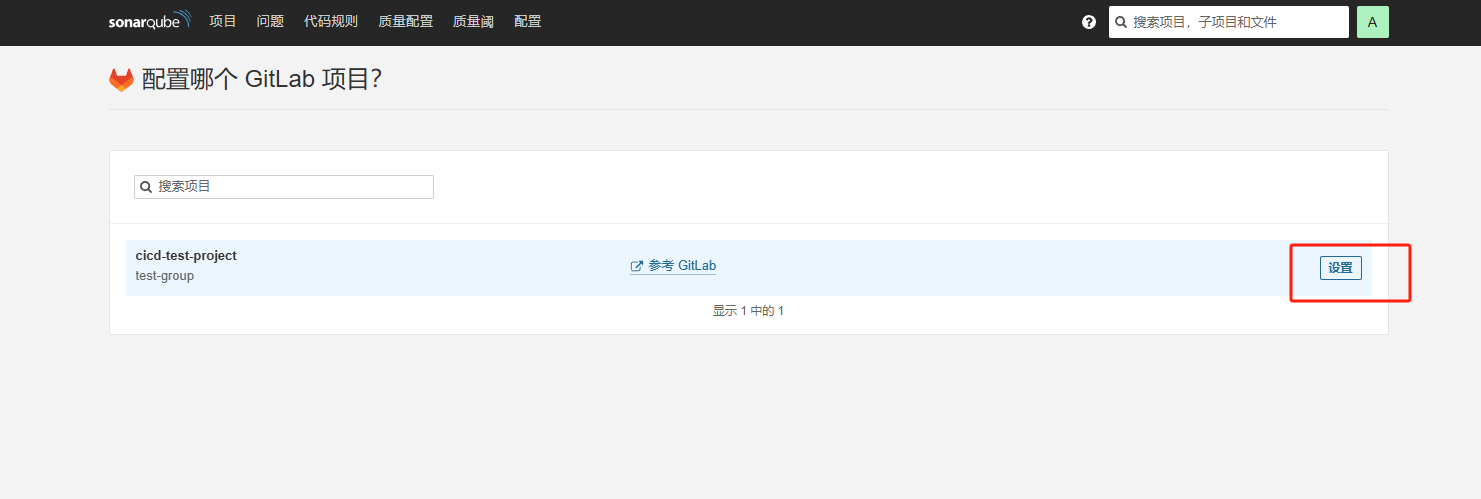
然后再回到sonarqube点击项目 => 添加项目 => 来自Gitlab,选择具体的项目点击设置即可

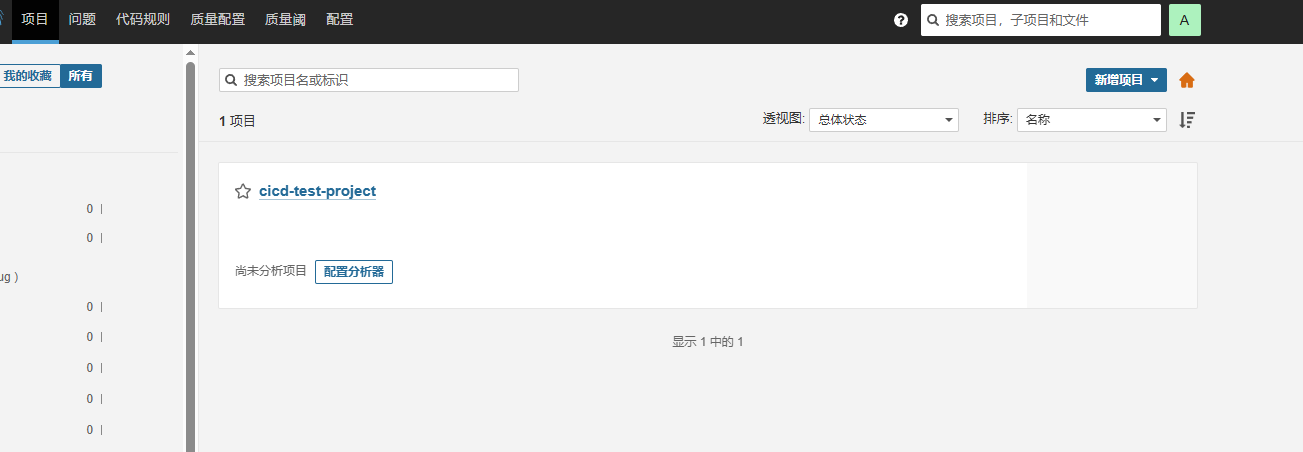
点击配置分析器 => 创建令牌将sonarqube的信息与gitlab-ci集成:
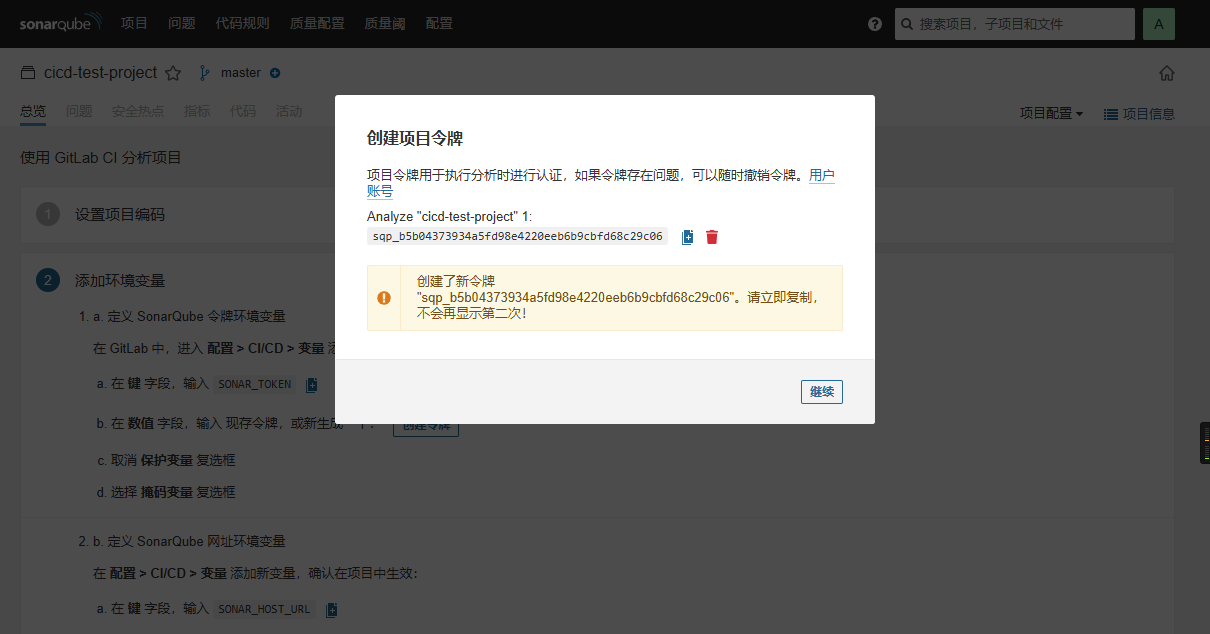
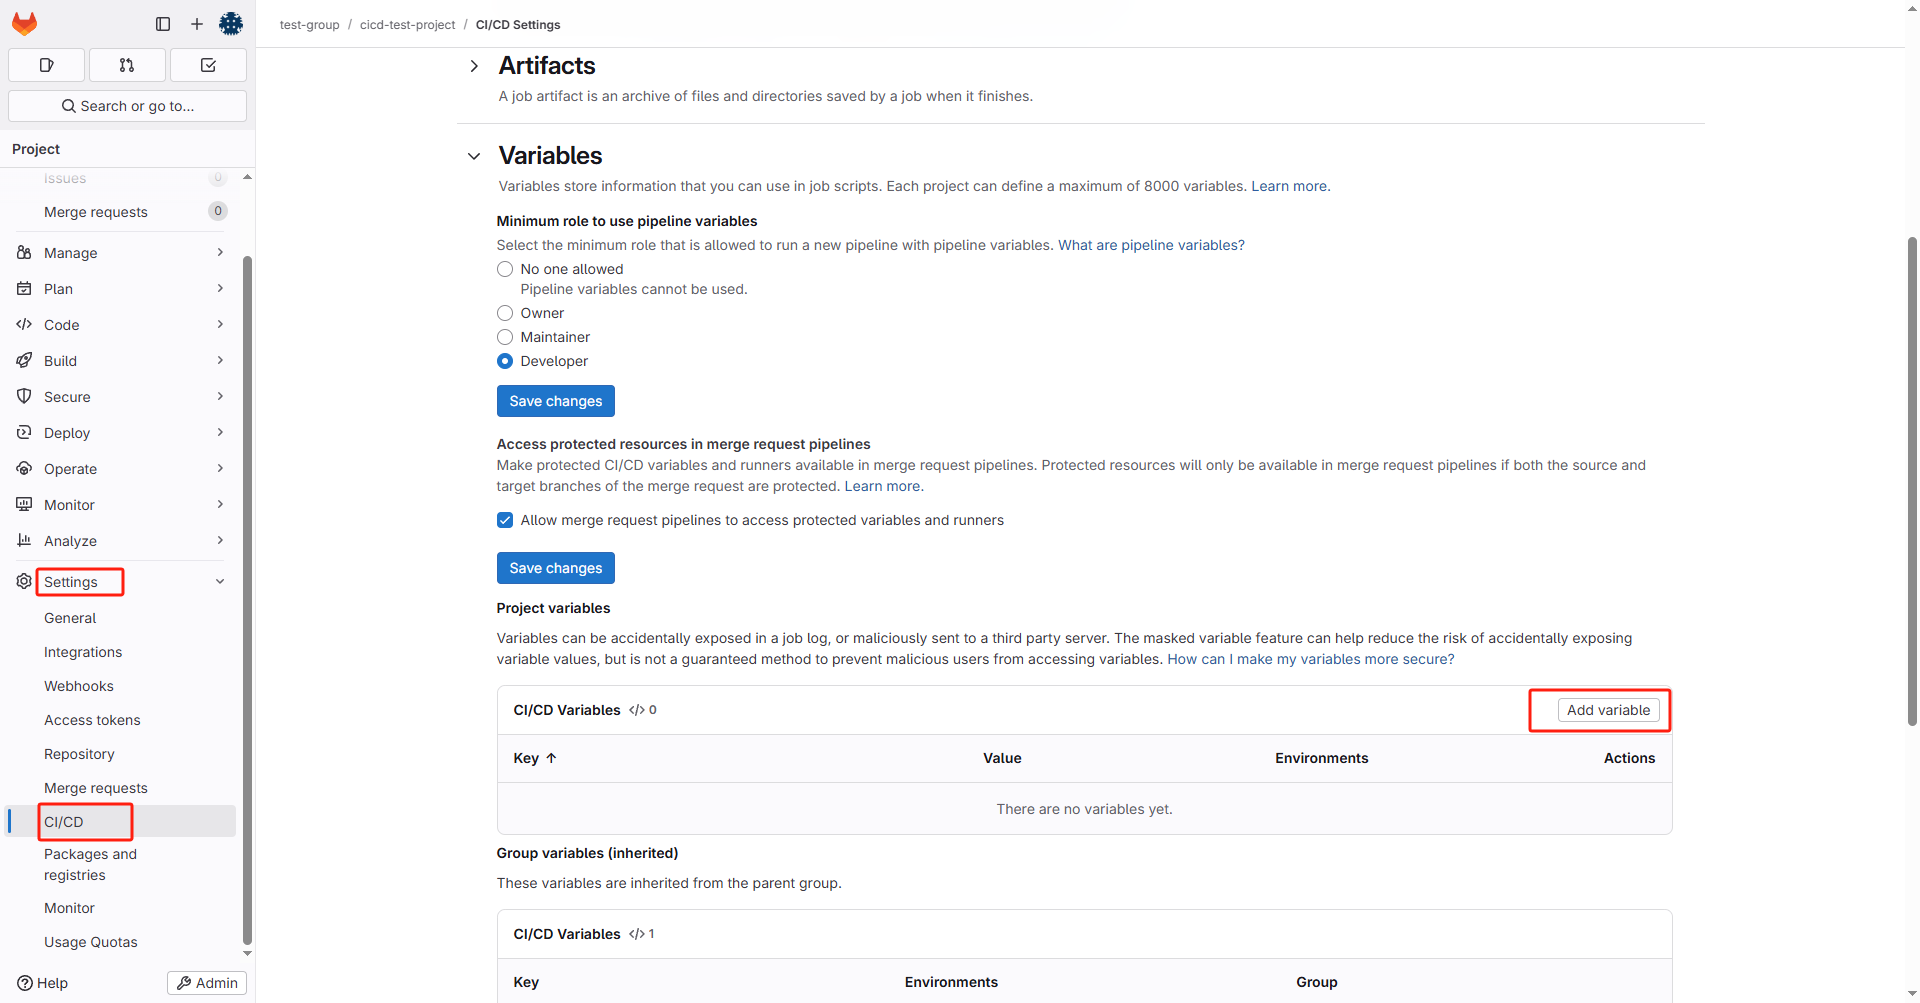
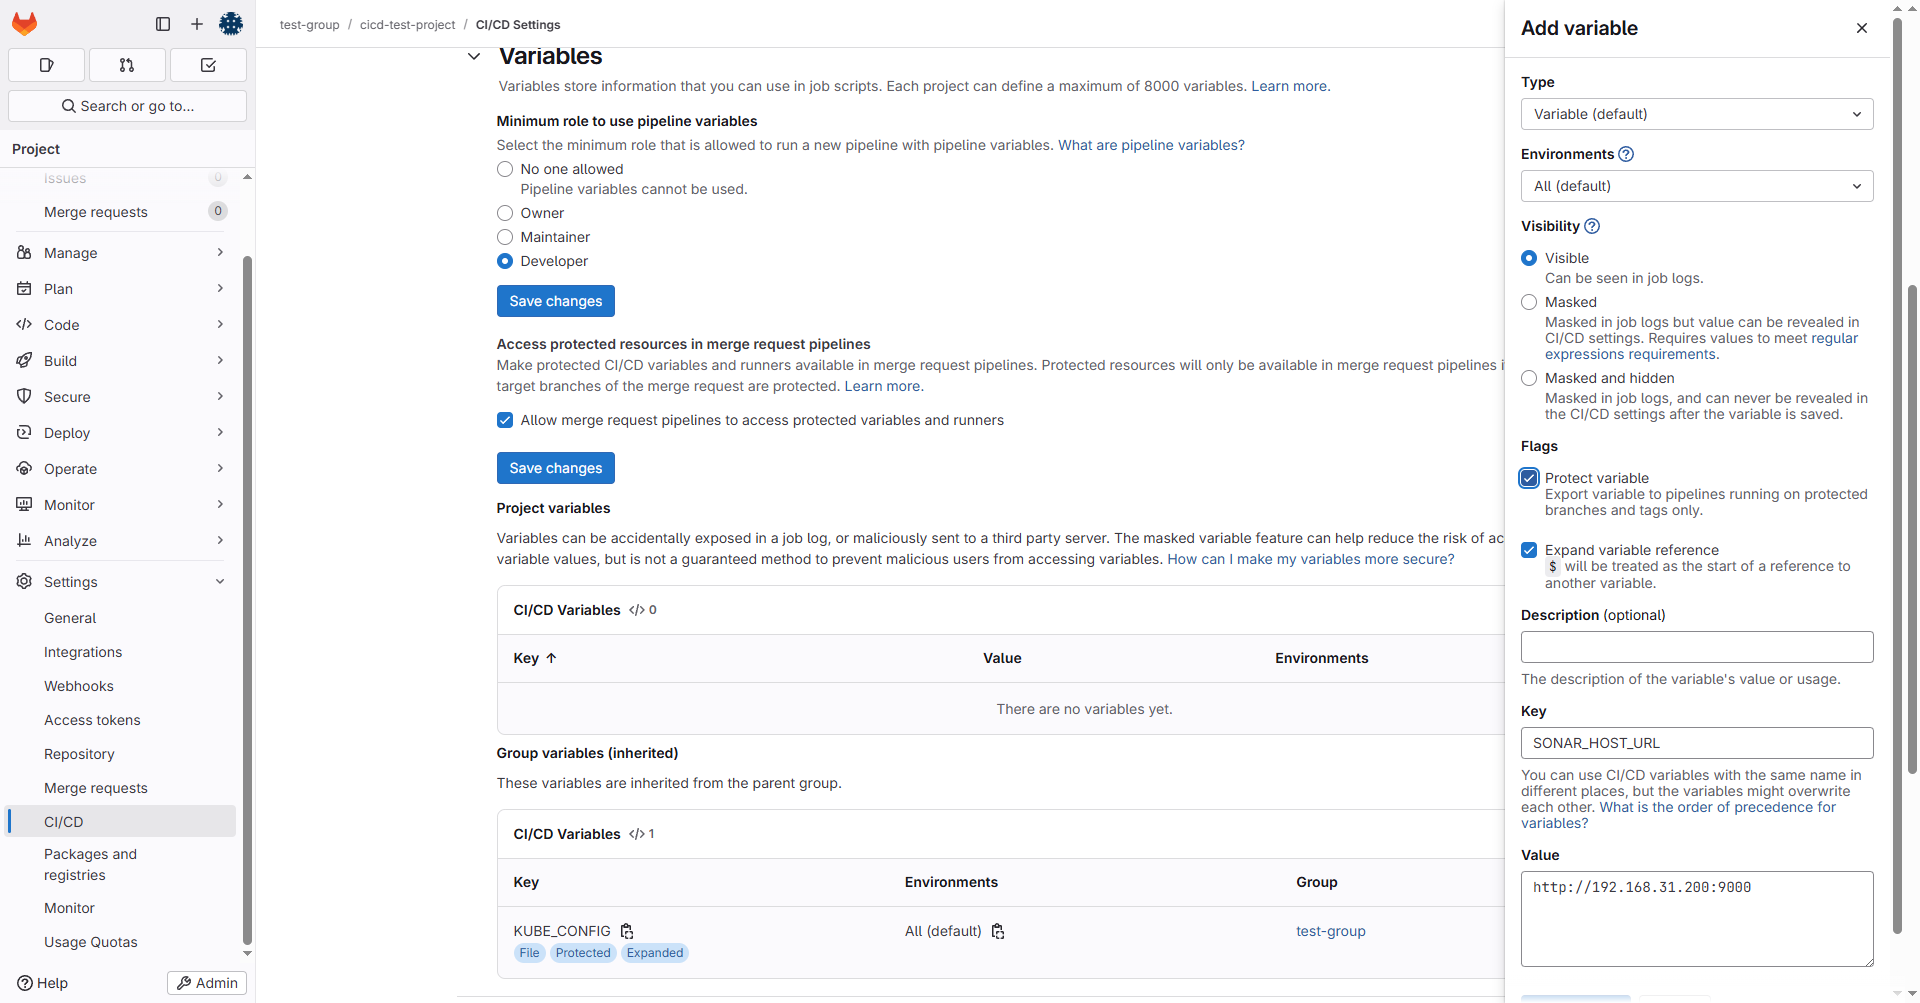
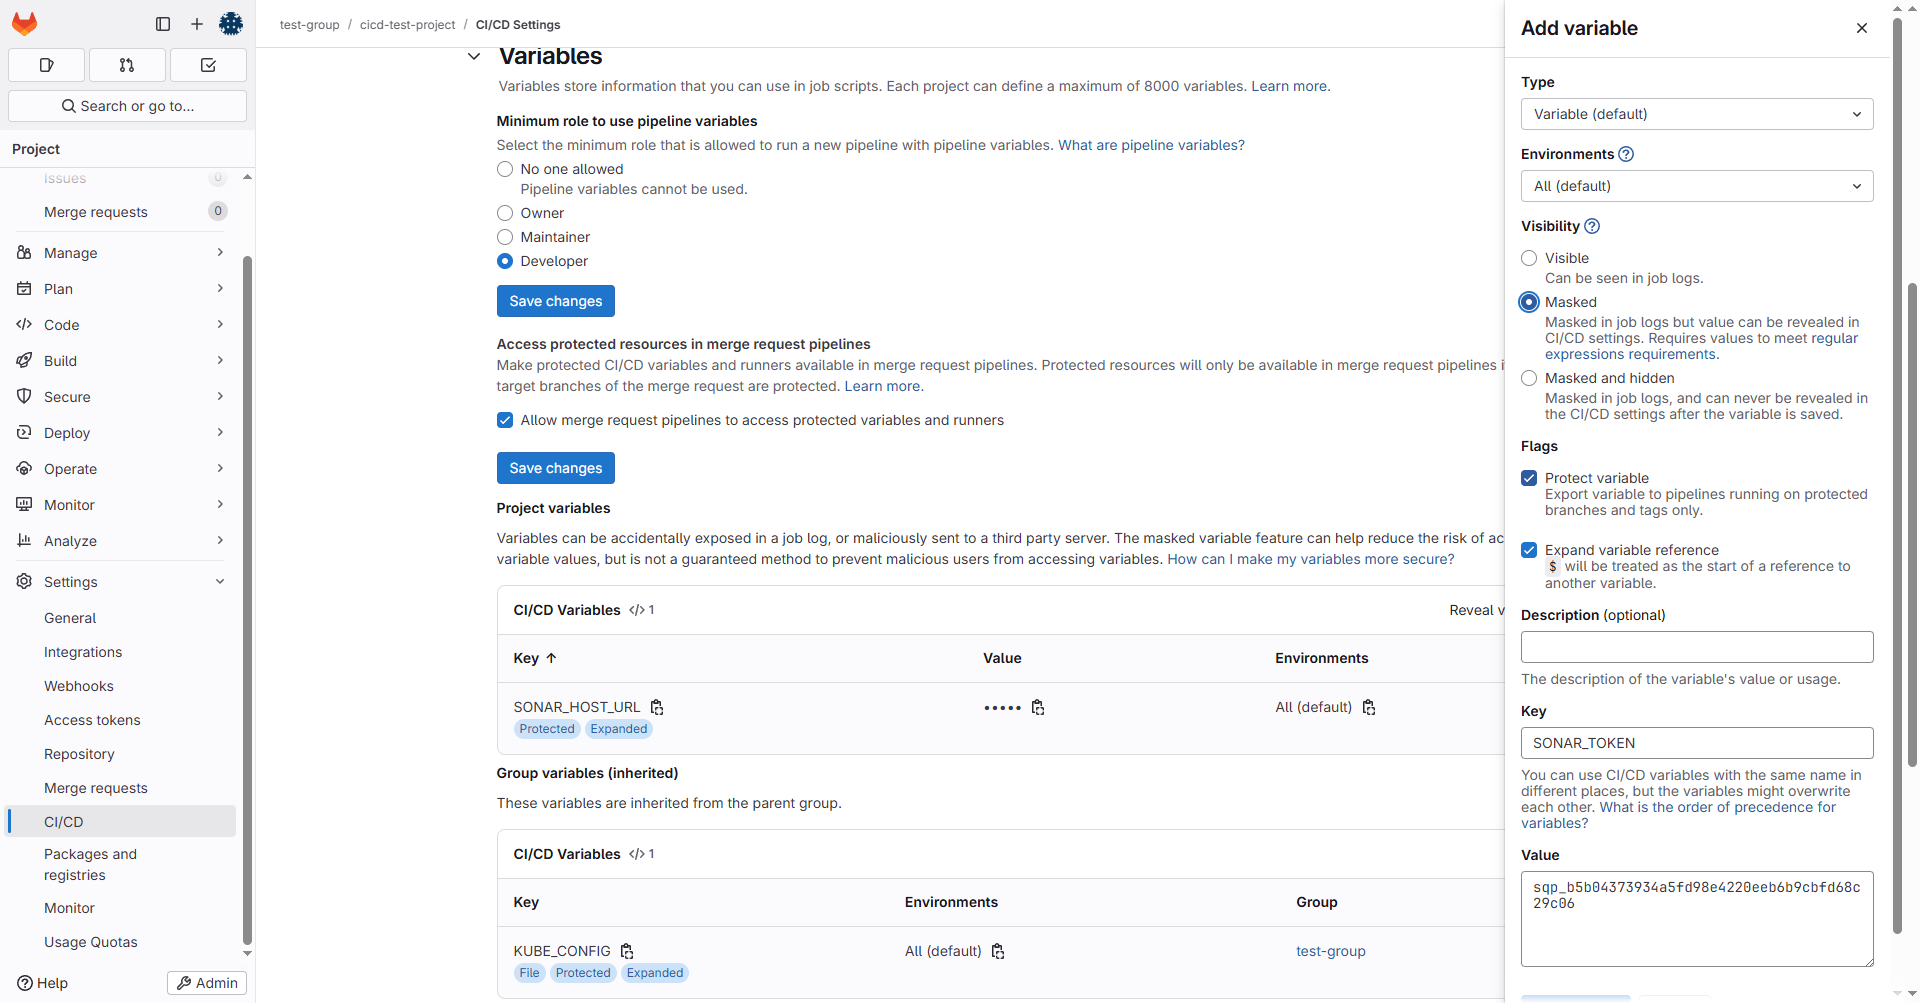
在Gitlab的cicd-test-group下配置token:
3.2.3 配置k8s环境变量
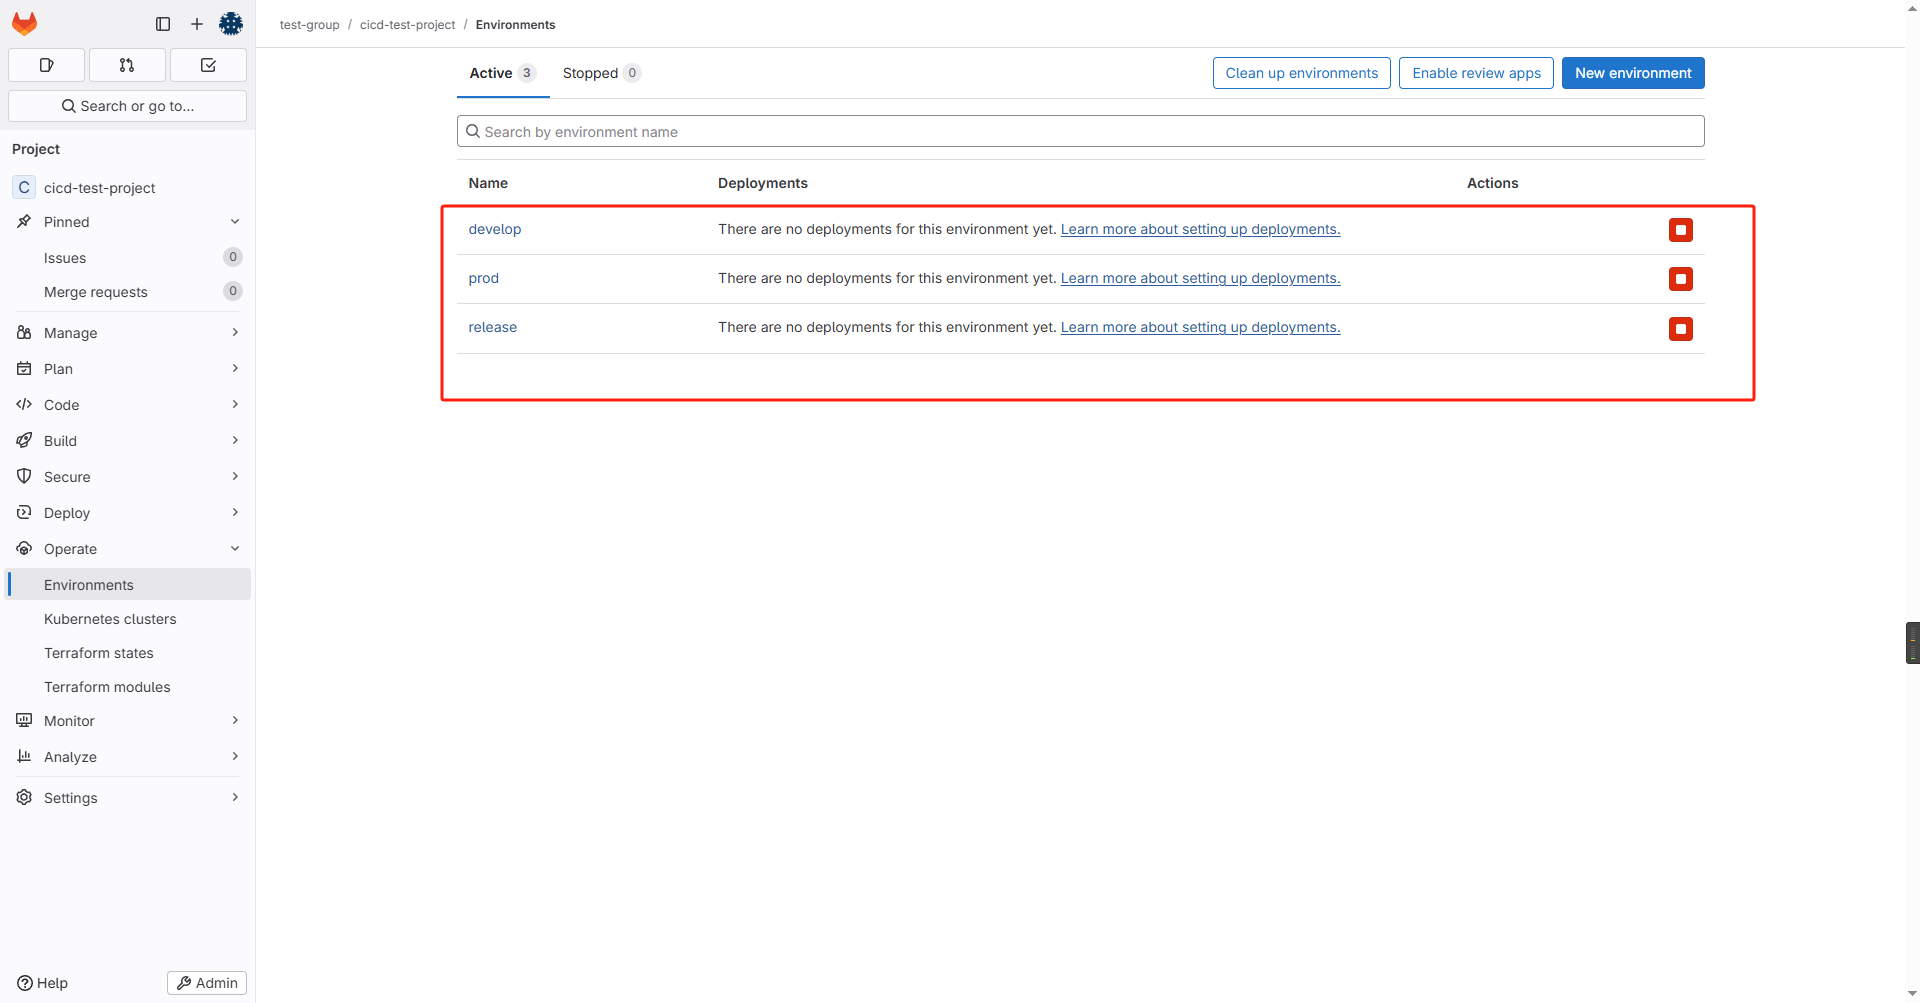
一般来说不同环境使用不同的k8s集群,我们需要先在项目中添加三组环境变量
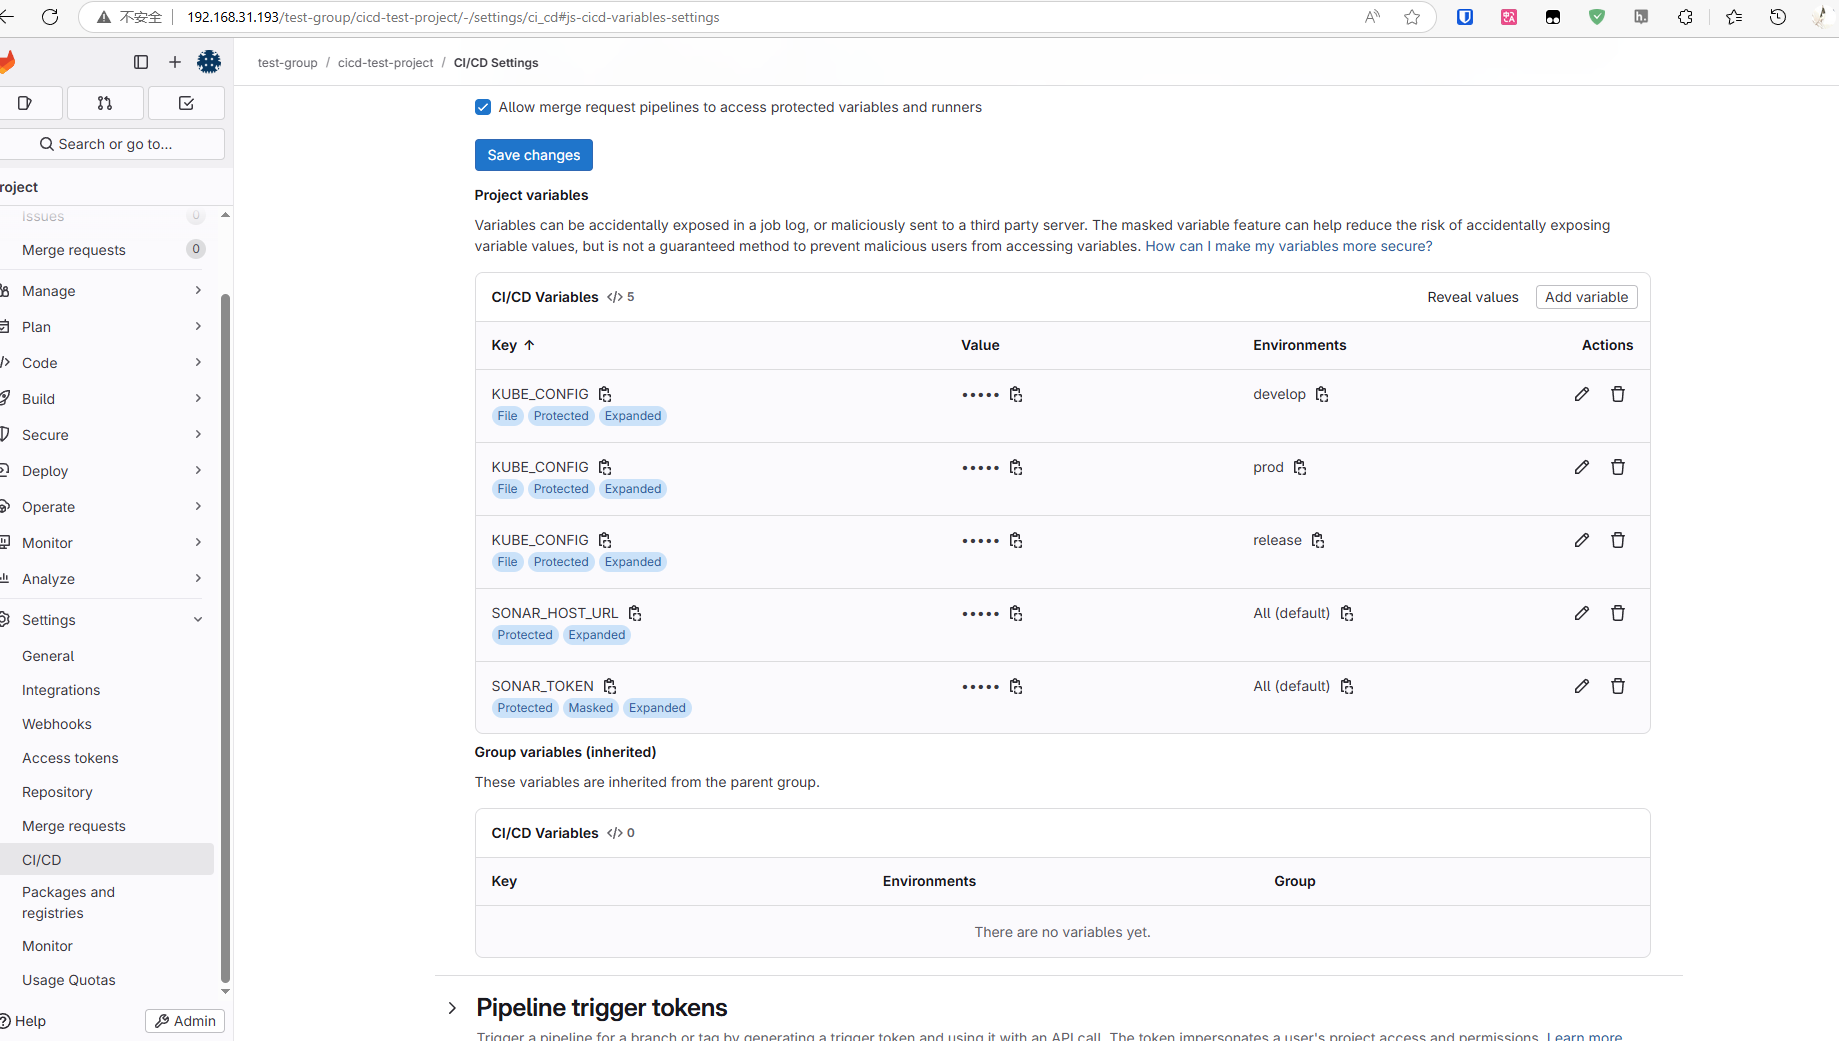
然后添加k8s环境变量,添加方式与之前CD一章一样,只是这里要三个环境添加各自的k8s信息:
创建一个永久token:
# gitlab-ci-secret.yaml
apiVersion: v1
kind: Secret
metadata:
  name: gitlab-ci-secret
  namespace: my-app
  annotations:
    kubernetes.io/service-account.name: gitlab-ci-sa
type: kubernetes.io/service-account-token
kubectl apply -f gitlab-ci-secret.yaml使用脚本提取token:
#!/bin/bash

# --- 1. 设置变量 ---
NAMESPACE="my-app"
SA_NAME="gitlab-ci-sa"
SECRET_NAME="gitlab-ci-secret" # 我们创建的Secret的名字
CLUSTER_NAME="default-cluster"

# --- 2. 自动获取集群信息 ---
SERVER_URL=$(kubectl config view --minify -o jsonpath='{.clusters[0].cluster.server}')
CA_DATA=$(kubectl config view --raw --minify -o jsonpath='{.clusters[0].cluster.certificate-authority-data}')

# --- 3. 从Secret中提取永久Token (关键变更) ---
# 这条命令会解码(decode)Secret中的数据,并提取出token字段
TOKEN=$(kubectl get secret ${SECRET_NAME} --namespace ${NAMESPACE} -o jsonpath='{.data.token}' | base64 --decode)

# --- 4. 生成最终的kubeconfig文件内容并打印到屏幕 ---
echo "
apiVersion: v1
kind: Config
clusters:
- name: ${CLUSTER_NAME}
  cluster:
    server: ${SERVER_URL}
    certificate-authority-data: ${CA_DATA}
contexts:
- name: ${CLUSTER_NAME}
  context:
    cluster: ${CLUSTER_NAME}
    user: ${SA_NAME}
    namespace: ${NAMESPACE}
current-context: ${CLUSTER_NAME}
users:
- name: ${SA_NAME}
  user:
    token: ${TOKEN}
"
chmod +x generate-kubeconfig.sh
./generate-kubeconfig.sh将不同环境生成的结果拷贝进gitlab的variables,选择对应的环境,key是KUBE_CONFIG,value就是脚本生成结果。
3.2.4 编写CI
# ==============================================================================
# 全局默认设置 (Global Defaults)
# ==============================================================================
default:
  tags:
    - linux
    - docker

variables:
  IMAGE_NAME: $CI_REGISTRY_IMAGE
  IMAGE_TAG: $CI_COMMIT_REF_SLUG-$CI_COMMIT_SHORT_SHA
  MAVEN_OPTS: "-Dmaven.repo.local=.m2/repository"

.maven_cache:
  cache:
    key:
      files:
        - pom.xml
      prefix: ${CI_PROJECT_NAME}
    paths:
      - .m2/repository/

.maven_defaults:
  extends:
    - .maven_cache
  image: maven:3.9.6-eclipse-temurin-21

.kubectl_defaults:
  image:
    name: bitnami/kubectl:latest
    entrypoint: [""]

stages:
  - build
  - test-and-analyze
  - publish
  - deploy-dev
  - deploy-release
  - deploy-prod


build-and-test:
  stage: build
  extends: .maven_defaults
  script:
    - echo "INFO [Stage build] Compiling, running unit tests, and packaging..."
    - mvn verify -B
  artifacts:
    paths:
      - target/
    expire_in: 1 hour
  rules:
    - if: '$CI_PIPELINE_SOURCE == "push" || $CI_PIPELINE_SOURCE == "merge_request_event"'


code-quality-scan:
  stage: test-and-analyze
  extends: .maven_defaults
  variables:
    GIT_DEPTH: "0"
  script:
    - echo "INFO [Stage test-and-analyze] Running SonarQube analysis via automatic integration..."
    - >-
      mvn verify sonar:sonar
      -Dsonar.projectKey=test-group_cicd-test-project_AZgXyvpJjZI_rh9cYAvb
      -Dsonar.qualitygate.wait=true
      -Dsonar.qualitygate.timeout=300
  needs:
    - job: build-and-test
      artifacts: true
  allow_failure: true
  rules:
    - if: '$CI_COMMIT_BRANCH == "develop" || $CI_COMMIT_BRANCH == "release" || $CI_COMMIT_BRANCH == "master"'
    - if: '$CI_PIPELINE_SOURCE == "merge_request_event"'


publish-image:
  stage: publish
  image: docker:latest
  script:
    - echo "INFO [Stage publish] Logging into GitLab Registry $CI_REGISTRY..."
    - echo "$CI_REGISTRY_PASSWORD" | docker login -u "$CI_REGISTRY_USER" --password-stdin $CI_REGISTRY
    - echo "INFO Building Docker image with name $IMAGE_NAME:$IMAGE_TAG"
    - docker build -t "$IMAGE_NAME:$IMAGE_TAG" .
    - echo "INFO Pushing Docker image $IMAGE_NAME:$IMAGE_TAG"
    - docker push "$IMAGE_NAME:$IMAGE_TAG"
  needs:
    - job: code-quality-scan
      artifacts: false
    - job: build-and-test
      artifacts: true
  rules:
    - if: '$CI_COMMIT_BRANCH == "develop" || $CI_COMMIT_BRANCH == "release" || $CI_COMMIT_BRANCH == "master"'


.deploy_template:
  extends: .kubectl_defaults
  script:
    - echo "INFO Deploying image $IMAGE_NAME:$IMAGE_TAG to $CI_ENVIRONMENT_NAME environment..."
    - export KUBECONFIG=$KUBE_CONFIG
    - cat $KUBE_CONFIG
    - sed -i "s|IMAGE_PLACEHOLDER|$IMAGE_NAME:$IMAGE_TAG|g" k8s/deployment.yaml
    - echo "INFO Applying Kubernetes manifests..."
    - kubectl apply -f k8s/deployment.yaml
    - kubectl apply -f k8s/service.yaml
    - echo "INFO Waiting for deployment rollout to complete..."
    - kubectl rollout status deployment/cicd-test-project-deployment --timeout=120s
  needs:
    - publish-image

deploy-dev:
  stage: deploy-dev
  extends: .deploy_template
  environment:
    name: develop
    url: https://dev.your-app.com
  rules:
    - if: '$CI_COMMIT_BRANCH == "develop"'

deploy-release:
  stage: deploy-release
  extends: .deploy_template
  environment:
    name: release
    url: https://staging.your-app.com
  rules:
    - if: '$CI_COMMIT_BRANCH == "release"'

deploy-prod:
  stage: deploy-prod
  extends: .deploy_template
  environment:
    name: prod
    url: https://www.your-app.com
  when: manual
  allow_failure: false
  rules:
    - if: '$CI_COMMIT_BRANCH == "master"'
3.2.5 MR测试
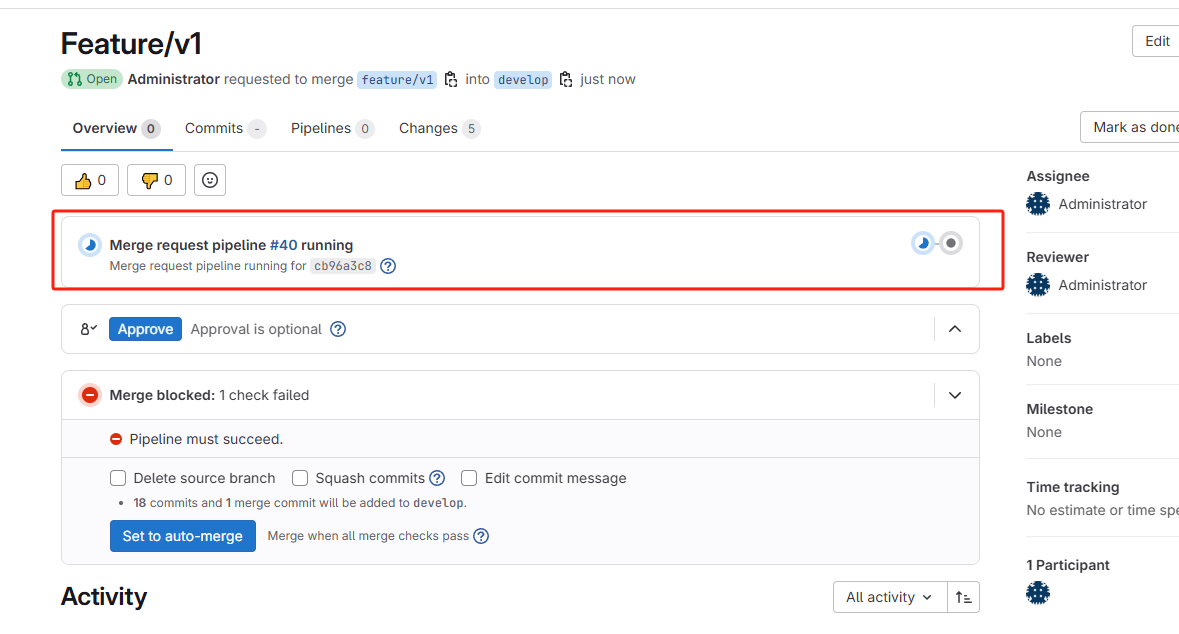
CI编写完成后,发起一个feature/v1到develop的MR

MR一旦发起,立马在source branch(feature/v1)执行打包和代码扫描
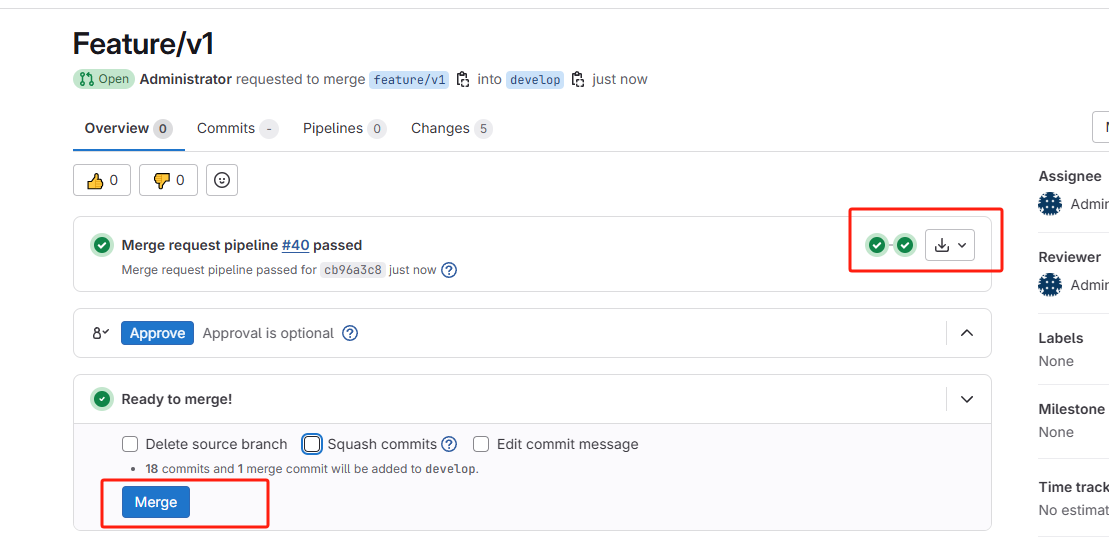
打包和代码扫描通过后,相关人员可以同意Merge
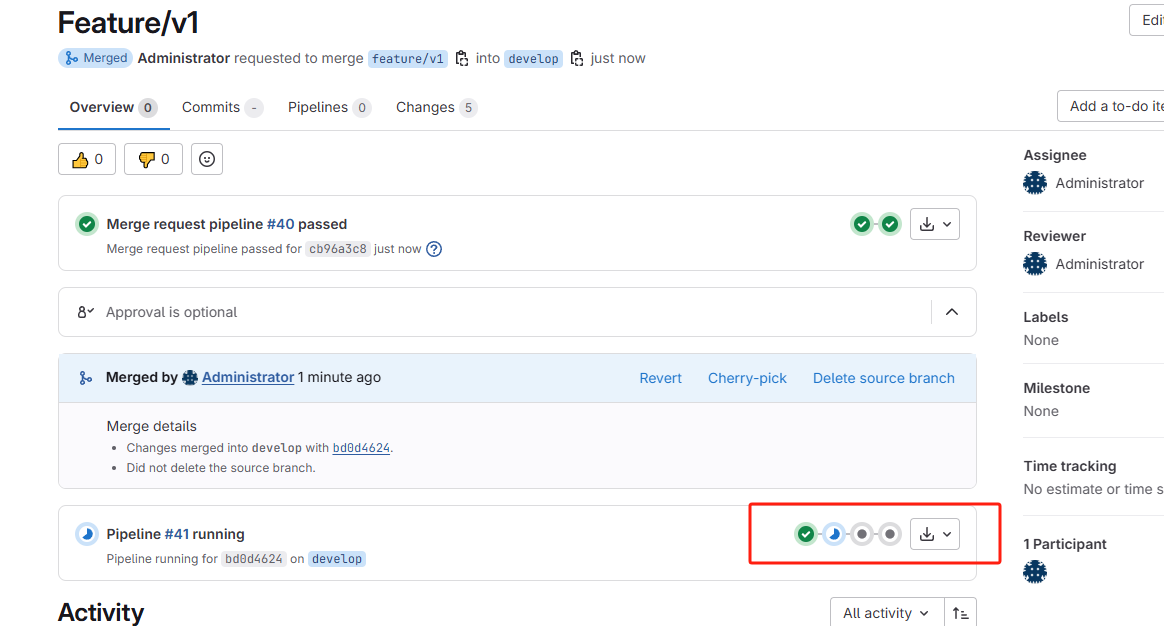
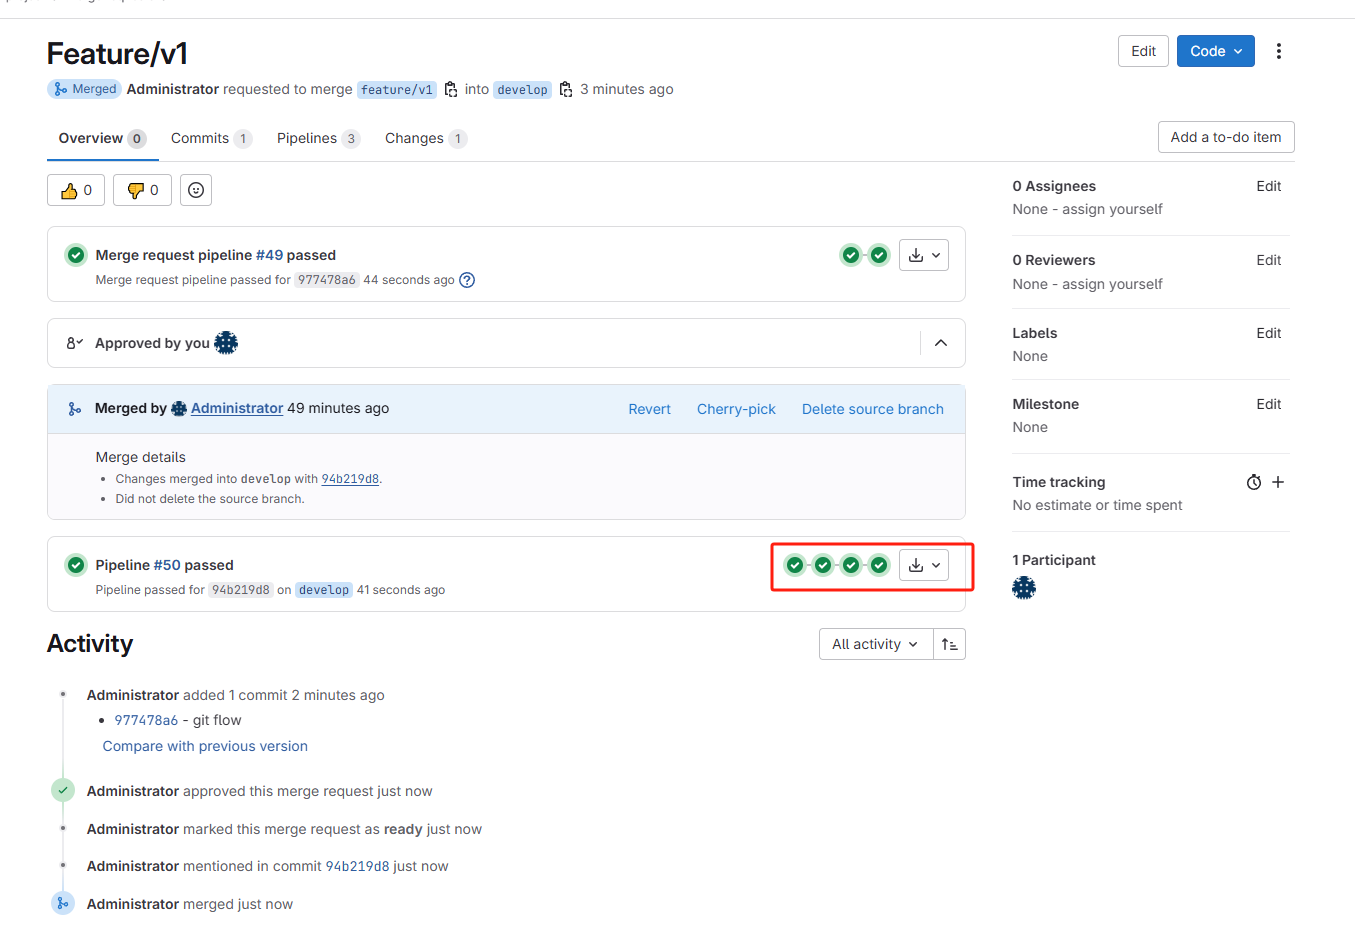
一旦同意Merge,代码被push到develop后,触发一次完整的CICD,包括打包、代码审查、镜像构建以及部署到开发环境
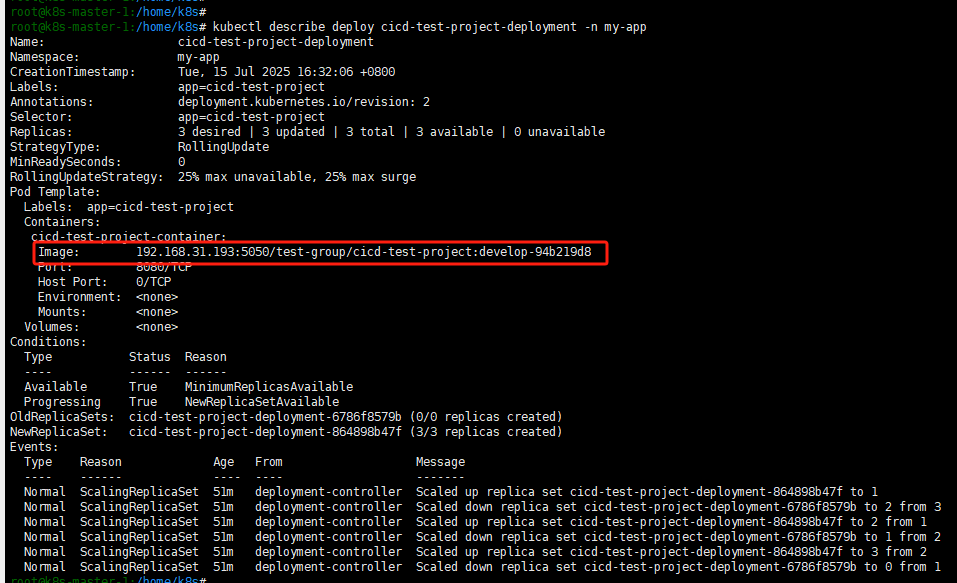
从develop发起向release的MR:


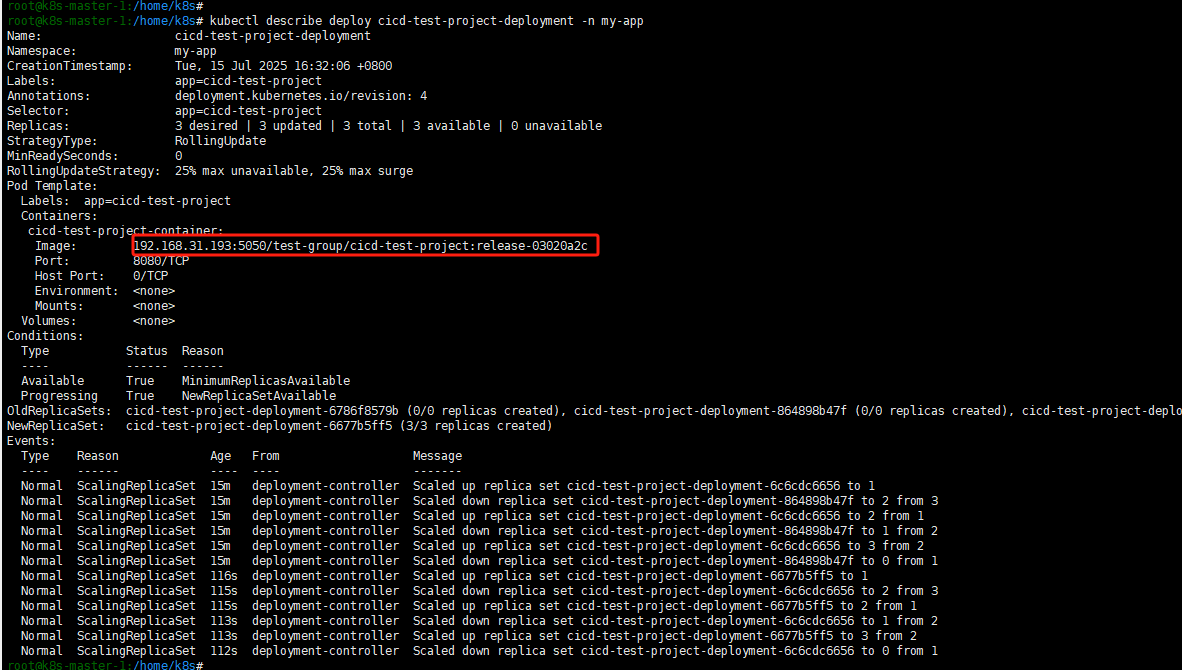
可以看到同样的流程,走CICD,并部署release分支到预发布的k8s集群上。
从release发起向master的MR:

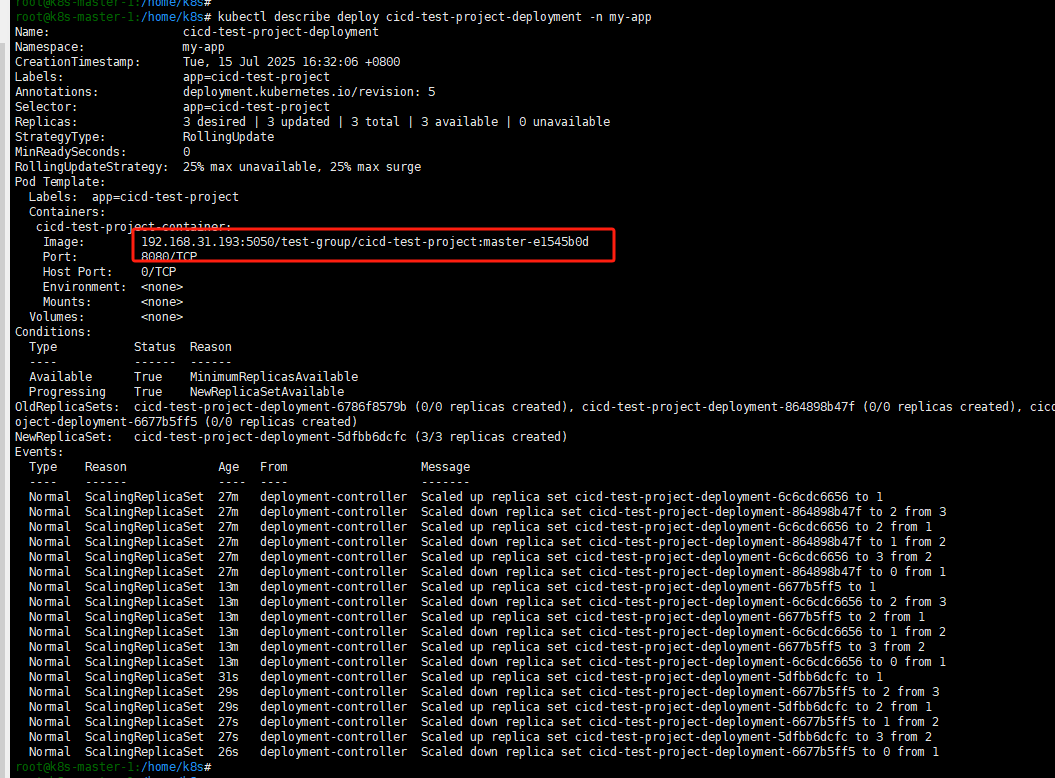
这里特殊的是我们生产环境的部署采用手动模式,因此需要手动确认下。
4. CI优化
4.1 私有maven仓库
4.1.1 搭建nexus
一般企业开发都会有自己的私有maven仓库,这有非常多好处,其中一个就是我们CICD的时候可以不从maven center拉取依赖,避免网络不通、下载过慢等问题。
搭建私服maven仓库一般选用nexus3
version: '3.8'
services:
  nexus:
    image: sonatype/nexus3
    container_name: nexus
    restart: always
    ports:
      - "8081:8081"
    volumes:
      - "/home/nexus/data:/nexus-data"
    environment:
      - INSTALL4J_ADD_VM_PARAMS=-Xms1024m -Xmx2048m -XX:MaxDirectMemorySize=2048m -Djava.util.prefs.userRoot=/nexus-data/prefs
启动后会生成一个admin的临时密码
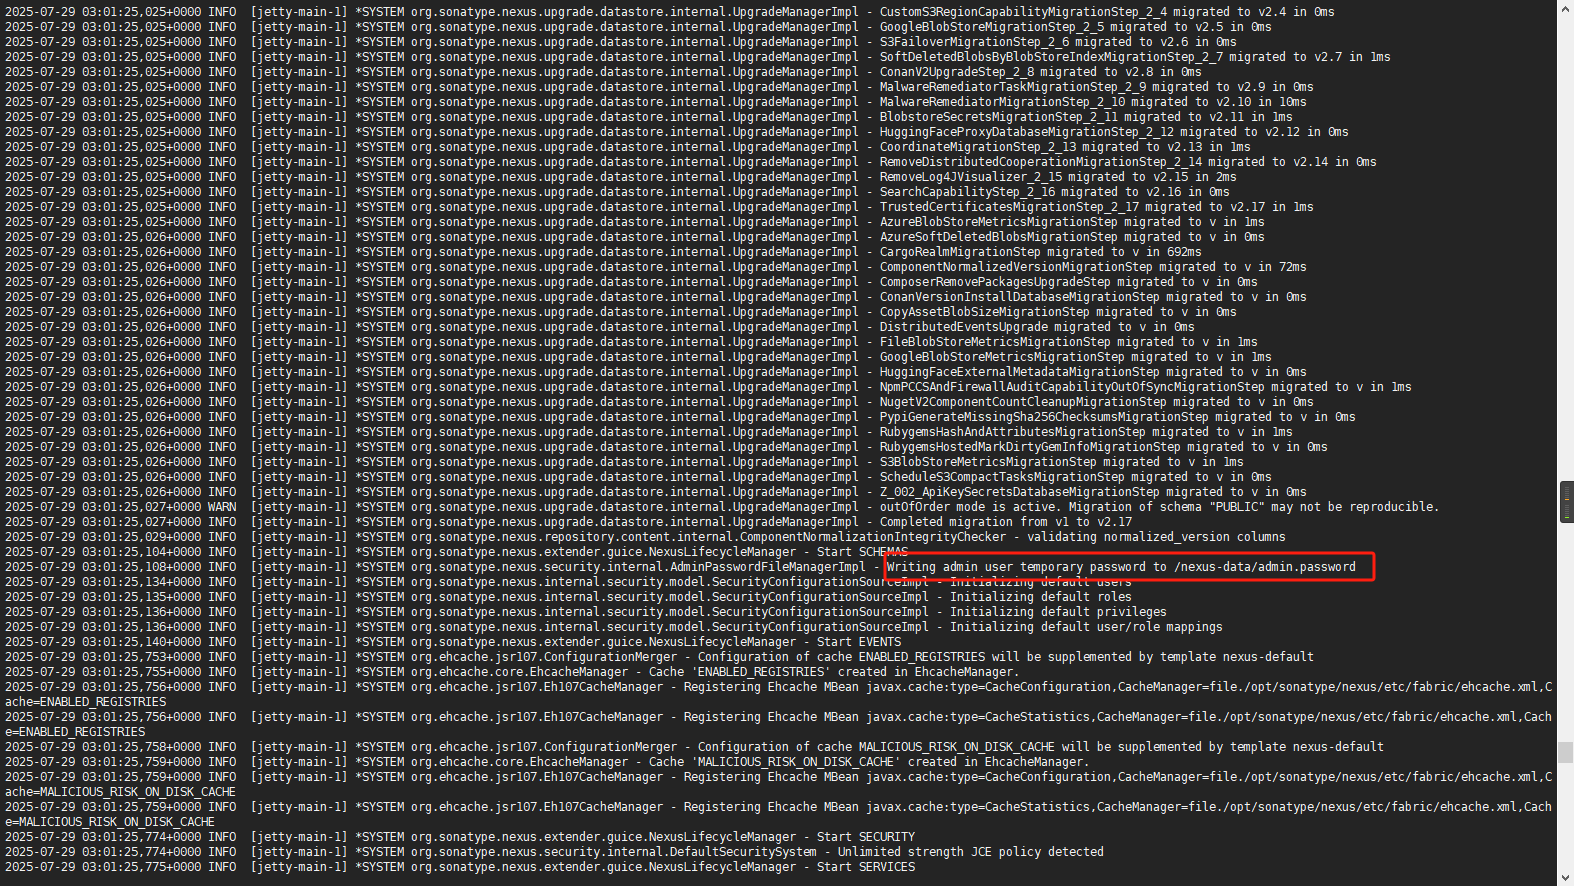
登录nexus,按引导修改密码并做一些简单配置

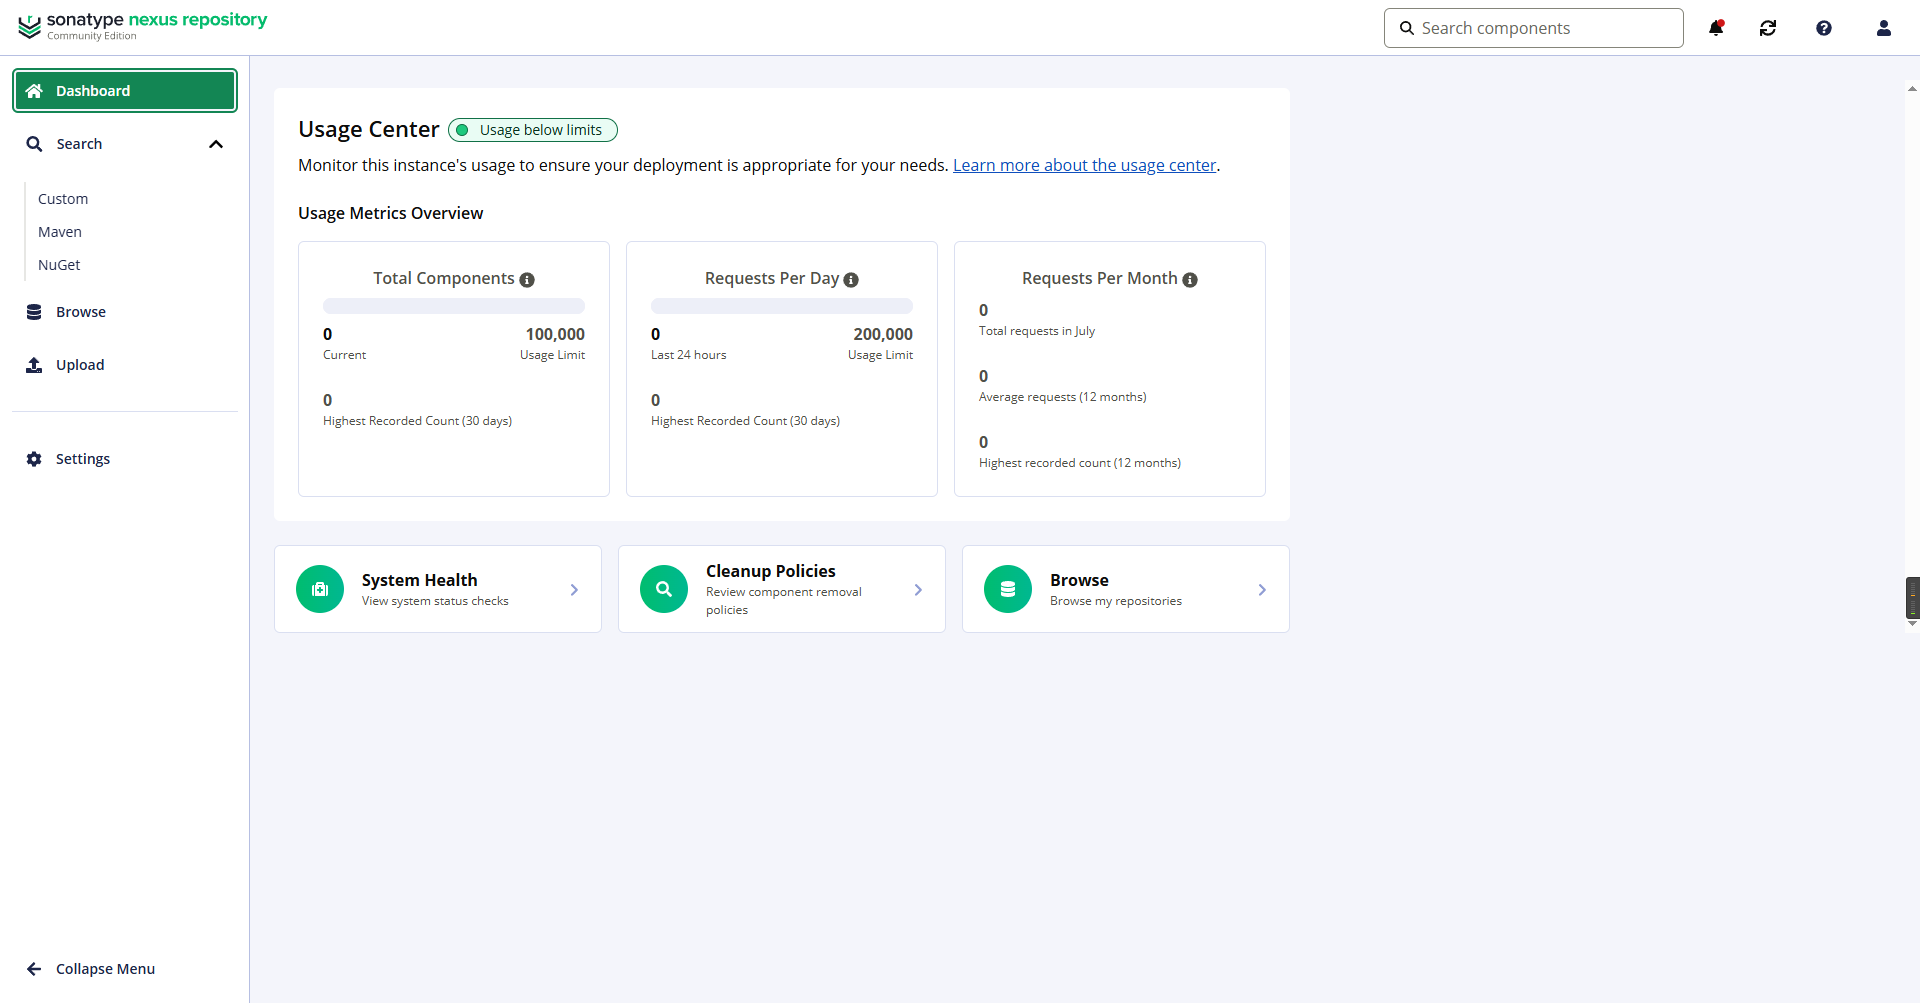
nexus基本可以做到开箱即用,无需额外配置。因为已经配置好了默认的blob,proxy repository,host repository和group repository,我们直接拿来用即可,如果需要,你也可以加一些别的代理库如aliyun的maven镜像源。
4.1.2 修改CI
在项目的根目录下新建.mvn/settings.xml文件
<settings xmlns="http://maven.apache.org/SETTINGS/1.0.0"
          xmlns:xsi="http://www.w3.org/2001/XMLSchema-instance"
          xsi:schemaLocation="http://maven.apache.org/SETTINGS/1.0.0
                              https://maven.apache.org/xsd/settings-1.0.0.xsd">
    <mirrors>
        <mirror>
            <id>nexus-public</id>
            <!-- 【关键】这行代码的意思是“拦截所有请求” 它会覆盖掉pom.xml里默认的中央仓库地址 -->
            <mirrorOf>*</mirrorOf>
            <url>http://192.168.31.193:8081/repository/maven-public/</url>
        </mirror>
    </mirrors>
</settings>修改.gitlab-ci.yml,主要改动使用我们给的上面这个settings.xml来启动maven,移除maven缓存:
# ==============================================================================
# 全局默认设置 (Global Defaults)
# ==============================================================================
default:
  tags:
    - linux
    - docker

variables:
  IMAGE_NAME: $CI_REGISTRY_IMAGE
  IMAGE_TAG: $CI_COMMIT_REF_SLUG-$CI_COMMIT_SHORT_SHA

.maven_defaults:
  image: maven:3.9.6-eclipse-temurin-21

.kubectl_defaults:
  image:
    name: bitnami/kubectl:latest
    entrypoint: [""]

stages:
  - build
  - test-and-analyze
  - publish
  - deploy-dev
  - deploy-release
  - deploy-prod


# ==============================================================================
# STAGE: build - Compiles, runs unit tests, and packages the application.
# ==============================================================================
build-and-test:
  stage: build
  extends: .maven_defaults
  script:
    - echo "INFO [Stage build] Compiling, running unit tests, and packaging..."
    # 主要改动引入我们的settings.xml
    - mvn -s .mvn/settings.xml verify
  artifacts:
    paths:
      - target/
    expire_in: 1 hour
  rules:
    - if: '$CI_PIPELINE_SOURCE == "push" || $CI_PIPELINE_SOURCE == "merge_request_event"'


# ==============================================================================
# STAGE: test-and-analyze - Performs SonarQube quality gate check.
# ==============================================================================
code-quality-scan:
  stage: test-and-analyze
  extends: .maven_defaults
  variables:
    GIT_DEPTH: "0"
  script:
    - echo "INFO [Stage test-and-analyze] Running SonarQube analysis via automatic integration..."!
    - >-
      mvn -s .mvn/settings.xml verify sonar:sonar
      -Dsonar.projectKey=test-group_cicd-test-project_AZgXyvpJjZI_rh9cYAvb
      -Dsonar.qualitygate.wait=true
      -Dsonar.qualitygate.timeout=300
  needs:
    - job: build-and-test
      artifacts: true
  allow_failure: true
  rules:
    - if: '$CI_COMMIT_BRANCH == "develop" || $CI_COMMIT_BRANCH == "release" || $CI_COMMIT_BRANCH == "master"'
    - if: '$CI_PIPELINE_SOURCE == "merge_request_event"'

# ==============================================================================
# STAGE: publish - Builds and pushes a Docker image to the registry.
# ==============================================================================
publish-image:
  stage: publish
  image: docker:latest
  script:
    - echo "INFO [Stage publish] Logging into GitLab Registry $CI_REGISTRY..."
    - echo "$CI_REGISTRY_PASSWORD" | docker login -u "$CI_REGISTRY_USER" --password-stdin $CI_REGISTRY
    - echo "INFO Building Docker image with name $IMAGE_NAME:$IMAGE_TAG"
    - docker build -t "$IMAGE_NAME:$IMAGE_TAG" .
    - echo "INFO Pushing Docker image $IMAGE_NAME:$IMAGE_TAG"
    - docker push "$IMAGE_NAME:$IMAGE_TAG"
  needs:
    - job: code-quality-scan
      artifacts: false
    - job: build-and-test
      artifacts: true
  rules:
    - if: '$CI_COMMIT_BRANCH == "develop" || $CI_COMMIT_BRANCH == "release" || $CI_COMMIT_BRANCH == "master"'


# ==============================================================================
# STAGE: deploy-*
# ==============================================================================
.deploy_template:
  extends: .kubectl_defaults
  script:
    - echo "INFO Deploying image $IMAGE_NAME:$IMAGE_TAG to $CI_ENVIRONMENT_NAME environment..."
    - export KUBECONFIG=$KUBE_CONFIG
    - cat $KUBE_CONFIG
    - sed -i "s|IMAGE_PLACEHOLDER|$IMAGE_NAME:$IMAGE_TAG|g" k8s/deployment.yaml
    - echo "INFO Applying Kubernetes manifests..."
    - kubectl apply -f k8s/deployment.yaml
    - kubectl apply -f k8s/service.yaml
    - echo "INFO Waiting for deployment rollout to complete..."
    - kubectl rollout status deployment/cicd-test-project-deployment --timeout=120s
  needs:
    - publish-image

deploy-dev:
  stage: deploy-dev
  extends: .deploy_template
  environment:
    name: develop
    url: https://dev.your-app.com
  rules:
    - if: '$CI_COMMIT_BRANCH == "develop"'

deploy-release:
  stage: deploy-release
  extends: .deploy_template
  environment:
    name: release
    url: https://staging.your-app.com
  rules:
    - if: '$CI_COMMIT_BRANCH == "release"'

deploy-prod:
  stage: deploy-prod
  extends: .deploy_template
  environment:
    name: prod
    url: https://www.your-app.com
  when: manual
  allow_failure: false
  rules:
- if: '$CI_COMMIT_BRANCH == "master"'上述CI在使用maven打包的时候会使用我们在settings.xml中配置的镜像地址(也即我们搭建的nexus私服maven仓库),如果nexus中存在依赖则直接返回给CI,如果不存在,则去代理地址仓库拉取依赖,代理仓库有代理地址,会去代理地址拉取。
4.2 私有镜像仓库
理论上gitlab已经内置了镜像仓库(5050端口就是镜像仓库端口),所以其实我们完全可以直接用gitlab的镜像仓库。但有时候为了解耦或者一些企业化管理需求,如更高的安全权限以及漏洞扫描镜像签名等功能。这种时候就需要用到harbor。
4.2.1 Harbor安装
跟着官方文档,按安装教程安装harbor即可。
安装完成后创建项目与对应的账户:
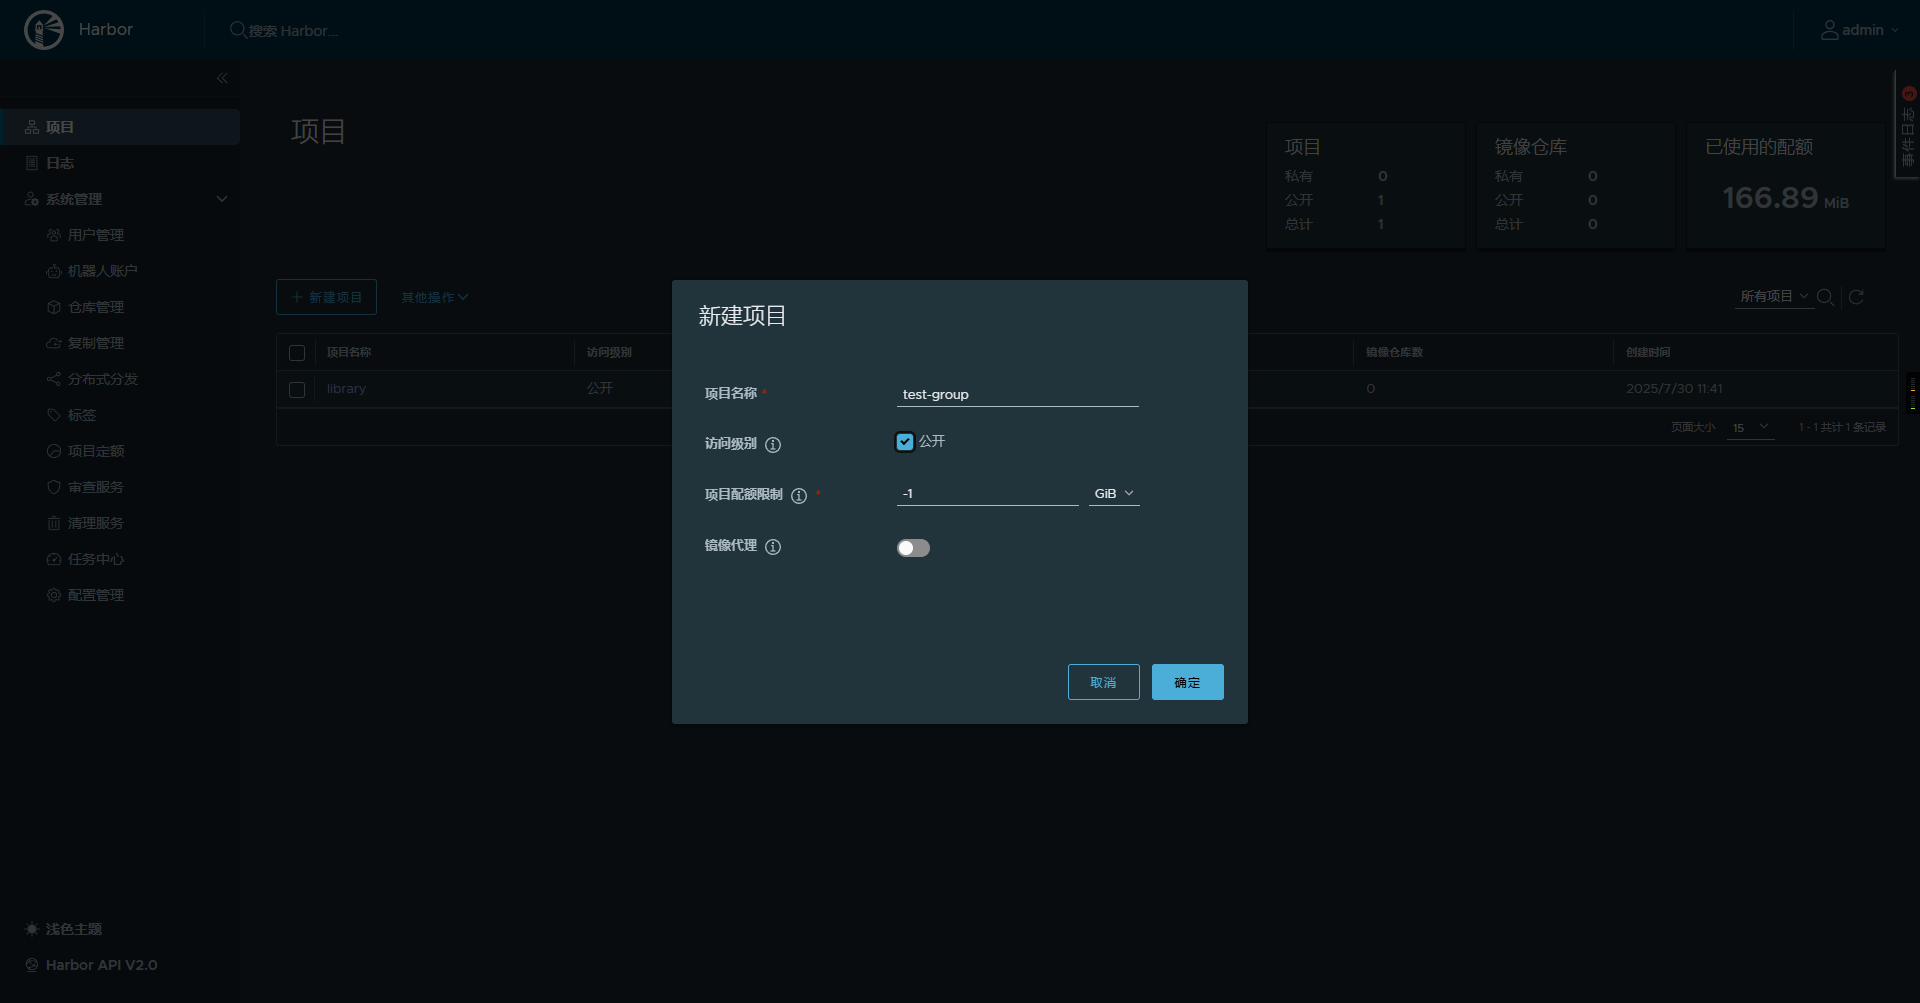
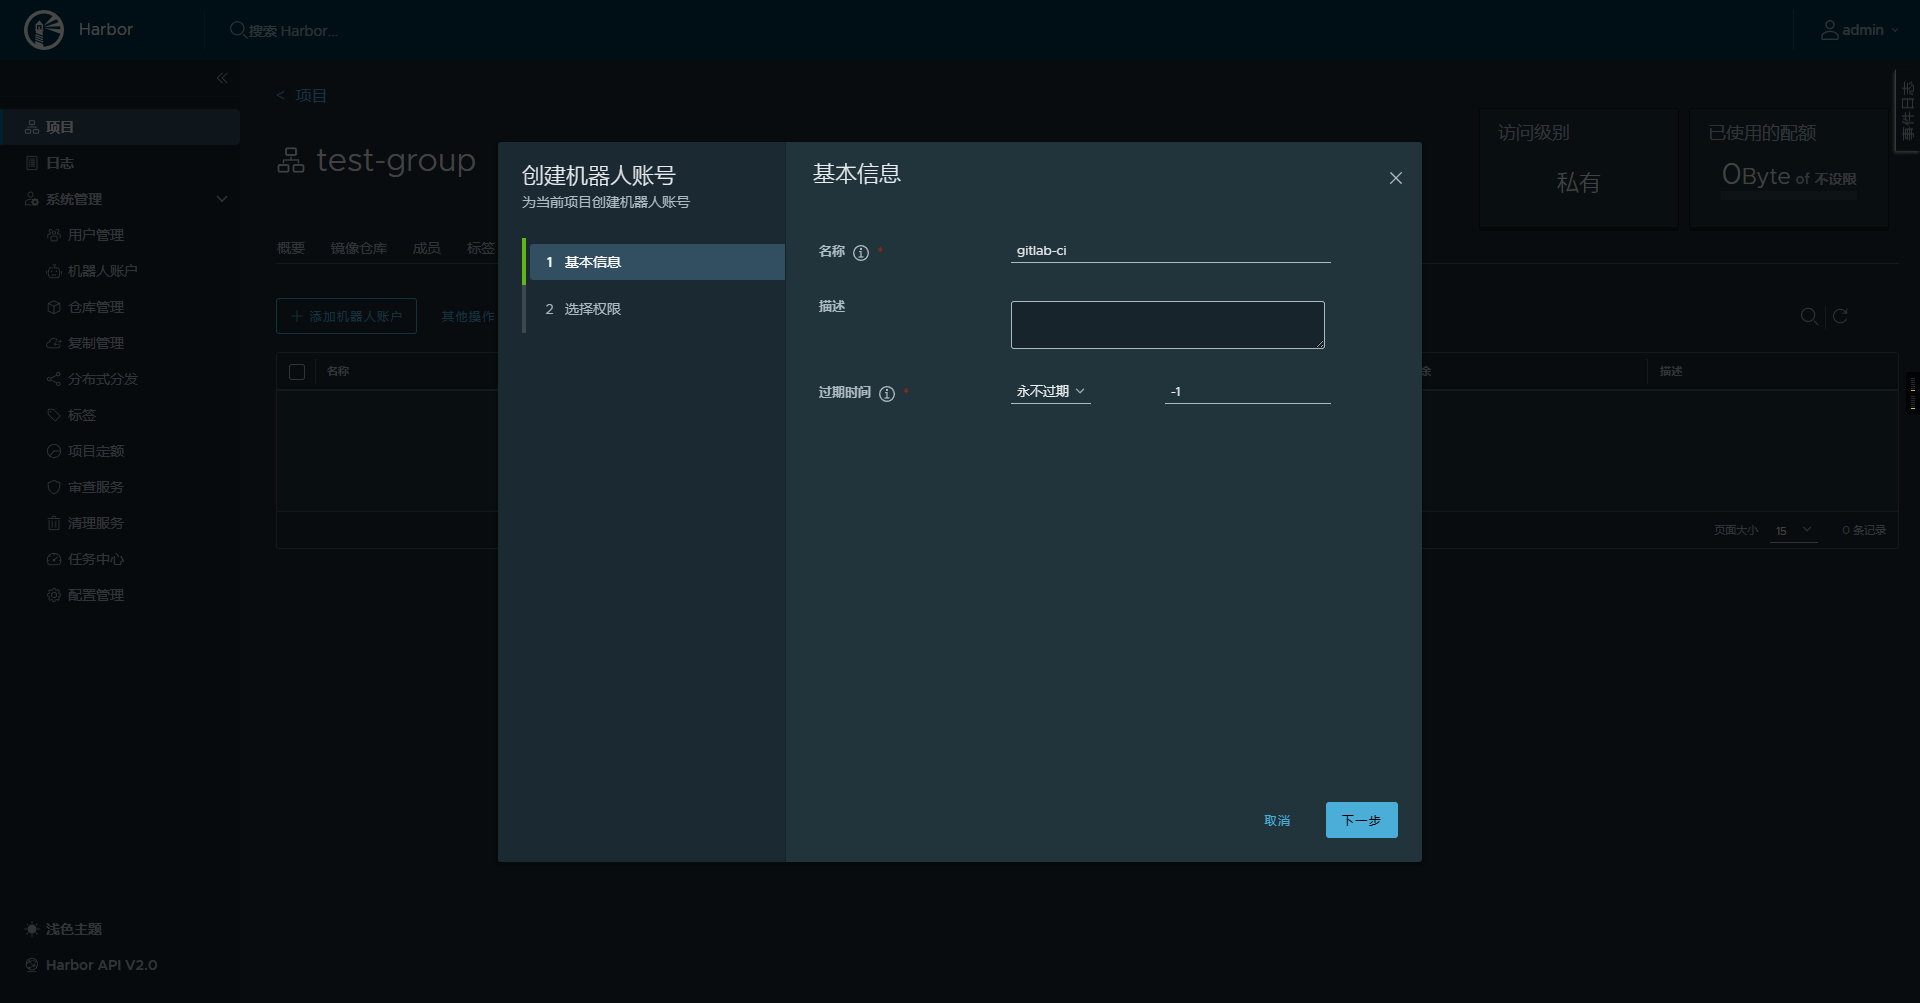
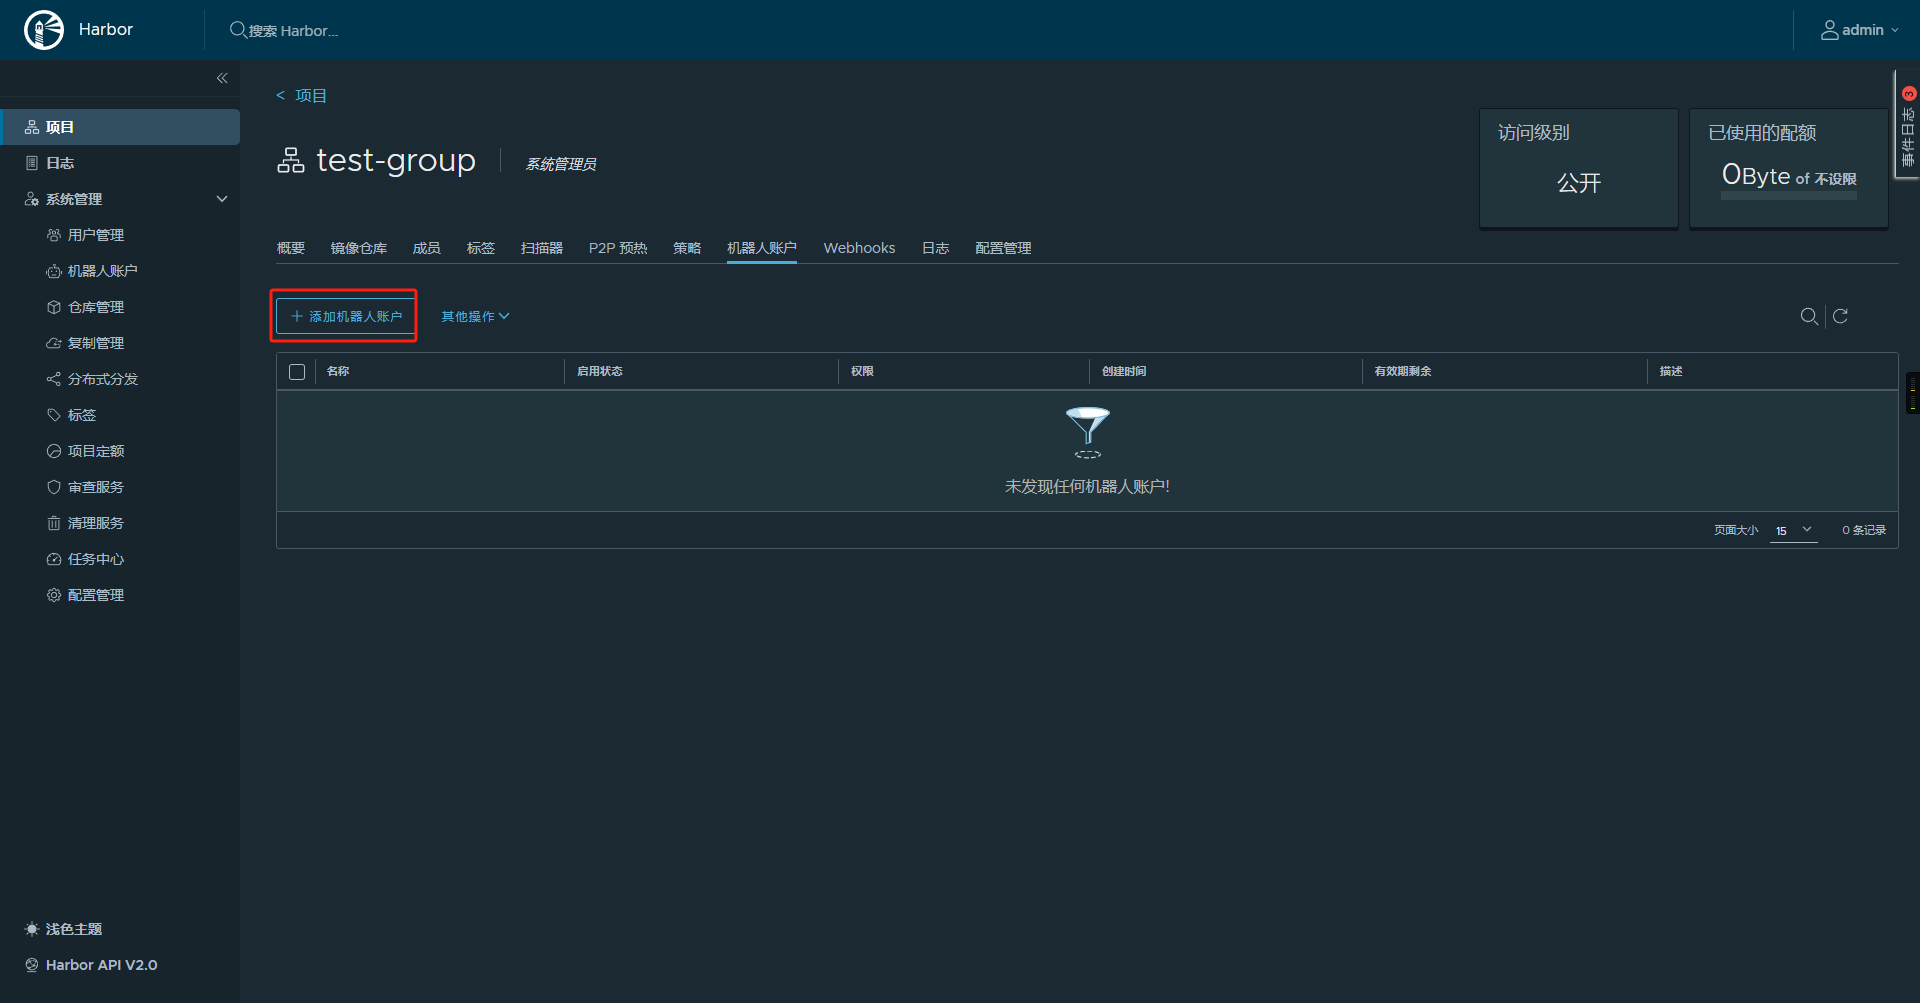
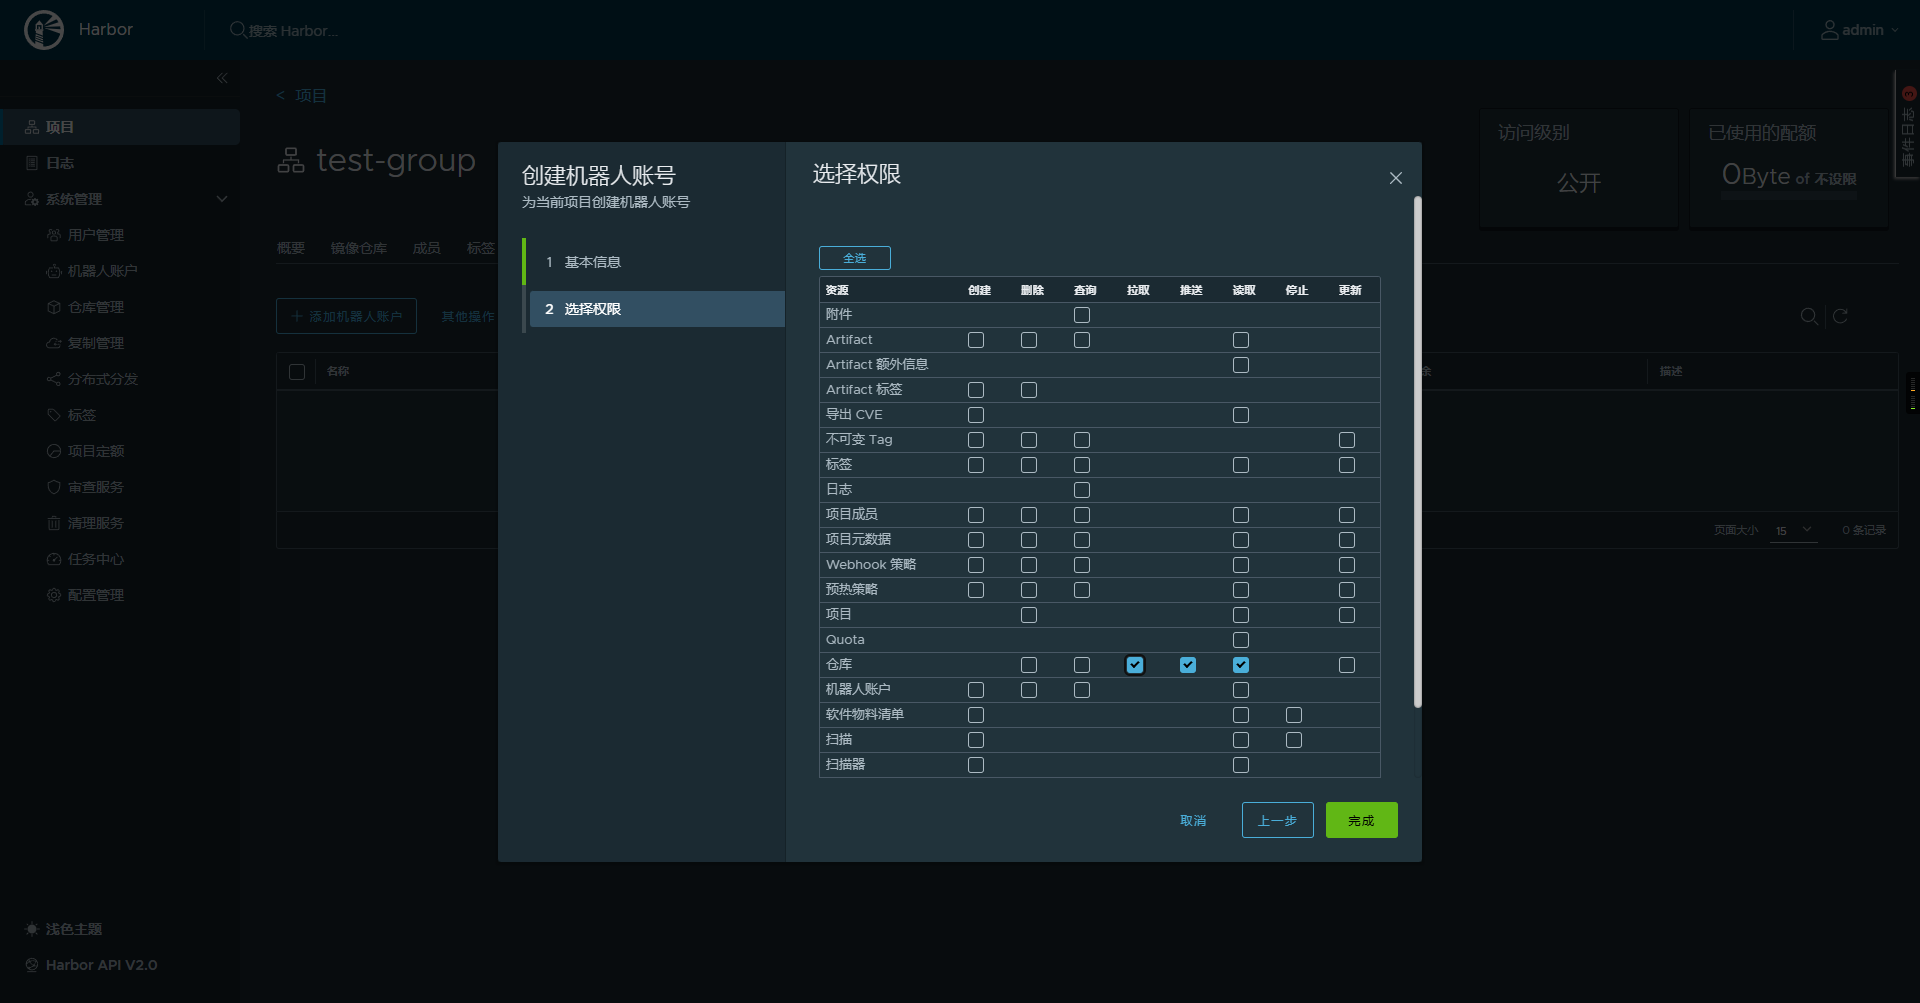
4.2.2 集成进gitlab
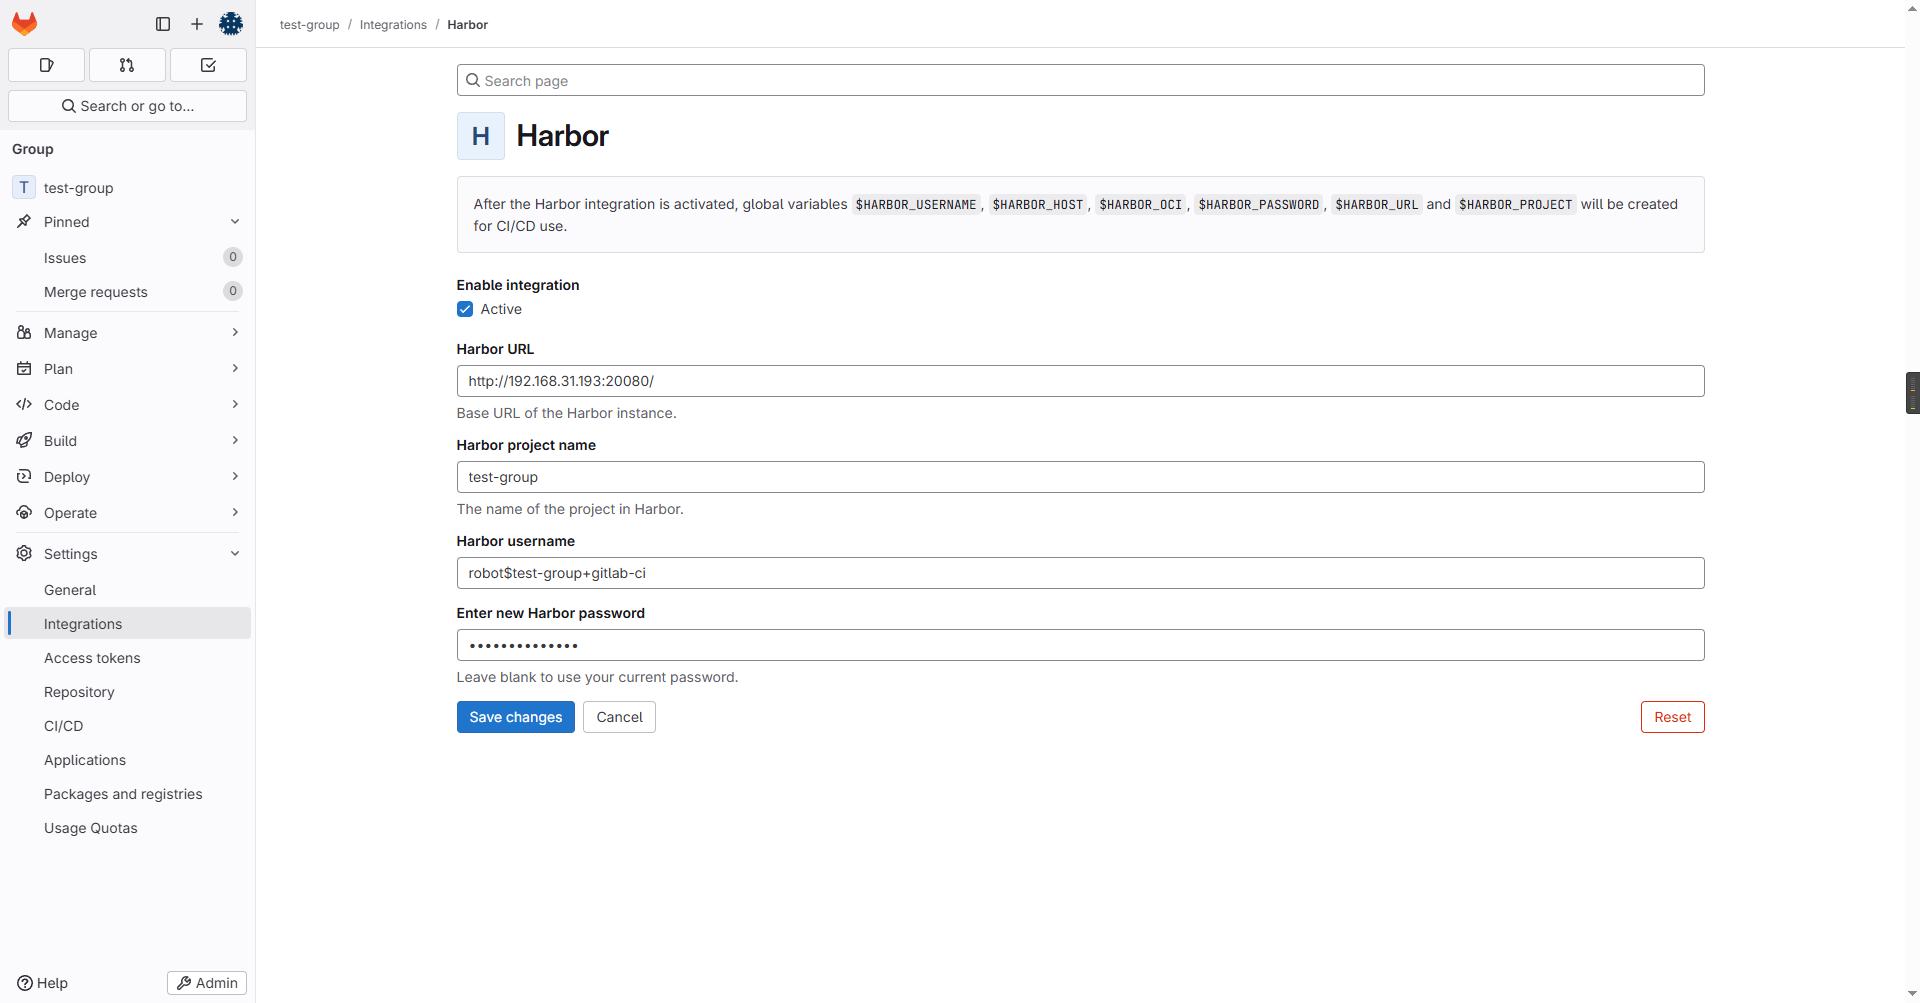
将harbor集成进gitlab:项目或group下 => Setting => integrations => Habor,集成harbor。
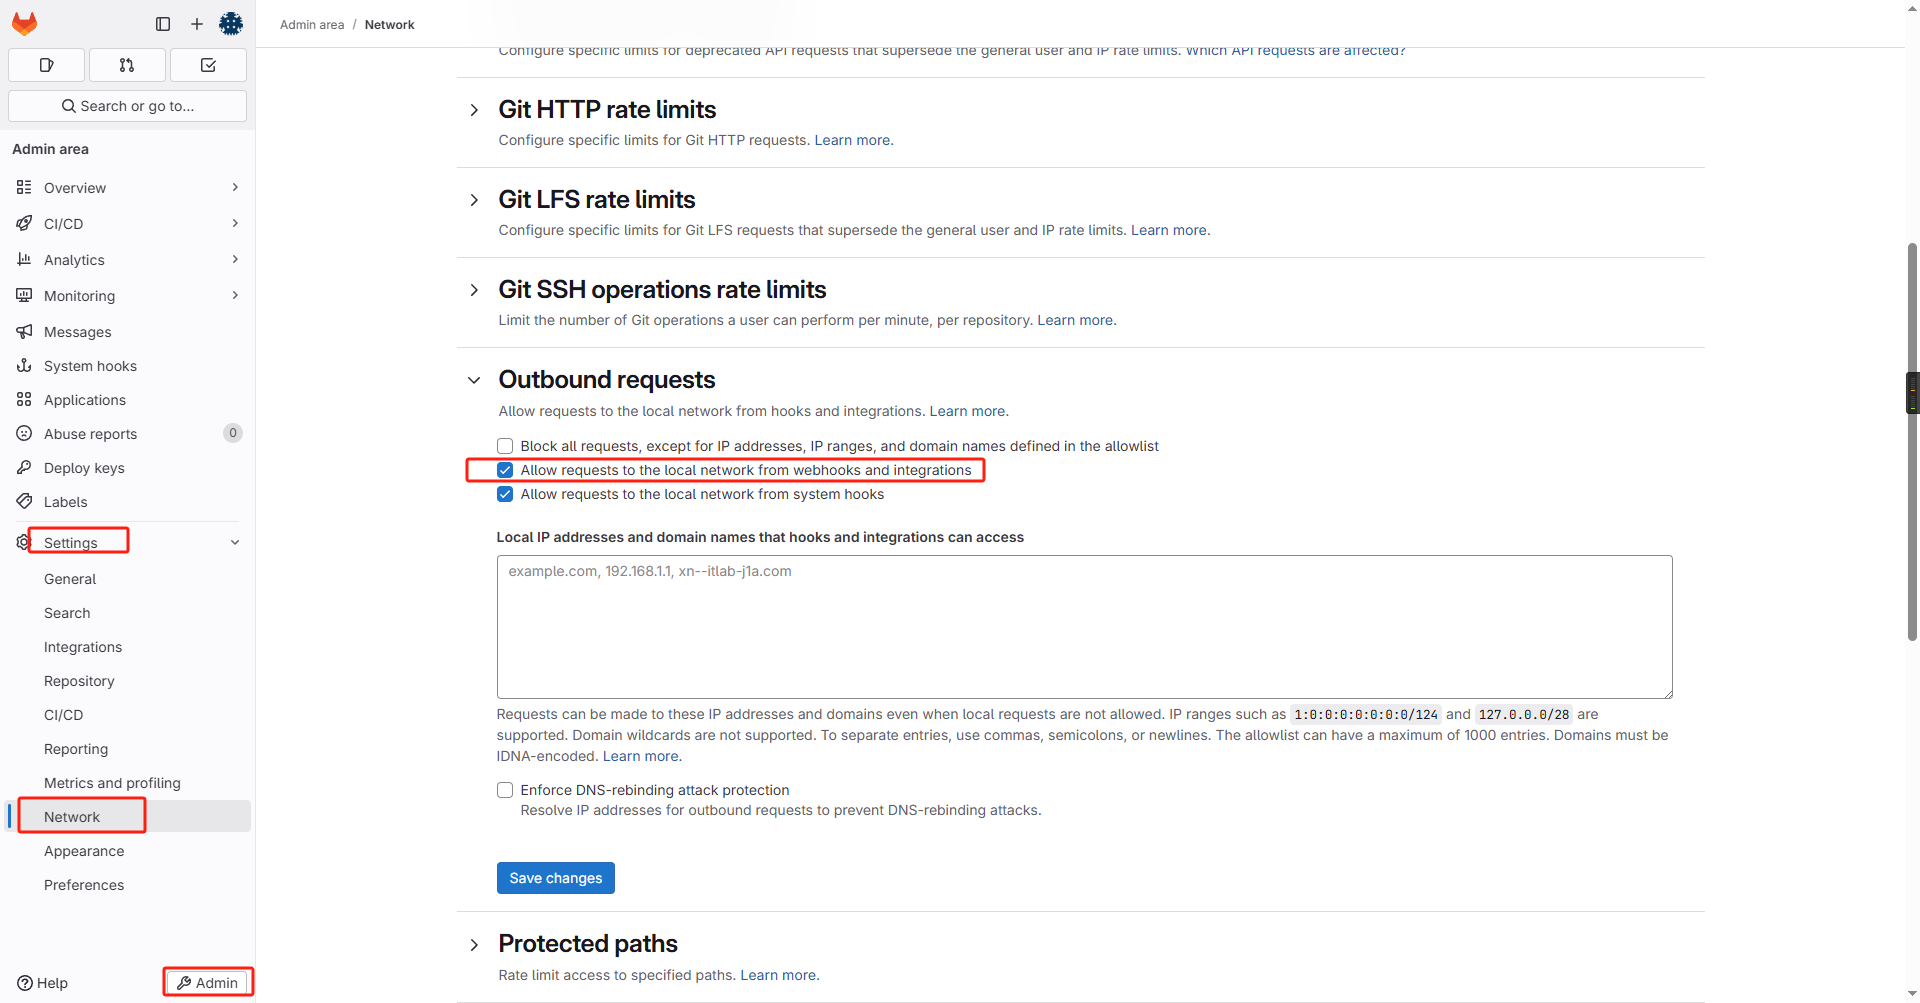
如果你的harbor地址是内网地址,还需要先授权本地网络访问:Admin => Settings => Network => Outbound requests勾选:Allow requests to the local network from webhooks and integrations
4.2.3 修改Docker和k8s containerd配置
由于我们的镜像中心换为了harbor不再是gitlab-registry,且harbor部署的时候我未使用https,因此我们需要修改部署gitlab宿主机的docker配置和k8s节点containerd配置:
Docker增加非安全注册中心

三个k8s节点均执行如下脚本:
sudo sed -i '/\[plugins."io.containerd.grpc.v1.cri".registry\]/a\
  [plugins."io.containerd.grpc.v1.cri".registry.mirrors."192.168.31.193:20080"]\
    endpoint = ["http://192.168.31.193:20080"]' /etc/containerd/config.toml
4.2.4 修改CI
# ==============================================================================
# 全局默认设置 (Global Defaults)
# ==============================================================================
default:
  tags:
    - linux
    - docker

variables:
  IMAGE_TAG: $CI_COMMIT_REF_SLUG-$CI_COMMIT_SHORT_SHA

.maven_defaults:
  image: maven:3.9.6-eclipse-temurin-21

.kubectl_defaults:
  image:
    name: bitnami/kubectl:latest
    entrypoint: [""]

# 生成镜像名,由于源gitlab-regisry可以直接通过$CI_REGISTRY_IMAGE拿到,但harbor没有,因此我们需要自己拼接
.prepare_image_name: &prepare_image_name
  - export HARBOR_HOST_WITH_PORT=$(echo $HARBOR_URL | sed -E 's|https?://||; s|/+$||')
  - export FULL_IMAGE_NAME="$HARBOR_HOST_WITH_PORT/$HARBOR_PROJECT/$CI_PROJECT_NAME"

stages:
  - build
  - test-and-analyze
  - publish
  - deploy-dev
  - deploy-release
  - deploy-prod

# ==============================================================================
# STAGE: build - Compiles, runs unit tests, and packages the application.
# ==============================================================================
build-and-test:
  stage: build
  extends: .maven_defaults
  script:
    - echo "INFO [Stage build] Compiling, running unit tests, and packaging..."
    - mvn -s .mvn/settings.xml verify
  artifacts:
    paths:
      - target/
    expire_in: 1 hour
  rules:
    - if: '$CI_PIPELINE_SOURCE == "push" || $CI_PIPELINE_SOURCE == "merge_request_event"'


# ==============================================================================
# STAGE: test-and-analyze - Performs SonarQube quality gate check.
# ==============================================================================
code-quality-scan:
  stage: test-and-analyze
  extends: .maven_defaults
  variables:
    GIT_DEPTH: "0"
  script:
    - echo "INFO [Stage test-and-analyze] Running SonarQube analysis via automatic integration..."
    - >-
      mvn -s .mvn/settings.xml verify sonar:sonar
      -Dsonar.projectKey=test-group_cicd-test-project_AZgXyvpJjZI_rh9cYAvb
      -Dsonar.qualitygate.wait=true
      -Dsonar.qualitygate.timeout=300
  needs:
    - job: build-and-test
      artifacts: true
  allow_failure: true
  rules:
    # 向关键分支合并或推送时进行强制的质量门禁检查
    - if: '$CI_COMMIT_BRANCH == "develop" || $CI_COMMIT_BRANCH == "release" || $CI_COMMIT_BRANCH == "master"'
    # 在合并请求时运行,以便在合并前发现问题
    - if: '$CI_PIPELINE_SOURCE == "merge_request_event"'


# ==============================================================================
# STAGE: publish - Builds and pushes a Docker image to the registry.
# ==============================================================================
publish-image:
  stage: publish
  image: docker:latest
  before_script:
    - *prepare_image_name # 关键改动,引用锚点,获得完整镜像名
  script:
    - echo "INFO [Stage publish] Logging into Harbor $HARBOR_URL"
    - echo "$HARBOR_PASSWORD" | docker login -u "$HARBOR_USERNAME" --password-stdin $HARBOR_URL
    # 下面均使用$FULL_IMAGE_NAME
    - echo "INFO Building Docker image with name $FULL_IMAGE_NAME:$IMAGE_TAG"
    - docker build -t "$FULL_IMAGE_NAME:$IMAGE_TAG" .
    - echo "INFO Pushing Docker image $FULL_IMAGE_NAME:$IMAGE_TAG to Harbor"
    - docker push "$FULL_IMAGE_NAME:$IMAGE_TAG"
  needs:
    - job: code-quality-scan
      artifacts: false
    - job: build-and-test
      artifacts: true
  rules:
    - if: '$CI_COMMIT_BRANCH == "develop" || $CI_COMMIT_BRANCH == "release" || $CI_COMMIT_BRANCH == "master"'


# ==============================================================================
# STAGE: deploy-*
# ==============================================================================
.deploy_template:
  extends: .kubectl_defaults
  before_script:
    - *prepare_image_name # 关键改动,引用锚点,获得完整镜像名
  script:
    - echo "INFO Deploying image $IMAGE_NAME:$IMAGE_TAG to $CI_ENVIRONMENT_NAME environment..."
    - export KUBECONFIG=$KUBE_CONFIG
    # 关键改动,使用$FULL_IMAGE_NAME
    - sed -i "s|IMAGE_PLACEHOLDER|$FULL_IMAGE_NAME:$IMAGE_TAG|g" k8s/deployment.yaml
    - echo "INFO Applying Kubernetes manifests..."
    - kubectl apply -f k8s/deployment.yaml
    - kubectl apply -f k8s/service.yaml
    - echo "INFO Waiting for deployment rollout to complete..."
    - kubectl rollout status deployment/cicd-test-project-deployment --timeout=120s
  needs:
    - publish-image

deploy-dev:
  stage: deploy-dev
  extends: .deploy_template
  environment:
    name: develop
    url: https://dev.your-app.com
  rules:
    - if: '$CI_COMMIT_BRANCH == "develop"'

deploy-release:
  stage: deploy-release
  extends: .deploy_template
  environment:
    name: release
    url: https://staging.your-app.com
  rules:
    - if: '$CI_COMMIT_BRANCH == "release"'

deploy-prod:
  stage: deploy-prod
  extends: .deploy_template
  environment:
    name: prod
    url: https://www.your-app.com
  when: manual
  allow_failure: false
  rules:
    - if: '$CI_COMMIT_BRANCH == "master"'
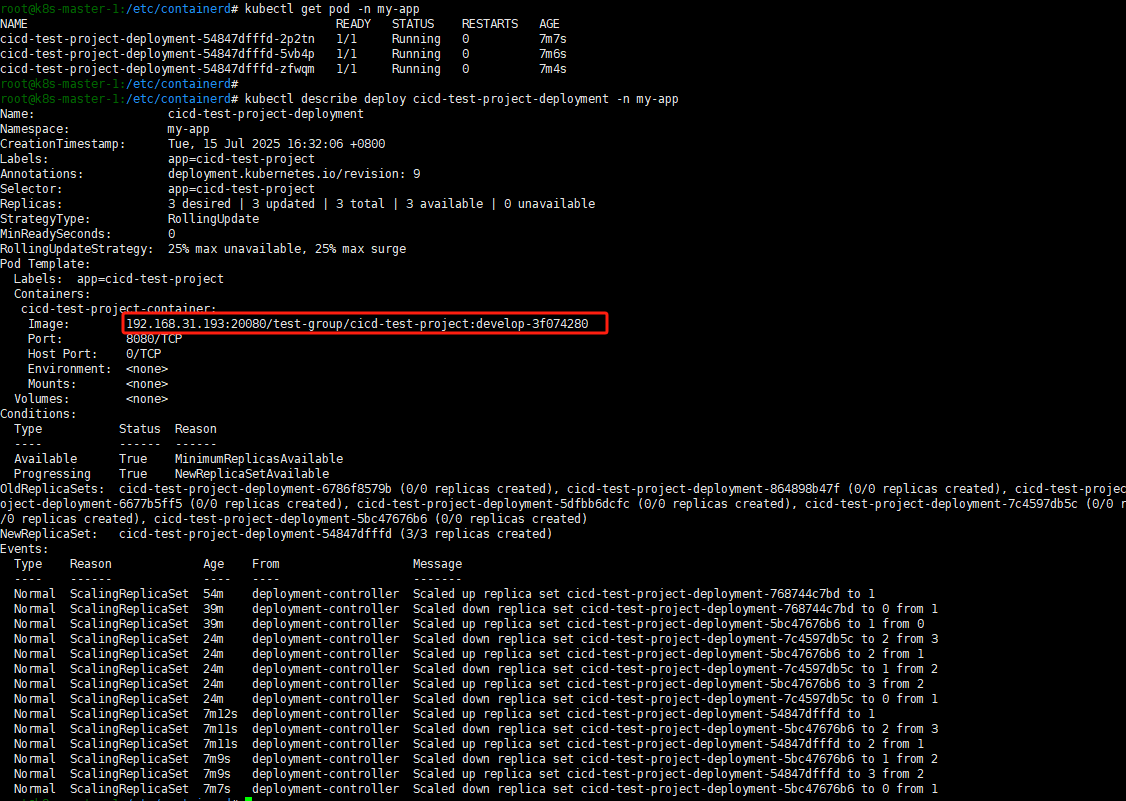
执行一遍完整CI:
4.2.5 镜像代理
既然我们有了harbor,肯定想的是不仅用来存储自己构建的镜像,还想缓存第三方的镜像。比如我们CI的时候用到了maven:3.9.6-eclipse-temurin-21,Dockerfile用到了eclipse-temurin:21-jre-alpine。理论上我们配置了gitlab-runner的镜像拉取策略是pull_policy = "if-not-present",宿主机只需要拉取一次镜像存到本地后续无需再拉取。但假设我们清理了宿主机上的镜像或Gitlab从宿主机上做了迁移,亦或别的平台也想用这些镜像,这时候我们本地缓存的镜像就失效了,还得重新拉取。但我们知道国内访问dockrhub等官方镜像源有些困难,因此一个比较好的方案是使用harbor做镜像代理,缓存我们需要的第三方镜像,CI或Dockerfile直接去harbor中拉取这些镜像即可。与nexus类似,如果本地存储的有镜像,直接将镜像返回给请求源,如果本地没有镜像则去代理源去下载。
首先我们点击harbor的系统管理=> 仓库管理 => 新建目标,创建一个代理,这里我选择的是(注国内无法访问,需自己在harbor的配置中设置http_proxy和https_proxy)。
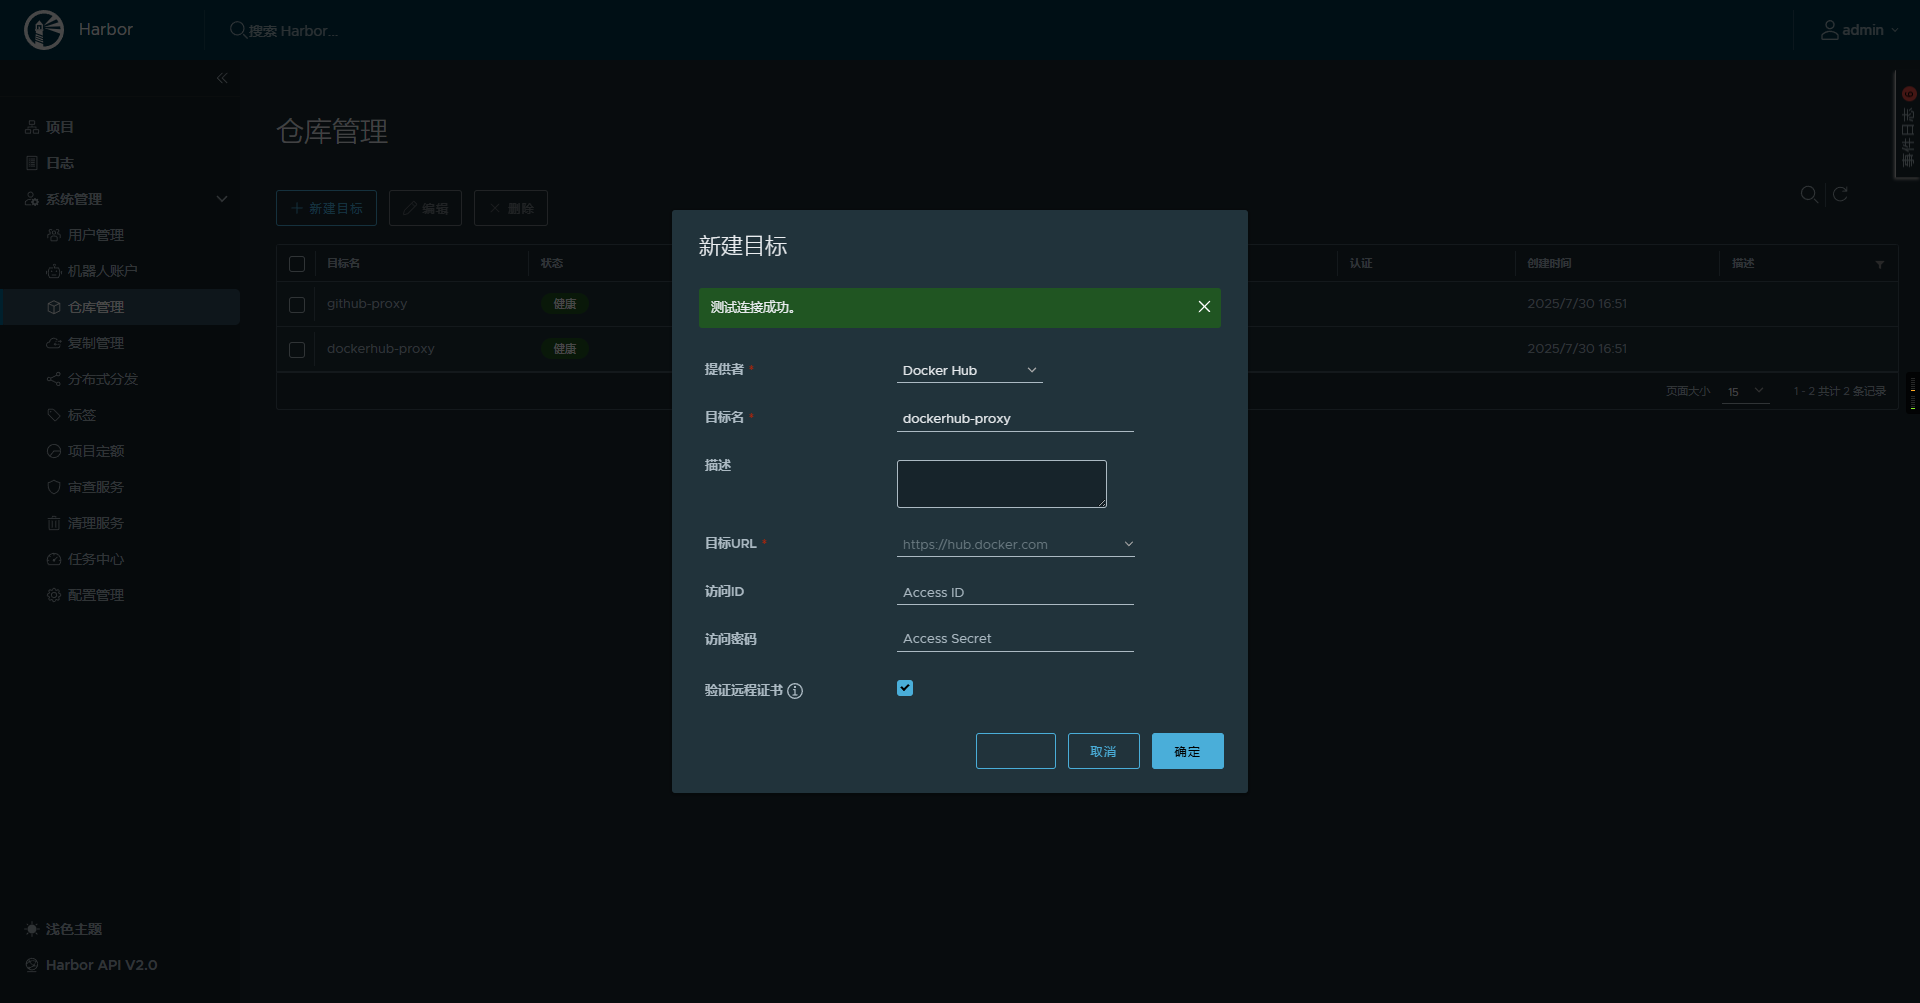
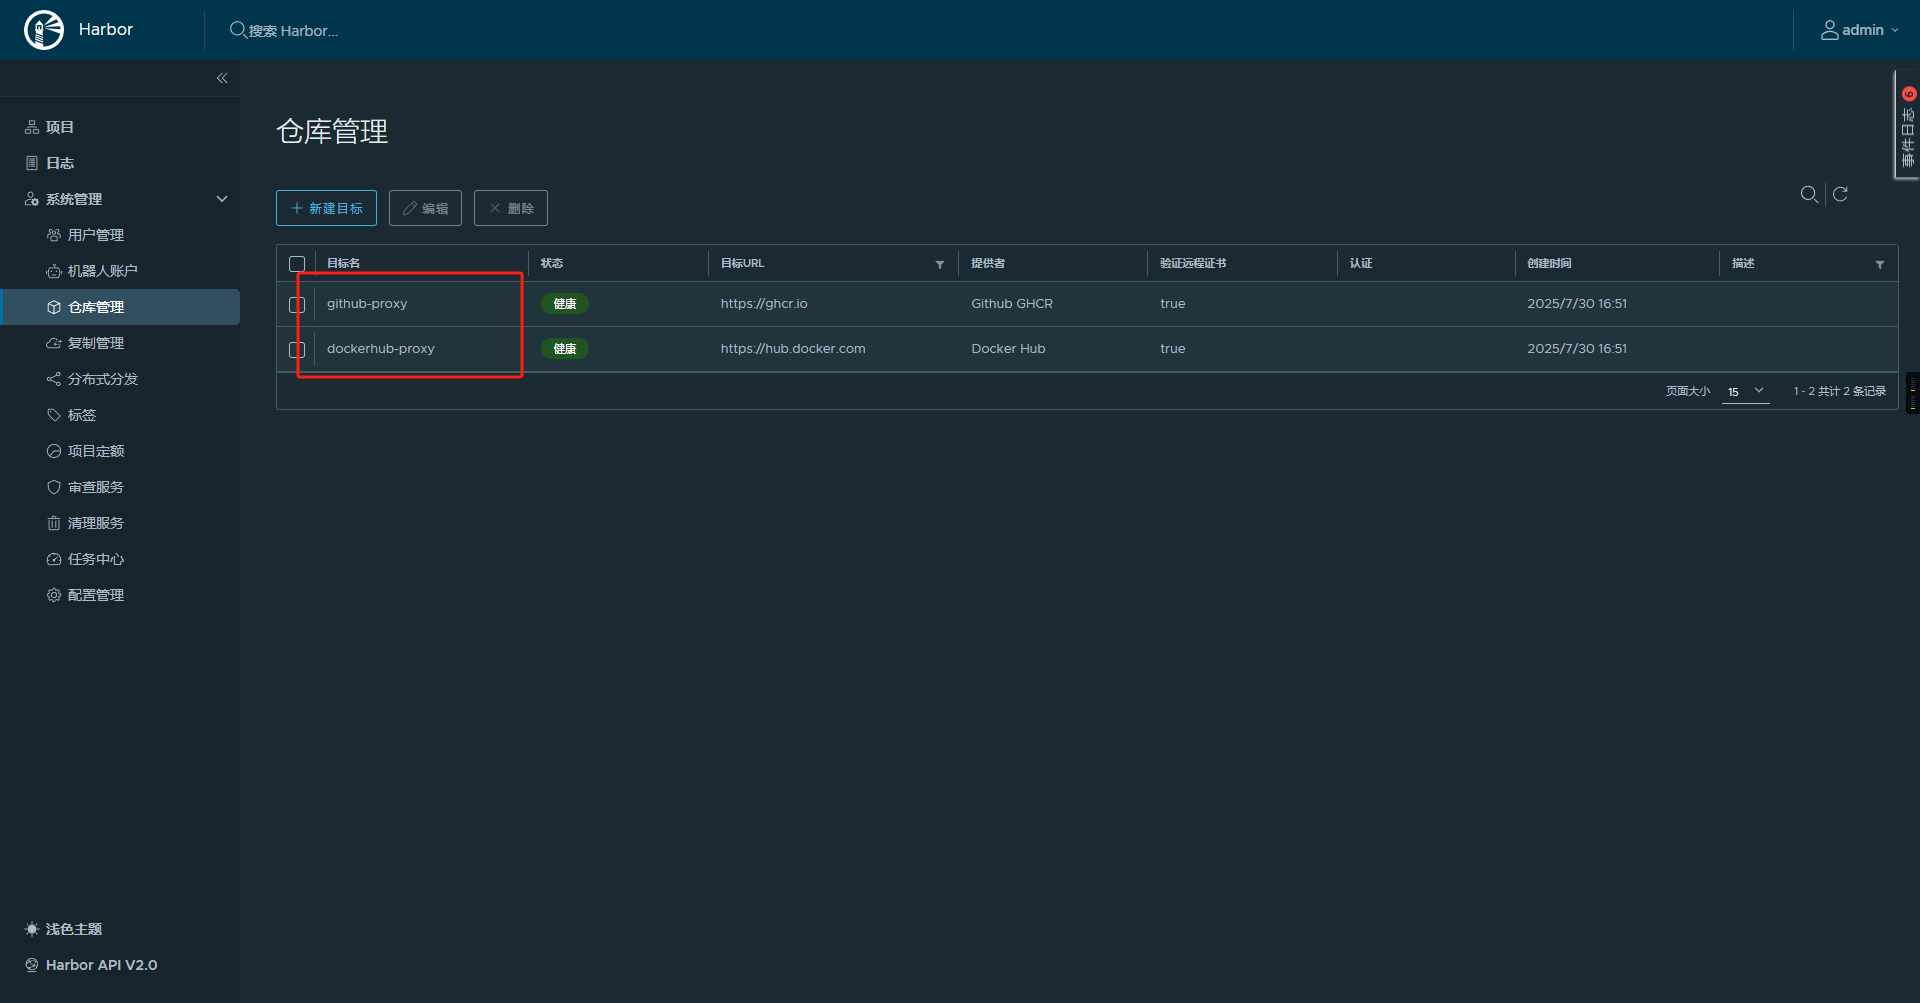
配置好代理镜像源后我们新建一个项目,我这里命名为docker-proxy并开启镜像代理,选择我们刚才建的dockerhub-proxy
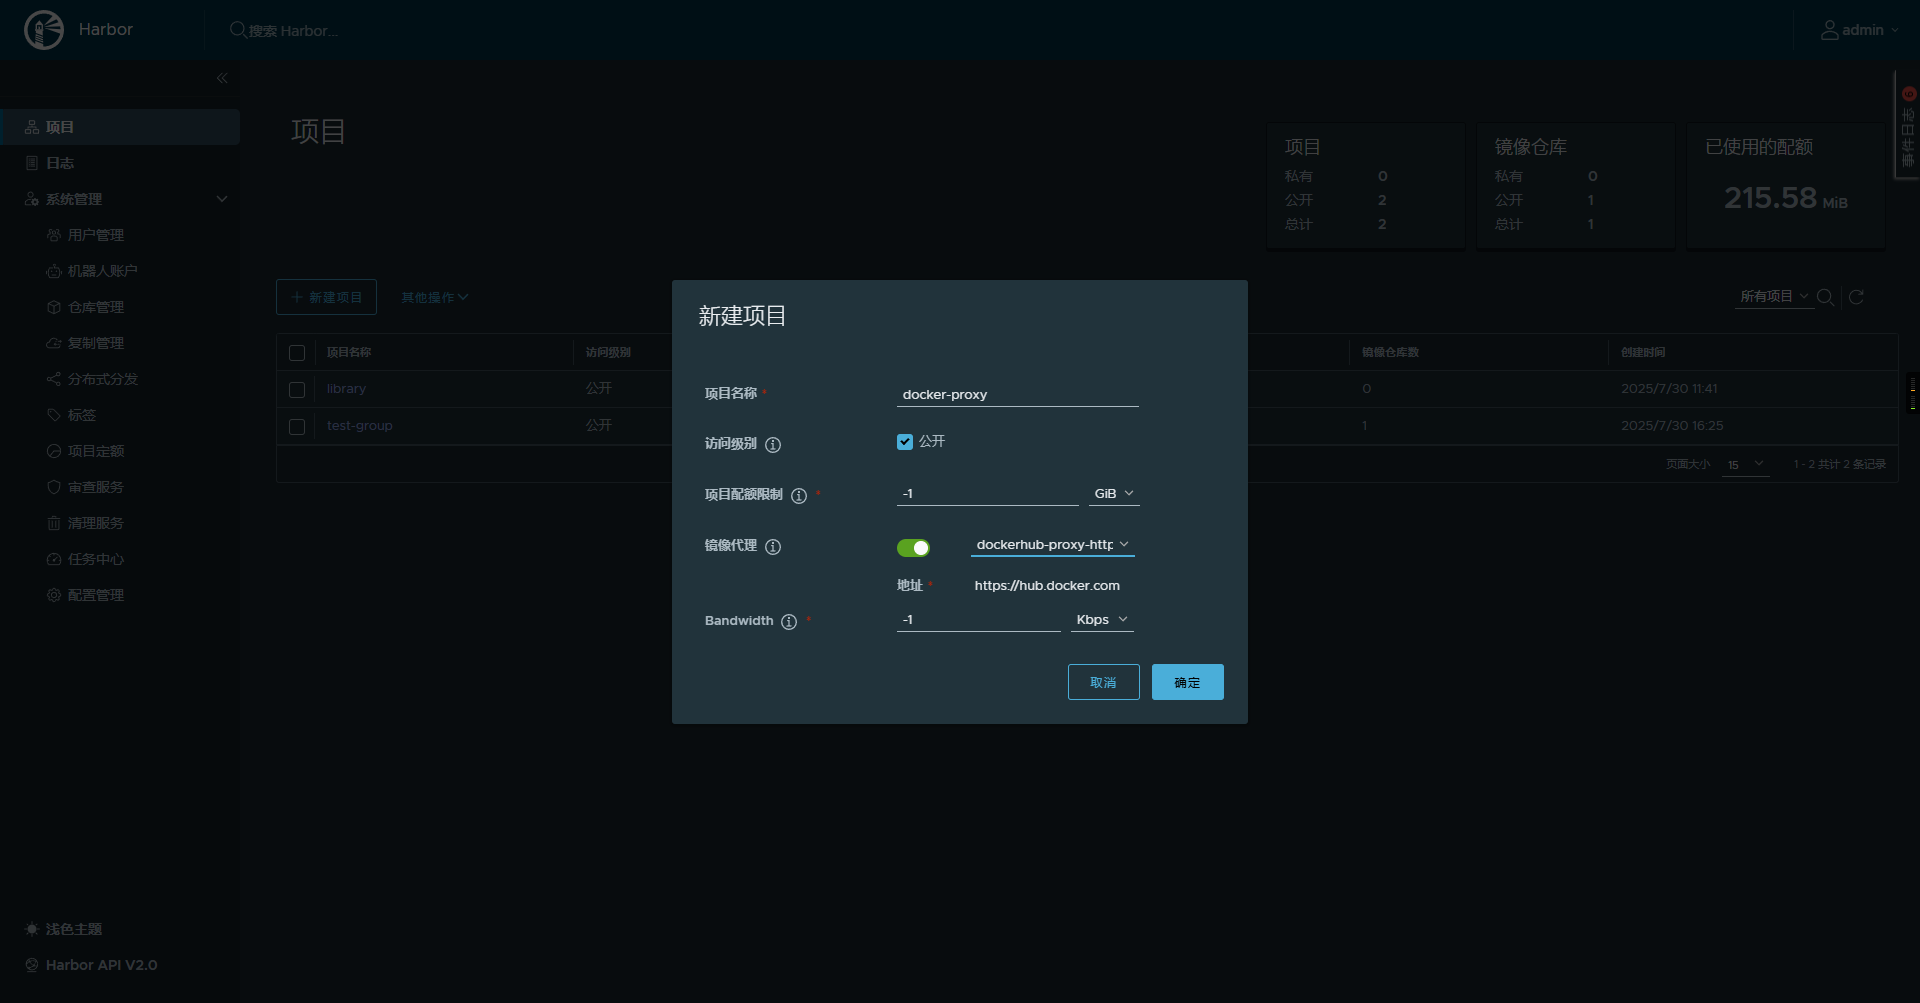
修改我们的.gitlab-ci.yaml文件以及修改Dockerfile:
default:
  tags:
    - linux
    - docker

variables:
  IMAGE_TAG: $CI_COMMIT_REF_SLUG-$CI_COMMIT_SHORT_SHA

.maven_defaults:
  # 主要改动,修改镜像源
  image: 192.168.31.193:20080/docker-proxy/maven:3.9.6-eclipse-temurin-21

.kubectl_defaults:
  image:
    # 主要改动,修改镜像源
    name: 192.168.31.193:20080/docker-proxy/bitnami/kubectl:latest
    entrypoint: [""]

.prepare_image_name: &prepare_image_name
  - export HARBOR_HOST_WITH_PORT=$(echo $HARBOR_URL | sed -E 's|https?://||; s|/+$||')
  - export FULL_IMAGE_NAME="$HARBOR_HOST_WITH_PORT/$HARBOR_PROJECT/$CI_PROJECT_NAME"
stages:
  - build
  - test-and-analyze
  - publish
  - deploy-dev
  - deploy-release
  - deploy-prod

# ==============================================================================
# STAGE: build - Compiles, runs unit tests, and packages the application.
# ==============================================================================
build-and-test:
  stage: build
  extends: .maven_defaults
  script:
    - echo "INFO [Stage build] Compiling, running unit tests, and packaging..."
    - mvn -s .mvn/settings.xml verify
  artifacts:
    paths:
      - target/
    expire_in: 1 hour
  rules:
    - if: '$CI_PIPELINE_SOURCE == "push" || $CI_PIPELINE_SOURCE == "merge_request_event"'


# ==============================================================================
# STAGE: test-and-analyze - Performs SonarQube quality gate check.
# ==============================================================================
code-quality-scan:
  stage: test-and-analyze
  extends: .maven_defaults
  variables:
    GIT_DEPTH: "0"
  script:
    - echo "INFO [Stage test-and-analyze] Running SonarQube analysis via automatic integration..."
    - >-
      mvn -s .mvn/settings.xml verify sonar:sonar
      -Dsonar.projectKey=test-group_cicd-test-project_AZgXyvpJjZI_rh9cYAvb
      -Dsonar.qualitygate.wait=true
      -Dsonar.qualitygate.timeout=300
  needs:
    - job: build-and-test
      artifacts: true
  allow_failure: true
  rules:
    - if: '$CI_COMMIT_BRANCH == "develop" || $CI_COMMIT_BRANCH == "release" || $CI_COMMIT_BRANCH == "master"'
    - if: '$CI_PIPELINE_SOURCE == "merge_request_event"'


# ==============================================================================
# STAGE: publish - Builds and pushes a Docker image to the registry.
# ==============================================================================
publish-image:
  stage: publish
  # 主要改动,修改镜像源
  image: 192.168.31.193:20080/docker-proxy/docker:latest
  before_script:
    - *prepare_image_name
  script:
    - echo "INFO [Stage publish] Logging into Harbor $HARBOR_URL"
    - echo "$HARBOR_PASSWORD" | docker login -u "$HARBOR_USERNAME" --password-stdin $HARBOR_URL
    - echo "INFO Building Docker image with name $FULL_IMAGE_NAME:$IMAGE_TAG"
    - docker build -t "$FULL_IMAGE_NAME:$IMAGE_TAG" .
    - echo "INFO Pushing Docker image $FULL_IMAGE_NAME:$IMAGE_TAG to Harbor"
    - docker push "$FULL_IMAGE_NAME:$IMAGE_TAG"
  needs:
    - job: code-quality-scan
      artifacts: false
    - job: build-and-test
      artifacts: true
  rules:
    - if: '$CI_COMMIT_BRANCH == "develop" || $CI_COMMIT_BRANCH == "release" || $CI_COMMIT_BRANCH == "master"'


# ==============================================================================
# STAGE: deploy-*
# ==============================================================================
.deploy_template:
  extends: .kubectl_defaults
  before_script:
    - *prepare_image_name
  script:
    - echo "INFO Deploying image $FULL_IMAGE_NAME:$IMAGE_TAG to $CI_ENVIRONMENT_NAME environment..."
    - export KUBECONFIG=$KUBE_CONFIG
    - sed -i "s|IMAGE_PLACEHOLDER|$FULL_IMAGE_NAME:$IMAGE_TAG|g" k8s/deployment.yaml
    - echo "INFO Applying Kubernetes manifests..."
    - kubectl apply -f k8s/deployment.yaml
    - kubectl apply -f k8s/service.yaml
    - echo "INFO Waiting for deployment rollout to complete..."
    - kubectl rollout status deployment/cicd-test-project-deployment --timeout=120s
  needs:
    - publish-image

deploy-dev:
  stage: deploy-dev
  extends: .deploy_template
  environment:
    name: develop
    url: https://dev.your-app.com
  rules:
    - if: '$CI_COMMIT_BRANCH == "develop"'

deploy-release:
  stage: deploy-release
  extends: .deploy_template
  environment:
    name: release
    url: https://staging.your-app.com
  rules:
    - if: '$CI_COMMIT_BRANCH == "release"'

deploy-prod:
  stage: deploy-prod
  extends: .deploy_template
  environment:
    name: prod
    url: https://www.your-app.com
  when: manual
  allow_failure: false
  rules:
    - if: '$CI_COMMIT_BRANCH == "master"'
# 主要改动,修改镜像源
FROM 192.168.31.193:20080/docker-proxy/eclipse-temurin:21-jre-alpine
# 设置工作目录
WORKDIR /app
# 从CI/CD工作区拷贝已经由'build-job'构建好的JAR文件
# 'build-job'的产物(target/目录)在'publish-job'执行时会被自动下载到当前目录
COPY target/*.jar app.jar
# 暴露Spring Boot应用程序的默认端口
EXPOSE 8080
# 容器启动时执行的命令
# 使用exec form (json数组格式),这是容器化应用的最佳实践
ENTRYPOINT ["java", "-jar", "app.jar"]4.3 分层打包
分层打包主要是减少镜像的体积,适应云原生的发展。
举个例子:我们现在项目cicd-test-project在测试环境已经部署了v1版本,发现有个bug,于是修改一行代码重新部署。但按照之前的打包和Dockerfile,我们其实是将整个项目先打成jar包,再通过java -jar启动,而我们的jar包是fat jar里面包含了三方依赖和我们自己的代码,三方依赖的改动基本很小,而我们自己代码的改动就比较频繁。因此SpringBoot在2.3后通过分层打包,将三方依赖和我们的代码分离,再通过Dockerfile分层构建,就可以复用三层依赖那一层,基本上一个不同版本的镜像只占用我们自己写的代码那一部分,可能仅有不到10MB。
以cicid-test-project为例:

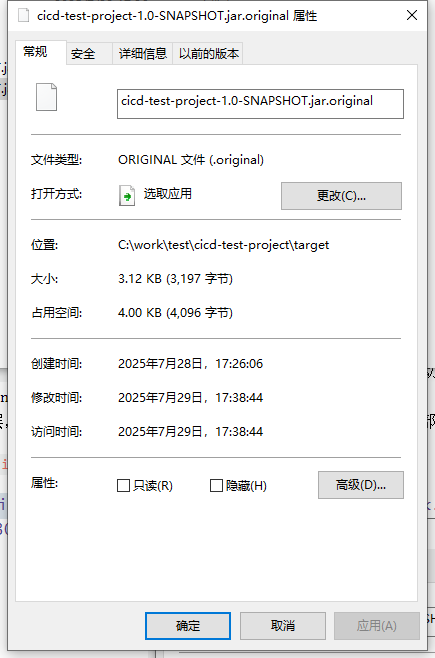
整个fat jar有50多MB,但我们的代码本身只有4KB。
首先修改pom.xml,开启分层打包:
<plugin>
    <groupId>org.springframework.boot</groupId>
    <artifactId>spring-boot-maven-plugin</artifactId>
    <configuration>
        <layers>
            <enabled>true</enabled>
        </layers>
    </configuration>
</plugin>
修改Dockerfile,分层构建
# 一阶段提取
FROM 192.168.31.193:20080/docker-proxy/eclipse-temurin:21-jre-alpine AS extractor

WORKDIR workspace

ARG JAR_FILE=target/*.jar

COPY ${JAR_FILE} application.jar
# 运行Spring Boot的layertools来提取所有层到独立的目录中
# 这会创建 common-dependencies, project-dependencies, spring-boot-loader, application 等目录
RUN java -Djarmode=layertools -jar application.jar extract


# 二阶段构建
FROM 192.168.31.193:20080/docker-proxy/eclipse-temurin:21-jre-alpine
# 设置工作目录
WORKDIR /app

# 关键步骤:按稳定性从高到低的顺序,逐层复制文件。
# 每一个COPY指令都会创建一个新的Docker镜像层。
# Docker会缓存这些层,如果层的内容没有变化,构建时会直接使用缓存。
COPY --from=extractor /workspace/dependencies/ ./

COPY --from=extractor /workspace/spring-boot-loader/ ./

COPY --from=extractor /workspace/snapshot-dependencies/ ./

COPY --from=extractor /workspace/application/ ./

# 暴露Spring Boot应用程序的默认端口
EXPOSE 8080

# Spring Boot分层应用需要使用 JarLauncher 来启动
ENTRYPOINT ["java", "org.springframework.boot.loader.launch.JarLauncher"]
这里有一点特殊:
笔者目前用的是SpringBoot3.5,分层后启动路径在org.springframework.boot.loader.launch.JarLauncher,如果是SpringBoot2.x,启动路径,是在org.springframework.boot.loader.JarLauncher
我们修改自己的代码,将return hello world改为return hello cicd
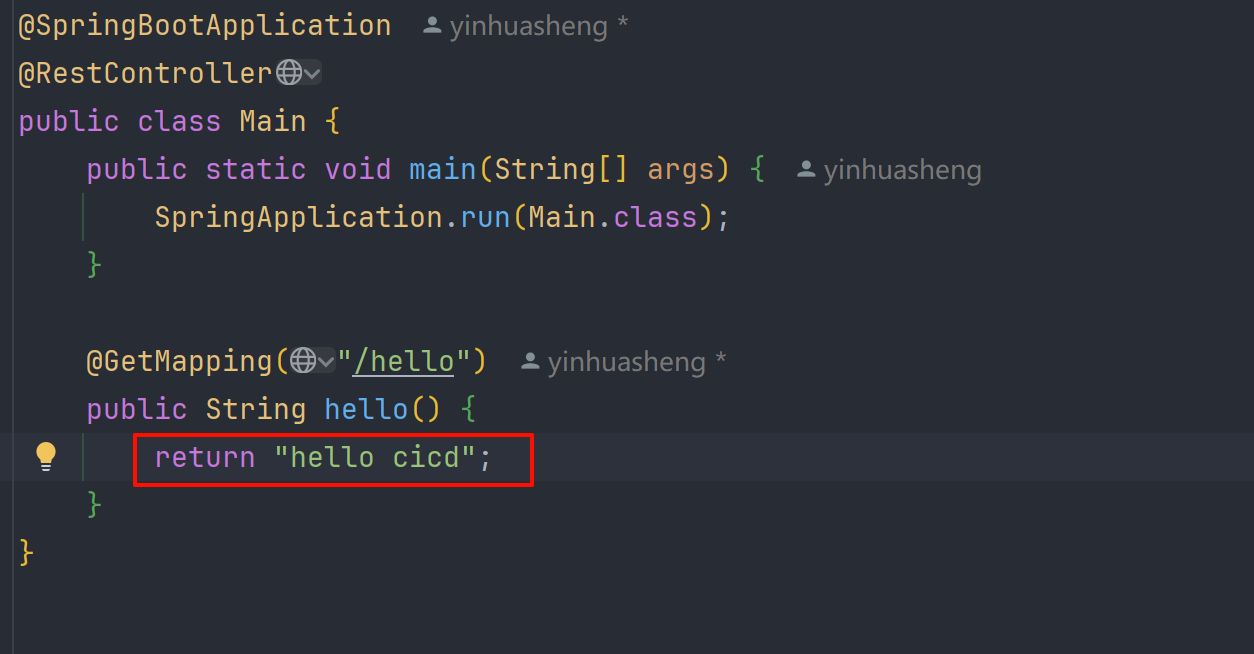
重新部署打包:

可以看到前两个镜像共享大小261.5MB,而我们当前最新的镜像仅额外占用8.263KB。
分层打包带来的收益是非常高的,一方面可以减少镜像体积,加快镜像的构建,提高镜像分发速率。另一方面分层可以减少我们服务器的磁盘使用。对于长期测试的环境,分层要比不分层磁盘占用至少可以减少90%。这里的服务器包括gitlab CI运行的宿主机、harbor存储空间、运行镜像的k8s节点等。除此以外,如果公司微服务较多,可以在分层打包的基础上提取一些公共依赖层,这些层不仅复用减少磁盘占用,还可以利用COW减少内存的占用。
5. CD优化
5.1 ingress
之前我们将环境分为了开发、预发布和生产环境,有时候这些环境属于不同的k8s集群,我们直接从不同环境拿KUBE_CONFIG设置进gitlab即可。但更多的时候企业仅会使用一或少数几个k8s集群,然后通过namespace来隔离不同环境。但我们知道项目cicd-test-project 的service是nodePort类型,如果多个环境的服务都部署在同一个k8s集群会存在端口冲突问题,这时候就需要引入网关层。
常见的网关是ingress和istio,但istio除网关外还包含了服务治理,流量监控,日志追踪等功能,更为复杂,我们这里采用ingress。
ingress本质上就是个nginx 7层转发,通过访问不同的url转发到后端不同的service上,而我们后端的service只需要配置为ClusterIp类型即可。
wget https://raw.githubusercontent.com/kubernetes/ingress-nginx/controller-v1.12.4/deploy/static/provider/baremetal/deploy.yaml修改deploy.yml:分别在Deployment部分增加replicas:3,多节点部署,保证高可用;在Service部分增加nodePort为80和443,显示指明映射端口
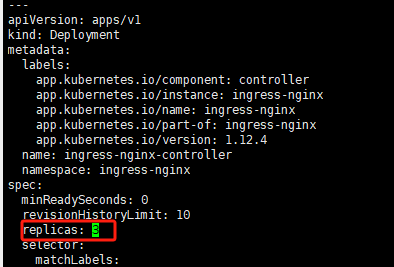
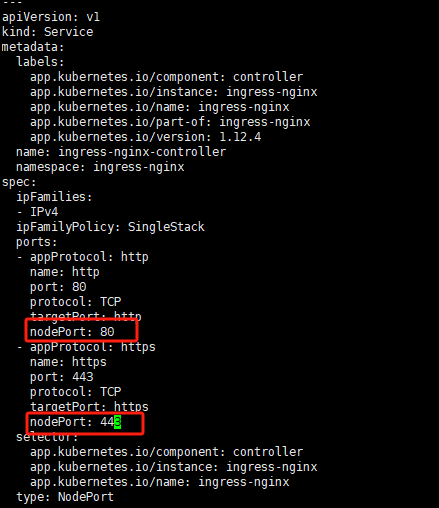
默认情况下k8s nodePort只允许是30000-32767,不支持我们上面写的80和443,因此修改三个k8s节点的kube-apiserver.yaml
vim /etc/kubernetes/manifests/kube-apiserver.yaml找到spec.containers[0].command,添加一行新的参数:--service-node-port-range=1-65535
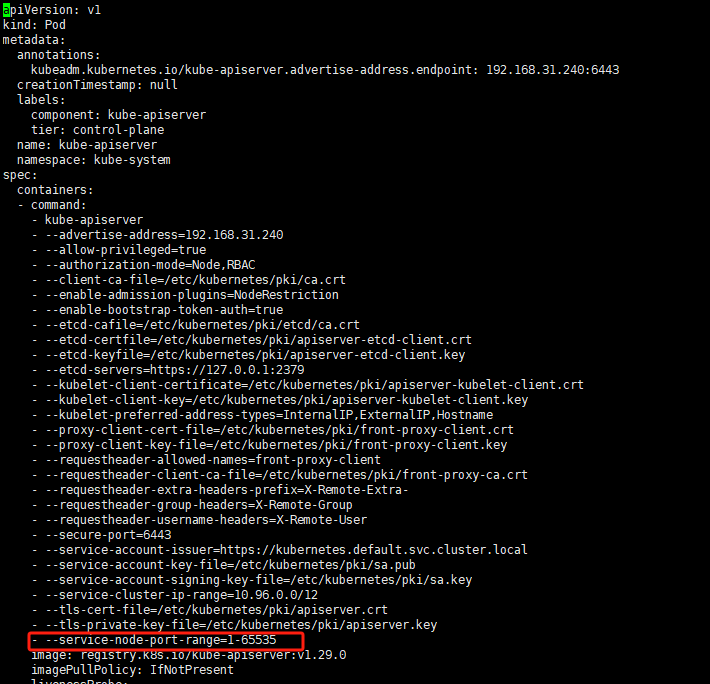
然后执行
kubectl apply -f deploy.yaml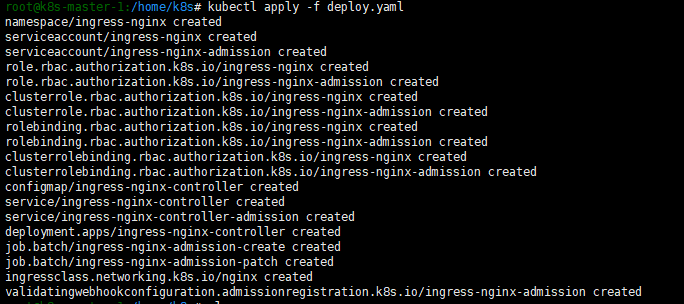
通过
kubectl get pod -n ingress-nginx
kubectl get service -n ingress-nginx
查看ingress是否启动正常

5.2 修改CI
首先修改./k8s/service.yaml,将NodePort类型改为ClusterIp
apiVersion: v1
kind: Service
metadata:
  name: cicd-test-project-service
spec:
  type: ClusterIP
  selector:
    app: cicd-test-project # 将所有流量转发给带有这个标签的Pod
  ports:
    - protocol: TCP
      port: 80
      targetPort: 8080
其次修改新增文件./k8s/ingress.yaml:
# k8s/ingress.yaml
apiVersion: networking.k8s.io/v1
kind: Ingress
metadata:
  # 名称将由CI/CD动态设置
  name: cicd-test-project-ingress
spec:
  ingressClassName: nginx
  rules:
    - host: "HOST_PLACEHOLDER" # 主机名占位符
      http:
        paths:
          - path: /
            pathType: Prefix
            backend:
              service:
                name: cicd-test-project-service
                port:
number: 80然后修改我们的.gitlab-ci.yaml
# ==============================================================================
# 全局默认设置 (Global Defaults)
# ==============================================================================
default:
  tags:
    - linux
    - docker

variables:
  IMAGE_TAG: $CI_COMMIT_REF_SLUG-$CI_COMMIT_SHORT_SHA

.maven_defaults:
  image: 192.168.31.193:20080/docker-proxy/maven:3.9.6-eclipse-temurin-21

.kubectl_defaults:
  image:
    name: 192.168.31.193:20080/docker-proxy/bitnami/kubectl:latest
    entrypoint: [""]

.prepare_image_name: &prepare_image_name
  - export HARBOR_HOST_WITH_PORT=$(echo $HARBOR_URL | sed -E 's|https?://||; s|/+$||')
  - export FULL_IMAGE_NAME="$HARBOR_HOST_WITH_PORT/$HARBOR_PROJECT/$CI_PROJECT_NAME"


stages:
  - build
  - test-and-analyze
  - publish
  - deploy-dev
  - deploy-release
  - deploy-prod

# ==============================================================================
# STAGE: build - Compiles, runs unit tests, and packages the application.
# ==============================================================================
build-and-test:
  stage: build
  extends: .maven_defaults
  script:
    - echo "INFO [Stage build] Compiling, running unit tests, and packaging..."
    - mvn -s .mvn/settings.xml verify
  artifacts:
    paths:
      - target/
    expire_in: 1 hour
  rules:
    - if: '$CI_PIPELINE_SOURCE == "push" || $CI_PIPELINE_SOURCE == "merge_request_event"'


# ==============================================================================
# STAGE: test-and-analyze - Performs SonarQube quality gate check.
# ==============================================================================
code-quality-scan:
  stage: test-and-analyze
  extends: .maven_defaults
  variables:
    GIT_DEPTH: "0"
  script:
    - echo "INFO [Stage test-and-analyze] Running SonarQube analysis via automatic integration..."
    - >-
      mvn -s .mvn/settings.xml verify sonar:sonar
      -Dsonar.projectKey=test-group_cicd-test-project_AZgXyvpJjZI_rh9cYAvb
      -Dsonar.qualitygate.wait=true
      -Dsonar.qualitygate.timeout=300
  needs:
    - job: build-and-test
      artifacts: true
  allow_failure: true
  rules:
    - if: '$CI_COMMIT_BRANCH == "develop" || $CI_COMMIT_BRANCH == "release" || $CI_COMMIT_BRANCH == "master"'
    - if: '$CI_PIPELINE_SOURCE == "merge_request_event"'


# ==============================================================================
# STAGE: publish - Builds and pushes a Docker image to the registry.
# ==============================================================================
publish-image:
  stage: publish
  image: 192.168.31.193:20080/docker-proxy/docker:latest
  before_script:
    - *prepare_image_name
  script:
    - echo "INFO [Stage publish] Logging into Harbor $HARBOR_URL"
    - echo "$HARBOR_PASSWORD" | docker login -u "$HARBOR_USERNAME" --password-stdin $HARBOR_URL
    - echo "INFO Building Docker image with name $FULL_IMAGE_NAME:$IMAGE_TAG"
    - docker build -t "$FULL_IMAGE_NAME:$IMAGE_TAG" .
    - echo "INFO Pushing Docker image $FULL_IMAGE_NAME:$IMAGE_TAG to Harbor"
    - docker push "$FULL_IMAGE_NAME:$IMAGE_TAG"
  needs:
    - job: code-quality-scan
      artifacts: false
    - job: build-and-test
      artifacts: true
  rules:
    - if: '$CI_COMMIT_BRANCH == "develop" || $CI_COMMIT_BRANCH == "release" || $CI_COMMIT_BRANCH == "master"'


# ==============================================================================
# STAGE: deploy-*
# ==============================================================================
.deploy_template:
  extends: .kubectl_defaults
  variables:
    # 预定义变量,由具体的deploy-job来覆盖
    K8S_NAMESPACE: ""
    APP_HOST: ""
  before_script:
    - *prepare_image_name
    - if [ -z "$K8S_NAMESPACE" ]; then echo "Error=> K8S_NAMESPACE is not set."; exit 1; fi
    - if [ -z "$APP_HOST" ]; then echo "Error=> APP_HOST is not set."; exit 1; fi
  script:
    - echo "INFO Deploying image $FULL_IMAGE_NAME:$IMAGE_TAG to namespace '$K8S_NAMESPACE' with host '$APP_HOST'..."
    - export KUBECONFIG=$KUBE_CONFIG
    # --- 动态修改YAML文件 ---
    - sed -i "s|IMAGE_PLACEHOLDER|$FULL_IMAGE_NAME:$IMAGE_TAG|g" k8s/deployment.yaml
    - sed -i "s|HOST_PLACEHOLDER|$APP_HOST|g" k8s/ingress.yaml

    # 执行k8s到具体的namespace
    - echo "INFO Applying Kubernetes manifests..."
    - kubectl create namespace $K8S_NAMESPACE || true
    - kubectl apply -f k8s/deployment.yaml --namespace $K8S_NAMESPACE
    - kubectl apply -f k8s/service.yaml --namespace $K8S_NAMESPACE
    - kubectl apply -f k8s/ingress.yaml --namespace $K8S_NAMESPACE
    # 监控结果
    - echo "INFO Waiting for deployment rollout to complete..."
    - kubectl rollout status deployment/cicd-test-project-deployment --namespace $K8S_NAMESPACE --timeout=120s
  needs:
    - publish-image

deploy-dev:
  stage: deploy-dev
  extends: .deploy_template
  variables:
    # 【新增】为开发环境注入特定的命名空间和域名
    K8S_NAMESPACE: develop
    APP_HOST: dev.cicd-test.com
  environment:
    name: develop
    url: http://dev.cicd-test.com
  rules:
    - if: '$CI_COMMIT_BRANCH == "develop"'

deploy-release:
  stage: deploy-release
  extends: .deploy_template
  variables:
    # 【新增】为预发布环境注入特定的命名空间和域名
    K8S_NAMESPACE: release
    APP_HOST: release.cicd-test.com
  environment:
    name: release
    url: http://release.cicd-test.com
  rules:
    - if: '$CI_COMMIT_BRANCH == "release"'

deploy-prod:
  stage: deploy-prod
  extends: .deploy_template
  variables:
    # 【新增】为生产环境注入特定的命名空间和域名
    K8S_NAMESPACE: prod
    APP_HOST: cicd-test.com
  environment:
    name: prod
    url: http://cicd-test.com
  when: manual
  allow_failure: false
  rules:
- if: '$CI_COMMIT_BRANCH == "master"'下面我们需要重新生成一个k8s凭证,由于之前生成凭证是不同环境用了不同的凭证,但这种在一个k8s集群多namespace下其实不用那么麻烦,因此改为生成一个唯一凭证,并为这个凭证授权我们上述namespace的权限。这样无论是哪个环境用的都是一个凭证,方便维护。
在k8s任一节点下创建脚本setup-gitlab-k8s-auth.sh
#!/bin/bash

# ==============================================================================
#  Kubernetes Auth Setup Script for GitLab CI/CD
#
#  This script provides a one-stop, idempotent solution to configure all
#  necessary Kubernetes resources for a secure CI/CD integration.
#
#  It performs the following actions:
#  1. Creates a centralized Service Account and a permanent token Secret.
#  2. Creates target namespaces for deployment (e.g., develop, release, prod).
#  3. Applies RBAC Roles and RoleBindings to grant the Service Account
#     deployment permissions in each target namespace.
#  4. Generates a universal Kubeconfig file for use in GitLab CI/CD variables.
#
#  Usage: ./setup-gitlab-k8s-auth.sh
# ==============================================================================

# --- Script Configuration ---
# Exit immediately if a command exits with a non-zero status.
set -e
# Treat unset variables as an error when substituting.
set -u
# Pipes fail on the first error.
set -o pipefail

# --- Core Variables ---
# The namespace where the central Service Account and its Secret will reside.
readonly SA_NAMESPACE="gitlab-ci"
# The name of the Service Account for GitLab Runner.
readonly SA_NAME="gitlab-runner-sa"
# The name of the Secret that holds the permanent token.
readonly SECRET_NAME="gitlab-runner-sa-secret"
# A list of target namespaces where applications will be deployed.
# You can easily add or remove environments here, e.g., ("develop" "qa" "staging" "prod")
readonly TARGET_NAMESPACES=("develop" "release" "prod")
# The name for the cluster in the generated Kubeconfig.
readonly CLUSTER_NAME="default-cluster"

# --- Helper Functions ---
# Prints a formatted info message.
info() {
    echo -e "\033[34m[INFO]\033[0m $1"
}

# Prints a formatted success message.
success() {
    echo -e "\033[32m[SUCCESS]\033[0m $1"
}

# Prints a formatted error message and exits.
error_exit() {
    echo -e "\033[31m[ERROR]\033[0m $1" >&2
    exit 1
}

# --- Main Logic ---

# Step 1: Create the central Service Account and its permanent token Secret.
# This part is idempotent because `kubectl apply` will only create if it doesn't exist,
# or update if it does.
info "Step 1: Ensuring central Service Account and Secret exist in '${SA_NAMESPACE}' namespace..."
cat <<EOF | kubectl apply -f -
apiVersion: v1
kind: Namespace
metadata:
  name: ${SA_NAMESPACE}
---
apiVersion: v1
kind: ServiceAccount
metadata:
  name: ${SA_NAME}
  namespace: ${SA_NAMESPACE}
---
apiVersion: v1
kind: Secret
metadata:
  name: ${SECRET_NAME}
  namespace: ${SA_NAMESPACE}
  annotations:
    kubernetes.io/service-account.name: ${SA_NAME}
type: kubernetes.io/service-account-token
EOF
success "Central Service Account and Secret are configured."

# Step 2: Apply RBAC permissions to all target namespaces.
info "Step 2: Applying RBAC Roles and RoleBindings to target namespaces..."
for ns in "${TARGET_NAMESPACES[@]}"; do
    info "  - Processing namespace: ${ns}"
    # The --create-namespace flag makes this idempotent.
    kubectl create namespace "${ns}" --dry-run=client -o yaml | kubectl apply -f -
    cat <<EOF | kubectl apply --namespace "${ns}" -f -
apiVersion: rbac.authorization.k8s.io/v1
kind: Role
metadata:
  name: app-deployer-role
rules:
- apiGroups: ["", "apps", "networking.k8s.io"]
  resources: ["deployments", "services", "ingresses", "pods"]
  verbs: ["get", "list", "watch", "create", "update", "patch", "delete"]
---
apiVersion: rbac.authorization.k8s.io/v1
kind: RoleBinding
metadata:
  name: gitlab-ci-rolebinding
subjects:
- kind: ServiceAccount
  name: ${SA_NAME}
  namespace: ${SA_NAMESPACE}
roleRef:
  kind: Role
  name: app-deployer-role
  apiGroup: rbac.authorization.k8s.io
EOF
done
success "RBAC permissions applied to all target namespaces."

# Step 3: Generate the final Kubeconfig.
info "Step 3: Generating the universal Kubeconfig..."
# Fetch cluster connection details.
readonly SERVER_URL=$(kubectl config view --minify -o jsonpath='{.clusters[0].cluster.server}')
readonly CA_DATA=$(kubectl config view --raw --minify -o jsonpath='{.clusters[0].cluster.certificate-authority-data}')
# Fetch the permanent token from the Secret.
readonly TOKEN=$(kubectl get secret "${SECRET_NAME}" --namespace "${SA_NAMESPACE}" -o jsonpath='{.data.token}' | base64 --decode)

if [ -z "$TOKEN" ]; then
    error_exit "Token could not be retrieved. Please check the Secret and RBAC permissions."
fi
success "Kubeconfig generated successfully."

# --- Final Output ---
# Provide clear instructions to the user.
echo
echo -e "\033[32m========================= ACTION REQUIRED =========================\033[0m"
echo "Copy the entire YAML content below and paste it into a GitLab CI/CD variable."
echo
echo "  - GitLab Project: Your project"
echo "  - Variable Key:   \033[33mKUBE_CONFIG\033[0m"
echo "  - Variable Type:  \033[33mFile\033[0m"
echo "  - Environment:    \033[33mAll (*)\033[0m"
echo "  - Flags:          \033[33m[x] Protect variable, [ ] Mask variable\033[0m"
echo -e "\033[32m===================================================================\033[0m"
echo

# Use a Here Document for clean output.
cat <<EOF
apiVersion: v1
kind: Config
clusters:
- name: ${CLUSTER_NAME}
  cluster:
    server: ${SERVER_URL}
    certificate-authority-data: ${CA_DATA}
contexts:
- name: ${CLUSTER_NAME}
  context:
    cluster: ${CLUSTER_NAME}
    user: ${SA_NAME}
current-context: ${CLUSTER_NAME}
users:
- name: ${SA_NAME}
  user:
    token: ${TOKEN}
EOF
chmod +x setup-gitlab-k8s-auth.sh
./setup-gitlab-k8s-auth.sh上述脚本核心内容是:
- 创建一个名为
gitlab-ci的namespace - 生成一个永久的
Token和Secret账户 - 为上述账户授权我们对
develop、release和prod三个namespace的资源权限 - 提取出账户的Token
我们将执行结果贴近gitlab ci的variables,现在所有环境只需要一份KUBE_CONFIG了
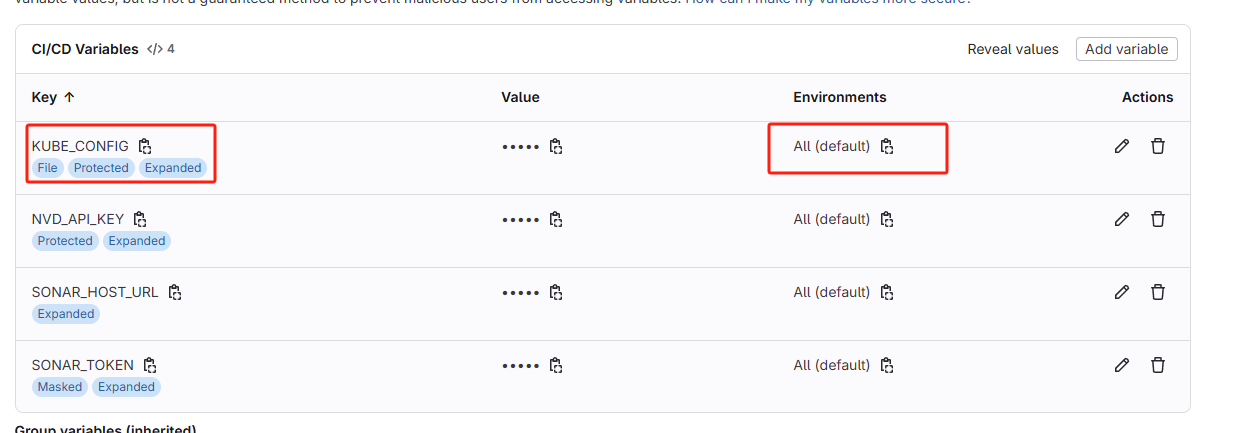
本地新增host,将不同环境域名都指向k8s vip
192.168.31.100 cicd-test.com dev.cicd-test.com release.cicd-test.com部署完服务后,我们就可以通过上述域名访问不同环境的服务了。
5.3 环境变量
现实开发中项目的运行往往依赖很多配置,比如常见的数据库、Redis配置等。以SpringBoot为例,一般自测本地运行的时候我们的配置文件可能是这样:
spring:
  datasource:
    driver-class-name: com.mysql.cj.jdbc.Driver
    url: jdbc:mysql://192.168.31.166:3306/cicd-test?useUnicode=true&useSSL=false&allowPublicKeyRetrieval=true&characterEncoding=utf8&rewriteBatchedStatements=true&serverTimezone=GMT%2B8
    username: root
password: 123456但不同环境数据库的连接不同,常见的开发方式是将这些配置信息放入环境变量,我们从环境变量读取这些配置,这时我们的配置文件就改为:
spring:
  datasource:
    driver-class-name: com.mysql.cj.jdbc.Driver
    url: ${JDBC_URL}
    username: ${DATABASE_USERNAME}
    password: ${DATABASE_PASSWORD}
可以看到我们将从环境变量加载这些配置。
现场运维人员负责环境变量的注入,而环境变量注入我们往往采取k8s的configmap或secret,因此运维人员往往需要维护这样一份文件:
# configmap-prod.yaml
apiVersion: v1
kind: ConfigMap
metadata:
  name: cicd-test-project-config
  namespace: prod
data:
  JDBC_URL: "jdbc:mysql://prod-mysql-service:3306/seed-sync?useUnicode=true&useSSL=false&allowPublicKeyRetrieval=true&characterEncoding=utf8&rewriteBatchedStatements=true&serverTimezone=GMT%2B8"
  DATABASE_USERNAME: "root"

---
# secret-prod.yaml
apiVersion: v1
kind: Secret
metadata:
  name: cicd-test-project-secret
  namespace: prod
type: Opaque
data:
  # Base64
  DATABASE_PASSWORD: "MTIzNDU2"
运维人员在环境一开始执行这份文件,让环境的配置里包含我们需要的信息。
我们还需要修改下k8s的deployment,保证从configmap或secret中加载这些环境变量:
apiVersion: apps/v1
kind: Deployment
metadata:
  name: cicd-test-project-deployment
  labels:
    app: cicd-test-project
spec:
  replicas: 3
  selector:
    matchLabels:
      app: cicd-test-project
  template:
    metadata:
      labels:
        app: cicd-test-project
    spec:
      containers:
        - name: cicd-test-project-container
          image: IMAGE_PLACEHOLDER
          ports:
            - containerPort: 8080
          # 从configmap和secret中读取环境变量
          envFrom:
            - configMapRef:
                name: cicd-test-project-config
            - secretRef:
                name: cicd-test-project-secret
因此实际企业开发过程往往是这样的:
开发人员将所有需要的配置均从环境变量引入;运维人员则负责维护一套环境变量信息。而这个信息就是上述ConfigMap和Secret的那份yaml,同时这份yaml也是被Git管理的。环境部署的时候要先执行配置文件,再执行应用的部署。
6. 总结
我们以一个简单的SpringBoot项目为例,从简到繁,慢慢优化,做到了一套企业级的CICD流程。整个流程如下:
- 项目采用Gitflow为基本的分支管理策略,feature分支push的时候触发打包和单元测试、feature MR到develop的时候触发打包单元测试和代码扫描,校验通过才允许MR,MR到develop分支后,触发develop分支的打包、单元测试、代码扫描和镜像构建与推送以及自动部署到开发环境,其他分支和环境同理
- 集成SonarQube做代码的门禁检测
- 使用nexus做私有maven仓库,加快CI的构建
- 使用harbor做私有镜像仓库,缓存三方镜像与自己服务的镜像(同时还可以做镜像扫描)
- 使用分层打包,适应云原生,减少镜像体积
- 在一套k8s上通过
namespace隔离不同环境 - 使用ingress,通过不同路由来访问不同环境服务
- 通过k8s的ConfigMap和Secret来作为环境变量,服务使用的外部配置直接从环境变量引入
附录1:GitOps
上述CICD无论是CI流水线、k8s deployment、service和ingress还是环境变量(k8s ConfigMap和Secret)我们均采用代码的形式,而非在一些可视化页面勾勾点点,通过UI实现的方式。且这些信息与代码一样均是被Git管理的,这其实就是现今主流的一种Devops最佳实践:GitOps。
相比于上面说的在可视化页面上来勾勾点点实现CI的方式,GitOps至少有如下优点:
- 来源唯一可追溯:无论是代码、代码的CI流水线、代码的部署方式还是代码依赖的环境变量均从单一的Citlab出,且Git记录了每一次变更、变更人、变更时间、以及通过MR进行的变更评审,这种单一来源可以避免不同环境部署错乱问题,Git记录方便出了问题能排查出问题的时间、人员和原因等。
- 自动操作,杜绝手动人为失误: 流程不再依赖人的记忆和手动操作。代码化的配置消除了“点错按钮”、“填错数字”这类低级但后果严重的失误。
- 灾难恢复容易:假设我们的CI工具,如jenkins或gitlab、gitea等发生故障,只能重建,那页面操作那些行为就得重新手动再操作一遍,还得和故障发生前的手动配置完全一模一样。但现在我们所有配置都写在了代码里,不依赖于任何平台,即使CI数据全部丢失完全重建,也对我们没任何影响。
- 一键重建,轻松复制:对于不同的环境或不同的项目,我们仅需要修改文件中的几个小配置即可完整对新项目的复制和新环境的重建。
当然更成熟的GitOps还需要配合一些GitOps工具,如Argo CD,但这对运维人员的要求也会更高,我们上面这些方案基本已经完全够用了。
附录2: k8s集群搭建
k8s集群部署可以分为master-worker节点分开或ha-master两种架构,为合理利用资源我们这里选择ha-master,三台服务器均为k8s master,通过配置一个vip来达到高可用。
2.1 安装k8s
配置主机名和hosts
# 在 192.168.31.240 上
sudo hostnamectl set-hostname k8s-master-1
# 在 192.168.31.66 上
sudo hostnamectl set-hostname k8s-master-2
# 在 192.168.31.97 上
sudo hostnamectl set-hostname k8s-master-3
编辑hosts文件,添加如下内容
192.168.31.240  k8s-master-1
192.168.31.66   k8s-master-2
192.168.31.97   k8s-master-3
禁用swap
sudo swapoff -a
sudo sed -i '/ swap / s/^\(.*\)$/#\1/g' /etc/fstab
root@k8s-master-1:/etc# systemctl --type swap --all UNIT LOAD ACTIVE SUB DESCRIPTION dev-vda3.swap loaded inactive dead Swap Partition LOAD = Reflects whether the unit definition was properly loaded. ACTIVE = The high-level unit activation state, i.e. generalization of SUB. SUB = The low-level unit activation state, values depend on unit type. 1 loaded units listed. To show all installed unit files use 'systemctl list-unit-files'. root@k8s-master-1:/etc# root@k8s-master-1:/etc# systemctl mask dev-vda3.swap Created symlink /etc/systemd/system/dev-vda3.swap → /dev/null.验证:
free -h命令输出中Swap应为0。启用iptables对桥接流量的处理
cat <<EOF | sudo tee /etc/modules-load.d/k8s.conf
overlay
br_netfilter
EOF

sudo modprobe overlay
sudo modprobe br_netfilter

cat <<EOF | sudo tee /etc/sysctl.d/k8s.conf
net.bridge.bridge-nf-call-ip6tables = 1
net.bridge.bridge-nf-call-iptables = 1
net.ipv4.ip_forward = 1
EOF

sudo sysctl --system
验证:
lsmod | grep br_netfilter和sysctl net.ipv4.ip_forward(应为1) 等。安装
k8s组件sudo apt-get install -y apt-transport-https ca-certificates curl gpg sudo mkdir -p /etc/apt/keyrings curl -fsSL https://pkgs.k8s.io/core:/stable:/v1.29/deb/Release.key | sudo gpg --dearmor -o /etc/apt/keyrings/kubernetes-apt-keyring.gpg echo 'deb [signed-by=/etc/apt/keyrings/kubernetes-apt-keyring.gpg] https://pkgs.k8s.io/core:/stable:/v1.29/deb/ /' | sudo tee /etc/apt/sources.list.d/kubernetes.list sudo apt-get update sudo apt-get install -y kubelet kubeadm kubectl sudo apt-mark hold kubelet kubeadm kubectl配置容器运行时
sudo mkdir -p /etc/containerd
containerd config default | sudo tee /etc/containerd/config.toml
sudo sed -i 's/SystemdCgroup = false/SystemdCgroup = true/' /etc/containerd/config.toml
sudo systemctl restart containerd
拉取镜像
# 需要containerd 配置代理
sudo kubeadm config images pull
配置VIP
目前多节点vip通过
keepalived管理安装keepalived
apt-get update
apt-get install -y keepalived
创建检测脚本
cat > /etc/keepalived/check_apiserver.sh << EOF
#!/bin/sh

# 检查本地API服务器
errorExit() {
    echo "*** $*" 1>&2
    exit 1
}

curl --silent --max-time 2 --insecure https://localhost:6443/healthz -o /dev/null || errorExit "Error: API server unreachable"

# 如果连接到API服务器没有问题,则退出时返回状态码0
exit 0
EOF

chmod +x /etc/keepalived/check_apiserver.sh
配置
keepalived.conf,三个节点优先级分别为100、90和80k8s-master-1
cat > /etc/keepalived/keepalived.conf << EOF
global_defs {
    router_id LVS_KUBERNETES
    script_user root
    enable_script_security
}

vrrp_script check_apiserver {
    script "/etc/keepalived/check_apiserver.sh"
    interval 3
    weight -2
    fall 3
    rise 2
}

vrrp_instance VI_1 {
    state MASTER
    interface enp1s0
    virtual_router_id 51
    priority 100
    advert_int 1
    authentication {
        auth_type PASS
        auth_pass kubernetes
    }
    virtual_ipaddress {
        192.168.31.100/24
    }
    track_script {
        check_apiserver
    }
}
EOF
k8s-master-2
cat > /etc/keepalived/keepalived.conf << EOF
global_defs {
    router_id LVS_KUBERNETES
    script_user root
    enable_script_security
}

vrrp_script check_apiserver {
    script "/etc/keepalived/check_apiserver.sh"
    interval 3
    weight -2
    fall 3
    rise 2
}

vrrp_instance VI_1 {
    state BACKUP
    interface enp1s0
    virtual_router_id 51
    priority 90
    nopreempt
    advert_int 1
    authentication {
        auth_type PASS
        auth_pass kubernetes
    }
    virtual_ipaddress {
        192.168.31.100/24
    }
    track_script {
        check_apiserver
    }
}
EOF
k8s-master-3
cat > /etc/keepalived/keepalived.conf << EOF
global_defs {
    router_id LVS_KUBERNETES
    script_user root
    enable_script_security
}

vrrp_script check_apiserver {
    script "/etc/keepalived/check_apiserver.sh"
    interval 3
    weight -2
    fall 3
    rise 2
}

vrrp_instance VI_1 {
    state BACKUP
    interface enp1s0
    virtual_router_id 51
    priority 90
    nopreempt
    advert_int 1
    authentication {
        auth_type PASS
        auth_pass kubernetes
    }
    virtual_ipaddress {
        192.168.31.100/24
    }
    track_script {
        check_apiserver
    }
}
EOF
启动
keepalivedsystemctl enable keepalived systemctl start keepalived systemctl status keepalived初始化第一个控制平面节点(
192.168.31.240)创建
kubeadm-config.yaml文件# 第一部分:InitConfiguration - 定义此节点在'init'过程中的特定行为 apiVersion: kubeadm.k8s.io/v1beta3 kind: InitConfiguration # localAPIEndpoint 定义了本节点API Server广播给其他集群成员的地址 localAPIEndpoint: # advertiseAddress 必须是本节点的物理IP地址 advertiseAddress: 192.168.31.240 bindPort: 6443 # nodeRegistration 定义了本节点注册到集群时的额外信息 nodeRegistration: kubeletExtraArgs: # 确保kubelet的cgroup驱动与容器运行时(containerd)的cgroup驱动一致 cgroup-driver: "systemd" --- # YAML文档分隔符,用于分隔InitConfiguration和ClusterConfiguration # 第二部分:ClusterConfiguration - 定义整个集群范围的共享配置 apiVersion: kubeadm.k8s.io/v1beta3 kind: ClusterConfiguration # 指定您安装的Kubernetes版本 kubernetesVersion: v1.29.0 # controlPlaneEndpoint 是集群控制平面的统一入口,必须设置为VIP地址 controlPlaneEndpoint: "192.168.31.100:6443" # networking 定义了集群的网络参数 networking: # podSubnet 是分配给Pod的IP地址范围,需与CNI插件配置保持一致 # Calico默认使用192.168.0.0/16,但10.244.0.0/16是另一个常用选择 podSubnet: "10.244.0.0/16" # etcd 的配置 etcd: local: # serverCertSANs 和 peerCertSANs 是为etcd的证书添加的备用名称 # 必须包含所有控制平面节点的IP和主机名,以确保etcd成员间通信的TLS验证成功 serverCertSANs: - k8s-master-1 - k8s-master-2 - k8s-master-3 - 192.168.31.240 - 192.168.31.66 - 192.168.31.97 peerCertSANs: - k8s-master-1 - k8s-master-2 - k8s-master-3 - 192.168.31.240 - 192.168.31.66 - 192.168.31.97 # apiServer 的配置 apiServer: # certSANs 是为API Server的证书添加的备用名称(Subject Alternative Names) # 这是一个极其重要的部分,必须包含所有可能用于访问API Server的地址 certSANs: # 1. 必须包含VIP地址 - "192.168.31.100" # 2. 必须包含所有控制平面节点的物理IP地址 - "192.168.31.240" - "192.168.31.66" - "192.168.31.97" # 3. 必须包含所有控制平面节点的主机名 - "k8s-master-1" - "k8s-master-2" - "k8s-master-3" # 4. 包含标准的Kubernetes服务名称和IP - "kubernetes" - "kubernetes.default" - "kubernetes.default.svc" - "kubernetes.default.svc.cluster.local"kubeadm init --config kubeadm-config.yaml --upload-certs这里会打印出一条join指令,用于其他控制平面的加入,我们需要记下来,下面会用到
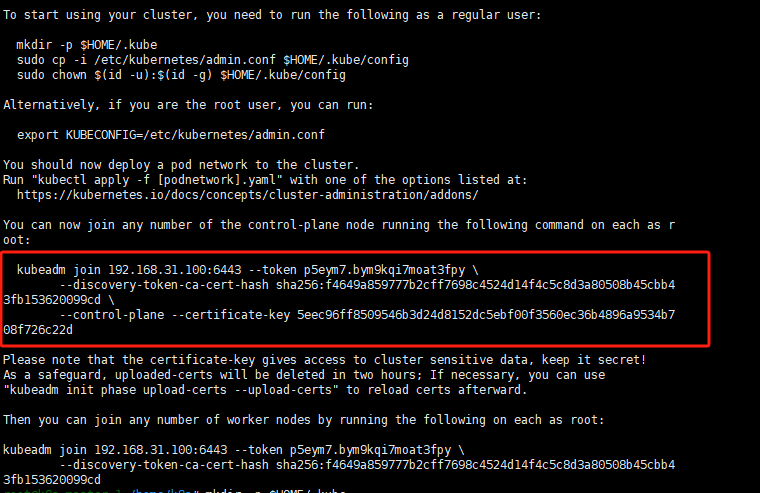
配置
kubectl和安装网络插件上一步控制平面安装完成后会打印出日志让我们配置kubectl和安装网络插件
配置kubectl
mkdir -p $HOME/.kube
sudo cp -i /etc/kubernetes/admin.conf $HOME/.kube/config
sudo chown $(id -u):$(id -g) $HOME/.kube/config
验证
kubectl:kubectl get nodes输出结果将看到
k8s-master-1,状态为NotReady安装Calico网络插件
kubectl apply -f https://raw.githubusercontent.com/projectcalico/calico/v3.28.0/manifests/calico.yaml# 每隔几秒运行一次,直到状态变为Ready watch kubectl get nodes当
k8s-master-1的STATUS从NotReady变为Ready时,按Ctrl+C退出。这通常需要1-3分钟。将其他节点加入到控制平面
将管理VIP的脚本同样拷贝到其他节点,并创建systemd服务来管理
# 在 k8s-master-1 上执行:
scp /usr/local/bin/vip_manager.py root@k8s-master-2:/usr/local/bin/
scp /usr/local/bin/vip_manager.py root@k8s-master-3:/usr/local/bin/
将节点加入集群(第8步中记录的指令)
kubeadm join 192.168.31.100:6443 --token <your_token> \
    --discovery-token-ca-cert-hash sha256:<your_hash> \
    --control-plane --certificate-key <your_cert_key>
mkdir -p $HOME/.kube sudo cp -i /etc/kubernetes/admin.conf $HOME/.kube/config sudo chown $(id -u):$(id -g) $HOME/.kube/config验证安装成功:
root@k8s-master-1:~# kubectl get node
NAME           STATUS   ROLES           AGE     VERSION
k8s-master-1   Ready    control-plane   13h     v1.29.15
k8s-master-2   Ready    control-plane   6m43s   v1.29.15
k8s-master-3   Ready    control-plane   4m15s   v1.29.15
移除
NoSchedule污点为让Master节点也可以部署普通pod,可以将master节点上的
NoSchedule污点移除,也可以让pod容忍NoSchedule污点,我们为简单,直接采取前者方案,移除三个master节点上的NoSchedule污点root@k8s-master-1:~# kubectl describe node k8s-master-1 | grep Taints Taints: <none> root@k8s-master-1:~# kubectl describe node k8s-master-2 | grep Taints Taints: <none> root@k8s-master-1:~# kubectl describe node k8s-master-3 | grep Taints Taints: <none>
2.2 验证k8s
nginx-test.yaml
# ---
# Kubernetes Deployment for NGINX
# This object manages the lifecycle of the NGINX Pods.
# ---
apiVersion: apps/v1
kind: Deployment
metadata:
  # The name of the Deployment. This will be used as a prefix for Pod names.
  name: nginx-deployment
  # Labels applied to the Deployment object itself. Useful for organization.
  labels:
    app: nginx
spec:
  # The desired number of Pod replicas. Setting to 5 increases the likelihood
  # of Pods being scheduled across multiple nodes, including control planes.
  replicas: 5
  # The selector determines which Pods this Deployment manages.
  # It must match the template's labels.
  selector:
    matchLabels:
      app: nginx
  # The template for the Pods that will be created.
  template:
    metadata:
      # Labels applied to each Pod created by this Deployment.
      # The Service will use these labels to find the Pods.
      labels:
        app: nginx
    spec:
      containers:
      - name: nginx-server
        # The container image to use. 'nginx:latest' is a standard, lightweight web server.
        image: nginx:latest
        # The port that the NGINX container will listen on.
        ports:
        - containerPort: 80
          protocol: TCP
      # This toleration allows the Pods to be scheduled on control-plane nodes
      # even if the NoSchedule taint is present. It's a robust practice.
      tolerations:
      - key: "node-role.kubernetes.io/control-plane"
        operator: "Exists"
        effect: "NoSchedule"

---
# ---
# Kubernetes Service of type NodePort for NGINX
# This object exposes the NGINX Deployment to traffic from outside the cluster.
# ---
apiVersion: v1
kind: Service
metadata:
  # The name of the Service.
  name: nginx-service
spec:
  # Type: NodePort makes the service accessible on a static port on each node's IP.
  type: NodePort
  # This selector must match the labels of the Pods to which traffic should be forwarded.
  selector:
    app: nginx
  # This section defines the port mapping for the service.
  ports:
    # A single port definition for this service.
    - name: http # Naming the port is a good practice.
      protocol: TCP
      # The port on the Service's own ClusterIP.
      port: 80
      # The port on the backend Pods (the containerPort).
      targetPort: 80
      # The static port opened on each cluster node.
      nodePort: 30080
如上创建了5个副本的nginx
kubectl apply -f nginx-test.yaml
root@k8s-master-1:/home/k8s# kubectl get pod -o wide | grep nginx
nginx-deployment-7668495448-6tk4l   1/1     Running   0          3m16s   10.244.182.67   k8s-master-2   <none>           <none>
nginx-deployment-7668495448-gxgh9   1/1     Running   0          3m16s   10.244.168.3    k8s-master-3   <none>           <none>
nginx-deployment-7668495448-hv2gk   1/1     Running   0          3m16s   10.244.168.4    k8s-master-3   <none>           <none>
nginx-deployment-7668495448-qkd44   1/1     Running   0          3m16s   10.244.182.68   k8s-master-2   <none>           <none>
nginx-deployment-7668495448-zsl6d   1/1     Running   0          3m16s   10.244.196.5    k8s-master-1   <none>           <none>
通过http://192.168.31.100:30080/访问,可以看到nginx首页。

